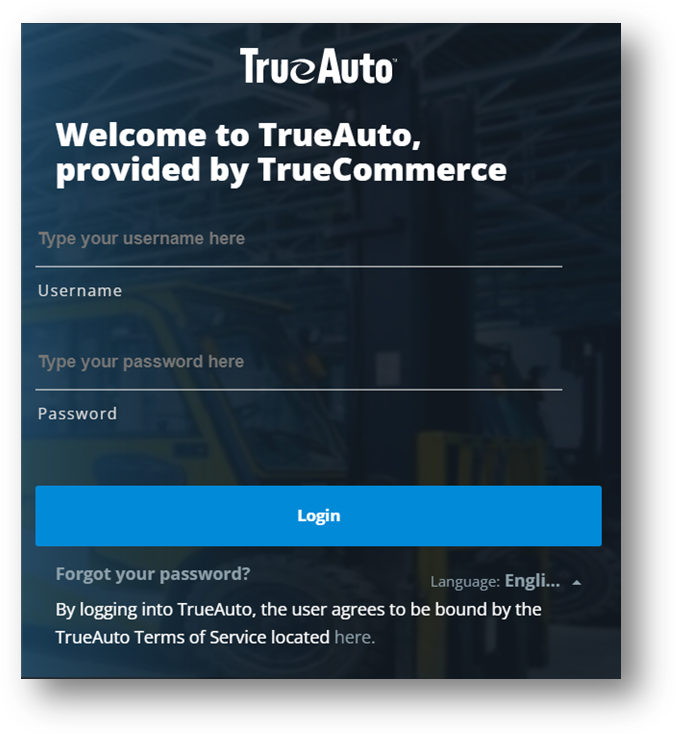
Use the following steps to log on to your TrueAuto account.
1. Go to trueauto.truecommerce.com
2. On the Login page, type your Username and Password, and then click Login.
TIP Click the Forgot your password link if you want to recover or reset your password.
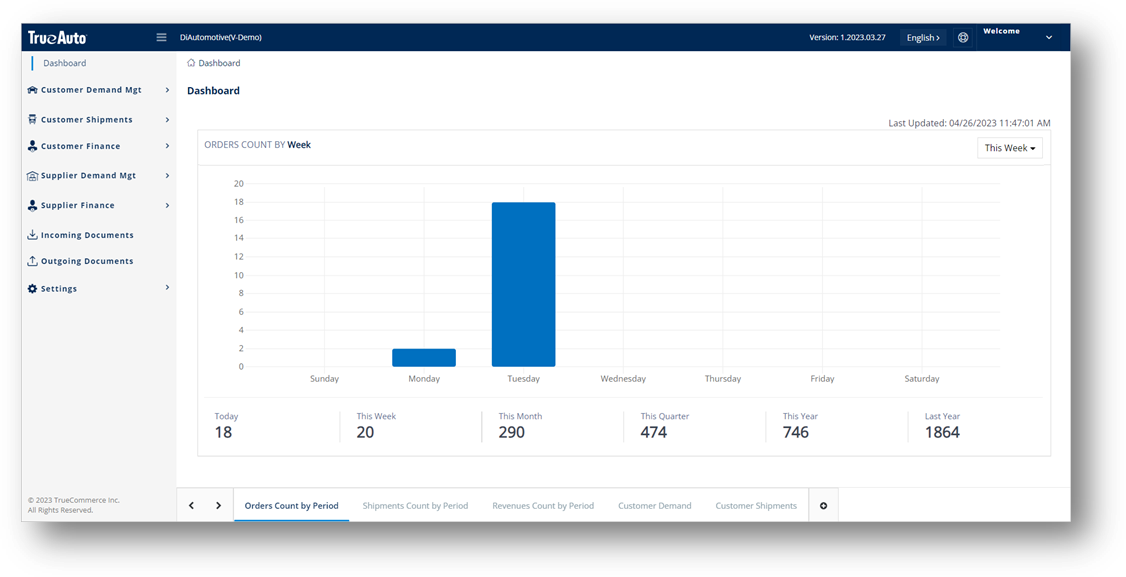
The TrueAuto Home page is loaded.
ð To log off from TrueAuto, click the My Account arrow in the upper-right corner, and then select Logout.
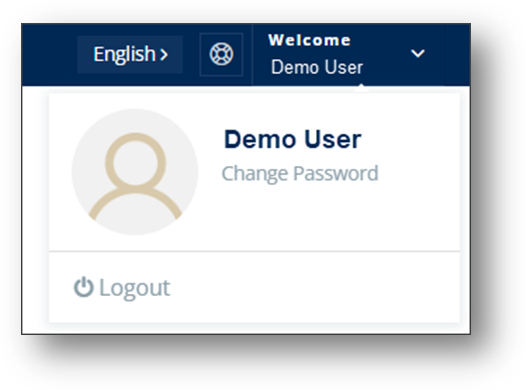
1. Click the My Account arrow in the upper-right corner, and then click Change Password.
2. On the Change Password window, do the following:
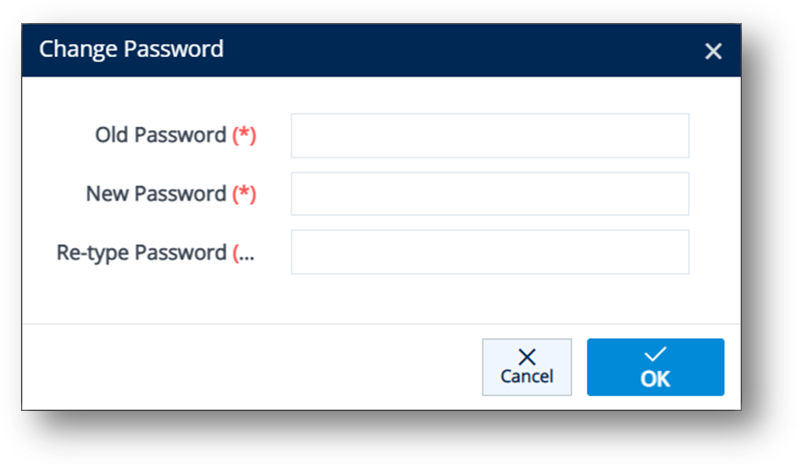
a. Enter your Old Password.
b. Enter your New Password, re-type your New Password, and then click OK.
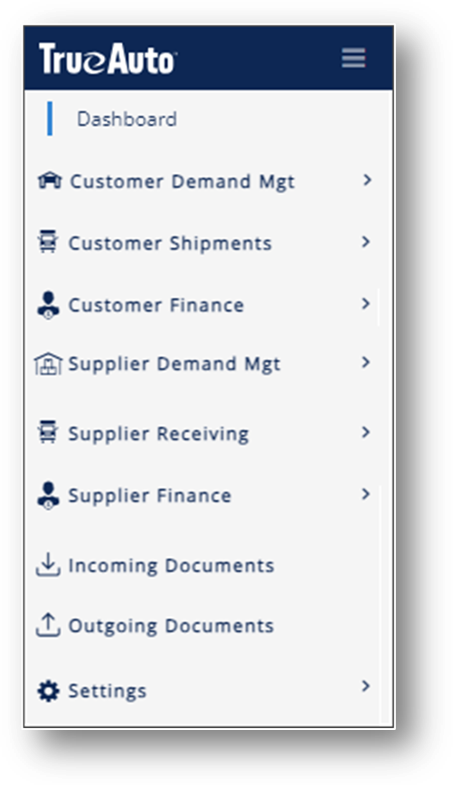
The main menu is located on the left side of the Home page, and includes the main features in TrueAuto.
|
|
Dashboard
Customer Demand Mgt |- Forecast Orders |- Firm Orders |- PO Acknowledgments |- Inventory Advices
Customer Shipments |- Shipments |- Barcode Labels |- TruckLoad Processing |- Outer Containers |- Inner Containers
Customer Finance |- Invoices |- Firm Orders
Supplier Demand Mgt |- Demand Schedules |- Schedules |- Demand Requests |- Inventory Advices
Supplier Receiving |- Shipment Receiving |
Supplier Finance |- Firm Orders |- Invoices
Incoming Documents
Outgoing Documents
Settings |- Trading Partner Parts |- Internal Parts |- Ship To Cumulatives |- Trading Partner Packaging |- Internal Packaging |- Addresses |- Contacts |- Country of Origin Adjuster |- Ship Date Adjuster |- Cross Reference Library |- Email Notifications |- Trading Partner Profiles
|
ð Click the Menu or the icon on the right.
ð Click the  icon in the upper-left corner. In the hidden state, you only view the TrueAuto logo and the Dashboard page interface is expanded to full screen.
ð Click the right arrow  in the upper-left corner. In the displayed state, you view the TrueAuto logo, the list of features, and the Dashboard page.
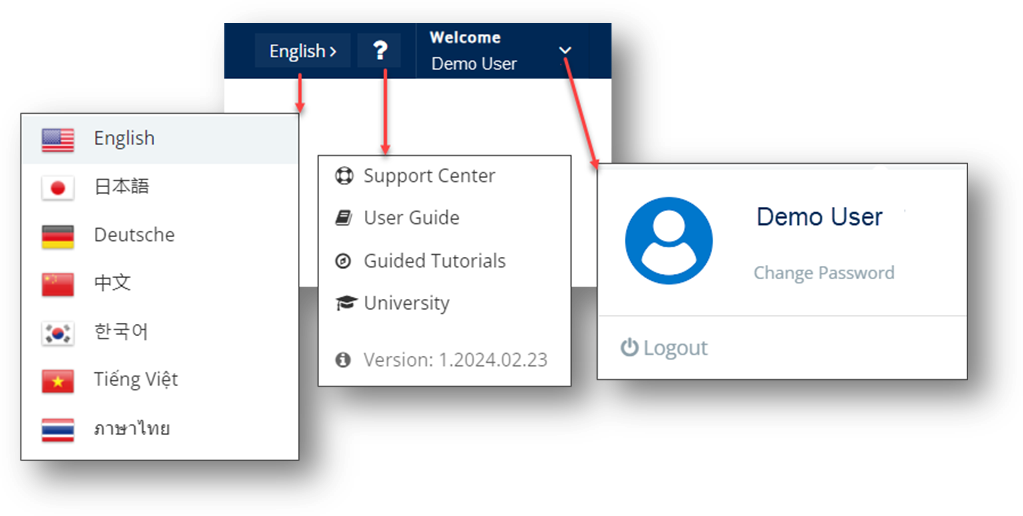
TrueAuto includes the following navigation pane in the upper-right corner of the screen:
|
Field |
Definition |
|
Language |
Displays the languages (English, Japanese, German, Chinese, Korean, Vietnamese, and Thai) that are supported by TrueAuto. English is the default. |
|
Help |
Displays the following Help items: § Support Center: Opens Intercom within the TrueAuto page. § User Guide: Loads the Online Help for TrueAuto on a new page. § Guided Tutorials: Opens WalkMe within the TrueAuto page. § University: Opens TrueCommerce University on a new page. § Version: Shows the current version information. |
|
My Account |
Displays the name of the account. |
Use the built-in Filter to quickly search for the data that you want to use. Filtered data displays only the rows that meet the criteria that you specify.
ð In the Filter panel, set your filter criteria and then click the Filter button to get the results.
Example: The Filter panel of the Customer Firm Orders screen.

TrueAuto breaks a long list of records into manageable pages. To navigate through the pages, use the bar under the document list.
ð Click the dropdown list to select one of the options.
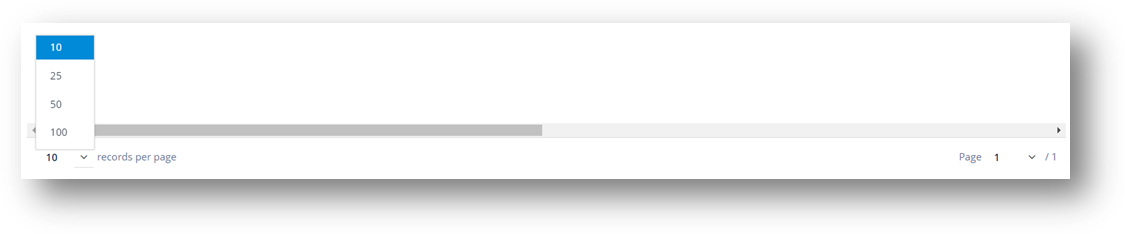
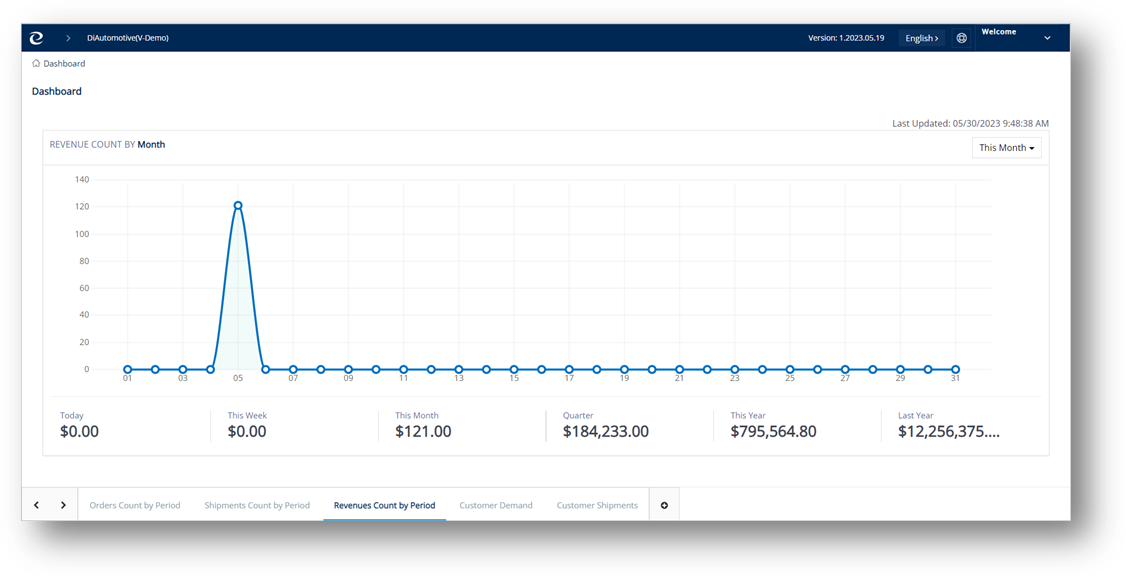
ð On the Dashboard page, select the time period from the dropdown list.
|
§ This week § Last week § This month § Last month
|
§ This quarter § Last quarter § This year § Last year
|
Note This Week is the default.
ð Click once or twice in the table header of the column that you want to sort until the up arrow  appears in the header.

ð Click once or twice in the table header of the column that you want to sort until the down arrow  appears in the header.

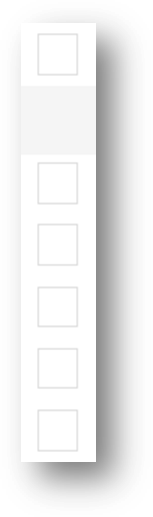
Figure: The Select column
ð Select the checkbox in the Select column to choose a specific row.
ð Select the checkbox in the Select column header.
ð Clear the checkbox in the Select column on the corresponding row.
ð Clear the checkbox in the Select column header.
In general, printers need to be set up to fit the size and type of labels that your customer requires.
Note For specific printer or scanner setup, configuration, or management, please consult with your IT department or system administrator.
The following sections include basic guidelines and requirements for label printing, troubleshooting, and scanning in TrueAuto.
The standard shipping label size for most trading partners is 4x6 inches. Thermal printers use the roll labels recommended by the manufacturer. For laser printers, 4x6” labels on legal paper (4 labels per page) is a size not commonly available from office supply retailers.
Laser printer users may use any larger label stock. We recommend that users select either 2 labels on 8.5 x 11 paper or 4 labels on 8.5 x 14 paper.The size of the label sticker itself is not important as long as the full label text and bar codes print within the edges of the label without being cut off. Larger label sizes are commonly available at most office supply retailers.
Thermal printer users should select the 1 label per page layout.
On the UCC Label form, click Continue to display the bar-coded label preview window. Wait for the labels to completely load on the screen (the browser logo in the upper-left corner will stop moving and the window will expand). You can use File > Print preview… to see how the labels will fit on your chosen paper size, and then print them just like a regular webpage to your thermal or laser printer.
You may need to adjust the page settings to ensure correct printing. In Windows, go to Control Panel > Printers and Devices, and then check the following settings or properties:
§ Printer
Select the printer that you will use to print labels.
§ Paper Size
Select the paper size you are using from the dropdown menu. If you are using a laser printer, select Letter (for two labels per page) or Legal (for four labels per page). If you are using a thermal printer, select 4x6”. You may need to create a custom paper size for single 4x6” labels or labels on a roll.
To create a custom paper size, click the Printer button. On the Printer window, click the Properties button to display the printer driver properties for the printer you are using. The appearance of this window will vary depending on which printer you are using, but there should be an option or tab available that allows you to add paper sizes. Create a new paper size at 4 inches wide by 6 inches high, and name it “4x6” label”. Click OK until you return to the Page Setup window. If there are any settings for Margins, set them all to 0.
§ Source
Source refers to the printer tray. You can leave the default setting, or set it to AutoSelect Tray, Auto, Automatically Select, or your tray preference. This menu might be disabled for thermal printer users.
§ Header and Footer
Delete the text codes in the Header and Footer sections, especially if you are using a thermal printer. These codes are used to add information to the margins of a printed webpage (and label), such as page number, web address, date, etc. If desired, you can make a note of the codes and re-enter the information later by returning to Page Setup from any browser window.
§ Margins
Label margins may require adjustment for the labels to be spaced correctly. You may have to adjust for different margin amounts depending on your printer. Laser printer users may need to adjust their top and left margins to get the labels to fit correctly on the label stock. Laser label stock can vary from .50” to 1.80” for the top margin. Thermal printer users should adjust to 0” for all margins.
Margin adjustment may require experimentation before the labels fit correctly because there are so many variations among printers. Some drivers will reset the margin settings after being changed, so after you adjust them and exit Page Setup, immediately return to make sure your setting changes were kept.
§ Orientation
Select Portrait if you are using a thermal printer or a laser printer with legal-size paper (4 labels per page). Letter-size paper (2 labels per page) must be set to Landscape.
You can view how the labels will print by selecting File > Print Preview. This will show you if the margins are lined correctly or if you need to make adjustments. You will need to click and drag the double-sided arrows for each margin you want to adjust. In fact, you can override default margins from this view.
1. Which printer should I use to print labels?
2. Not all of the labels showed up in the Print Preview, or not all of the labels were printed.
3. The labels do not fit on the label stock, or the numbers/text/bar codes are being cut off.
4. My margins won’t go to zero; they get reset to a higher value.
5. The text seems too big, or is pushing the bar codes too far to the side.
6. My product color/size/style numbers are not appearing on the labels.
7. The label doesn’t match what my trading partner requires.
Thermal printers such as Zebra and Datamax are made specifically for printing labels and are therefore preferred. Laser printers also produce acceptable quality. Inkjet and dot-matrix printers are not recommended because they will not print the bar code with high enough quality for most trading partners.
After you click Continue on the Label Options window, make sure that you let the label preview page load completely before doing anything else. You will know when it is completely loaded when the browser logo in the upper-left corner stops moving and the window expands.
Your margins are set too high or too low. If you are using 4 or 2 labels per page, you will want to adjust the top and left margins under the File > Page Setup… menu and see how the label placement is affected.
Thermal printer margins should always be set to zero (0) inches whenever possible.
Note All bar codes on the label must have at least .25” of quiet zone (white space) on the sides and bottom.
If your thermal printer driver resets the margin values to a number just slightly higher than zero (such as .01 or .1), that may still be small enough for the label to fit. Enter the lowest value that it will save, and then go to File > Print Preview… to see the results.
If text or graphics are still cut off, you must either use an alternate driver or another printer. First, make sure that you have the most updated version of your printer driver from the manufacturer’s website. Download and install the updated driver and try viewing the label from Print Preview again.
Your browser or system text size may be set too large. There are two places where text size can be adjusted. On your browser menu, go to View > Text Size and make sure it is set to Medium.
If this does not resolve it, access your computer’s Display properties (from your Start menu or by right-clicking your Desktop). From the Display properties window, go to the Settings tab and click the Advanced button. Adjust the Display Font Size or DPI setting to Small Fonts or Normal Size (96dpi). Click OK to save the changes, and then return to your label preview window to view the results.
The labels use information directly from the ASN, and we program the labels to match each trading partner’s specifications for labeling. Therefore, one trading partner may have different requirements from another trading partner. If you want to add information on the label, check with TrueCommerce and we will see what is allowed by your trading partner.
If there are existing spaces on the label that are empty, that data may be missing from the corresponding ASN. If there is a space on the label that does not have a corresponding field on the ASN (such as Vendor Style Number), it may still be possible to add that iSnformation through a cross-reference table that matches UPC codes to your Vendor Style Numbers. Contact TrueCommerce for more information.
Your trading partner’s label specifications may have changed. Notify TrueCommerce and we will make necessary changes to comply.
With the scanner programming in TruckLoad, you will need the following:
§ A keyboard wedge scanner
§ The scanner must minimally be able to read 1D barcode fonts: 3of9 or 128 code
§ The scanner must include a tab character (ASCII character #9) at the end of each scan
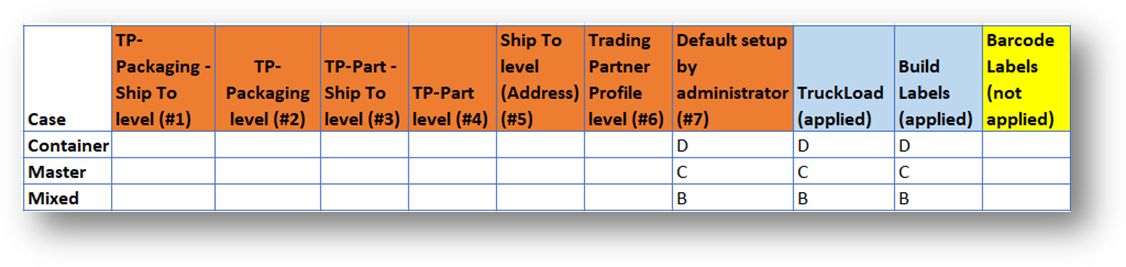
This topic provides instructions on how to select label templates in TrueAuto. There are several types of label templates for the Container, Master, and Mixed cases that you can apply to a print job.
§ In TrueAuto, you can select label templates in one of these modules: Ship To Cumulatives, Trading Partner Packages, Trading Partner Parts, Addresses, and Trading Partner Profiles. The selected templates will be applied to the Build Labels and TruckLoad features according to a priority logic.
|
|
NOTE - If label templates have NOT been configured in one of the mentioned modules, the active default set up by an administrator will be applied to the print job instead. - You can find the Build Labels button on the Customer Shipments and the Customer Firm Orders screens. |
§ The Barcode Labels feature enables you to manually create a barcode label with the desired Type of Label template that will be applied to the print job. If you use this feature, the label templates selected in any other modules will NOT take effect. For the steps on how to create and print a barcode label, refer to the Barcode Labels section.
§ Label templates for Container, Master, and Mixed cases will be selected according to the following priority levels:
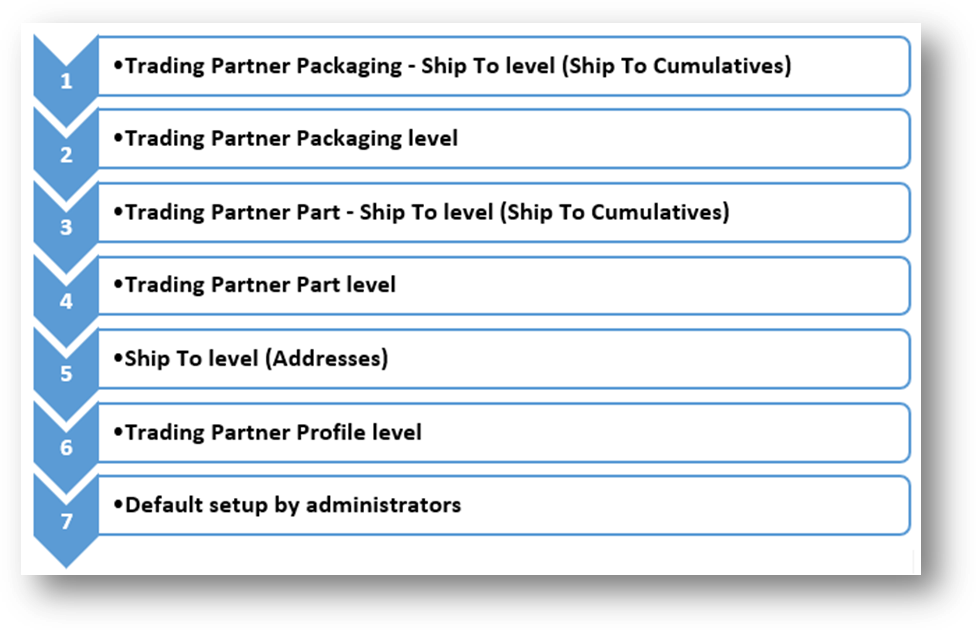
In the following tables, the priority logic for label template selection is described in descending sequence, from left to right.
|
|
Modules that you can use to set up label templates |
|
|
Features to which the selected label templates will be applied |
|
|
The feature that you can use to manually create a barcode label with the desired Type of Label template |
§ A, B, C, and D are the example label templates, which have been selected.

Note Blank cells mean no setup value.

Note Blank cells mean no setup value.

Note Blank cells mean no setup value.