Customer Shipments
The goal of DiAutomotive is to give you a simple method for compiling both paper and electronic shipping documents. An ASN (Advance Ship Notice) is the electronic document that DiAutomotive creates and sends when your truck is completed and leaves the dock. Depending on your specific Trading Partner or your Company terminology, an ASN may also be referred to, but is not limited to, a Shipment, Shipper, Delivery, Truck, 856, DESADV, or AVIEXP.
Sending ASNs gives your customers prior knowledge of what is coming on the truck. The type of information on ASNs depends on each Trading Partner’s EDI Specifications. Trading Partner specific special instructions, labeling, and barcode scanning requirements are completed based on the DiAutomotive design for those Trading Partners. If you have a question about these requirements or have found a discrepancy, please acquire the specifications from your customer’s EDI technical support team. If you need help relating the specifications to the way DiAutomotive is operating, contact the DiAutomotive Support team.
DiAutomotive simplifies ASNs with a small number of screens to satisfy many requirements of vastly differing customers. As an example, three different Trading Partners may require these different structures:
§ No pallets or container serials are needed on ASNs
§ Only container serials are transmitted on ASNs
§ Both pallets and container serials are required on ASNs
In DiAutomotive, the screens that are used to complete each of these three types of ASNs are the same, but the steps you will follow will be different. Due to variations in Trading Partner and your environment’s unique processes, the DiAutomotive Support team will not have complete documentation for shipping in DiAutomotive. Therefore, you must thoroughly document your own location’s process flow for each Trading Partner.
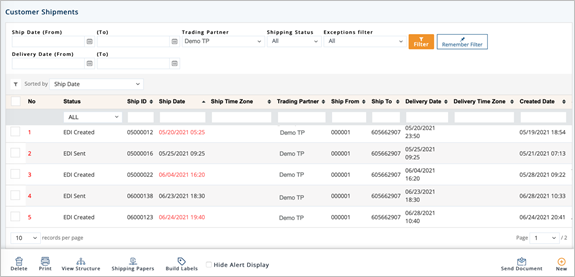
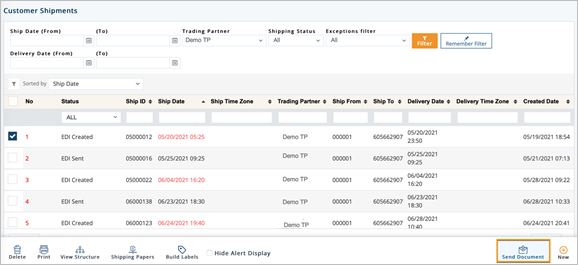
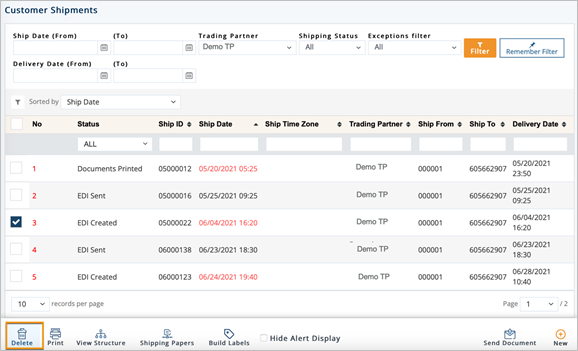
1. On the Customer Shipments menu, click Shipments.
tip Use the Filter panel to search for the shipments.
2. On the Customer Shipments screen, click the shipment that you want to view.
tip For a full description of each field, refer to the Field Definitions in the next section.
NOTE If the Ship ID (ASN Number) is displayed in red, it means that the Ship Date is prior to today and the shipment has not yet been sent (a Packing List has not been printed or the ASN has not been sent).
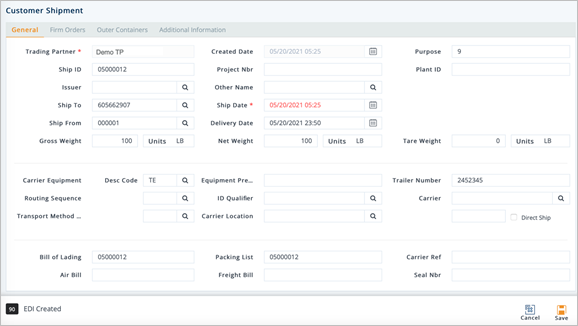
3. On the Customer Shipment screen, click the shipment that you want to view.
General tab
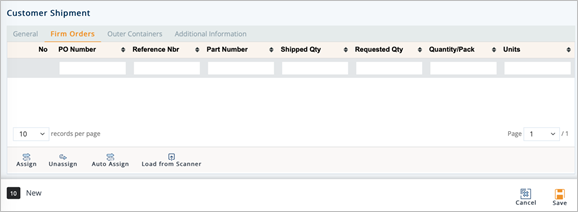
Firm Orders tab
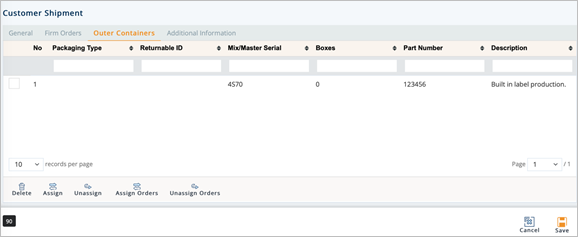
Outer Containers tab
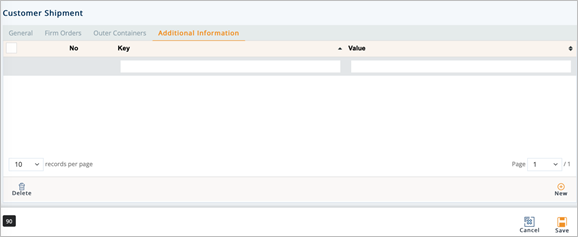
Additional Information tab
Field Definitions
§ Status:The shipment’s status.
- New: No orders have been assigned to the ASN yet.
- Viewed: Record has been opened and saved by a user.
- Orders Assigned: Firm Orders posted on the ASN. Nothing else has been done.
- Labels Created: Container labels have been generated.
- Labels Scanned: Container labels have been printed against this ASN.
- Documents Printed: Shipping Documents have been printed.
- Staged: Allows the user to generate Product Activity records without generating EDI.
- EDI Created: ASN has been created.
- EDI Sent: ASN has been sent (no ACK expected).
- Cancelled: Record has been cancelled by a user.
- Accepted (Acknowledged): Document has been fully accepted at the Trading Partner's side without any error.
- Accepted (Application): Document content has been fully accepted at the Trading Partner's side without any error.
- Rejected (Acknowledged): Document has been rejected at the Trading Partner's side.
- Rejected (Application): Document content has been rejected at the Trading Partner's side.
- Accepted with Errors (Acknowledged): Document has been accepted with errors at the Trading Partner's side.
- Accepted with Errors (Application): Document content has been accepted with errors at the Trading Partner's side.
§ Ship ID: Shipment ID, ASN Number or truck number which often matches the packing list number or the BOL number.
§ Ship Date:The date when this shipment is scheduled to ship.
§ Ship From:The address code of the supplier (your address).
§ Ship To: The code representing the customer’s address. The location where the shipment is going to.
§ Created Date:The date when this shipment was created (not sent).
§ SCAC: Standard Carrier Alpha Code of the trucking company used to ship the parts.
§ Trailer Number: The trailer number of the truck on which the shipment was sent.
Work with Firm Orders
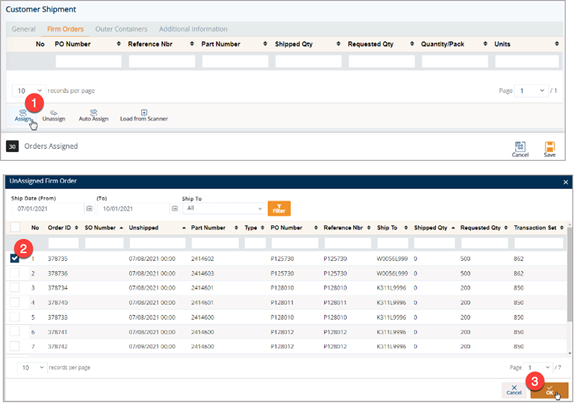
To assign a firm order to a shipment
1. On the Firm Orders tab of the Customer Shipment screen, click the Assign icon.
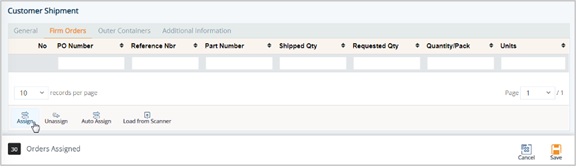
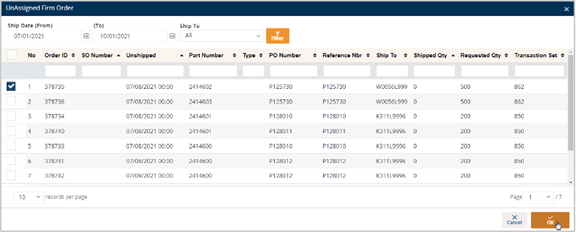
2. On the Unassigned Firm Orders window, select the orders that you want to assign to the shipment and click OK to proceed.
To automatically assign firm orders to a Shipment
When you click the Auto Assign button on the Firm Orders tab of the Customer Shipment screen, all Firm Orders will automatically be assigned to a Customer Shipment in case the Ship To, Ship Date, and Delivery Date fields of the Customer Shipment match the Ship To, Ship Date, and Delivery Date fields of the Firm Order.
After Firm Orders are automatically assigned, a few fields on the Customer Shipment will also be automatically updated, according to information on the Firm Order.
The following steps assume that the Ship To, Ship Date, and Delivery Date fields of the Customer Shipment match the Ship To, Ship Date, and Delivery Date fields of the Firm Order whose Part Number is 35250S87JA100M1.
1. On the Firm Orders tab of the Customer Shipment screen, click the Auto Assign button.
2. On the Additional Selection Information window, click OK.
note The Ship From, Plant ID, Project Nbr, and Carrier Codefields are automatically filled out.
Firm Orders are automatically assigned to the Customer Shipment.
To unassign a firm order from a shipment
You may not want to ship everything scheduled with this ASN. For example, when no quantities are available or you need to send orders with a matching date and time on multiple trucks, unassigning may be necessary.
1. On the Firm Orders tab of the Customer Shipment screen, select the firm order that you want to unassign, and click the Unassign icon.
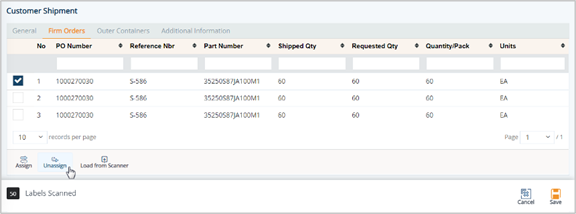
2. On the Unassign Firm Order Request from Shipment message, select one of the options and click Save.
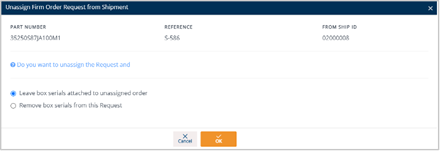
This does several things to the unassigned order:
§ The Our Ship and Our Delivery Date and Time will be removed from the unassigned Order.
§ The Ship Quantity will be set back to 0.
§ The shipping weight of the unassigned order will be deducted from the truck weight of the ASN.
§ The status of the order will change to PLN as a planned shipment.
note Pallets are not removed.
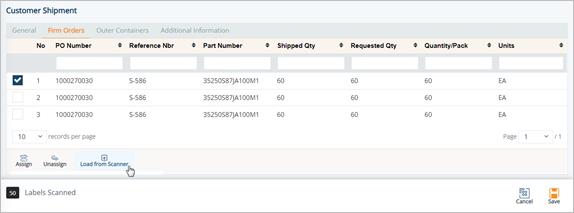
Load from Scanner
If you use scanning to preload firm orders, clicking Load from Scanner on the Firm Orders tab of the Customer Shipment screen will allow you to upload firm order information into inventory in DiAutomotive. If you use this method of scanning, you can only scan the pallets onto the Shipments (when it comes time to ship) instead of scanning both the pallets and the serials.
ð On the Firm Orders tab of the Customer Shipment screen, click the Load from Scanner button.
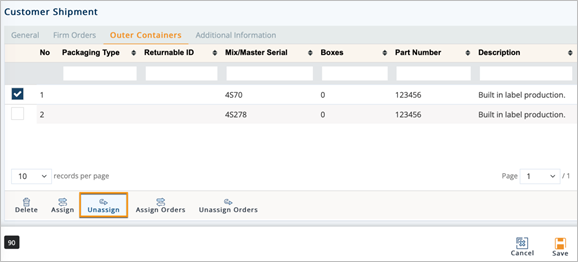
Work with Outer Containers
To assign outer containers with container serials to shipment
If you do not scan, Outer Containers and Orders handle serial numbers independently from each other on the SHIPMENTS screens. If the serials are assigned to the order, they still need to be assigned to the outer container.
1. On the Outer Containers tab of the Customer Shipment screen, click the Assign icon.
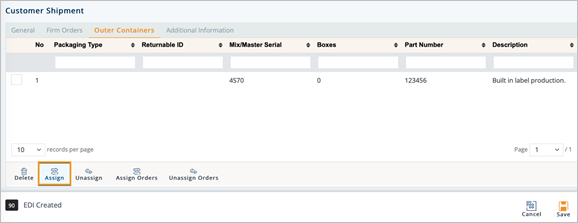
2. On the Choose Pallets to Assign window, choose the pallets and click Select.
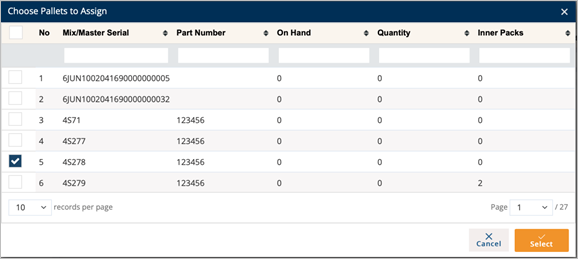
The pallets are assigned.
To unassign the outer container and associated container serials from shipment
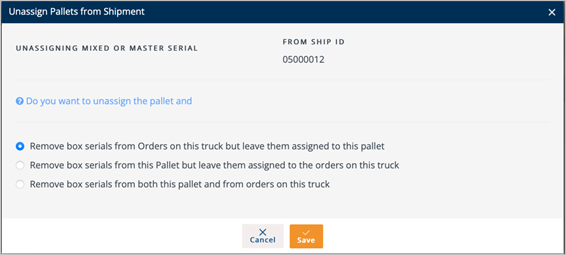
1. On the Outer Containers tab of the Customer Shipment screen, select the outer container that you want to unassign and click the Unassign icon.
2. On the Unassign Pallets from Shipment window, select an unassign method based on the options listed on the screen, and click Save.
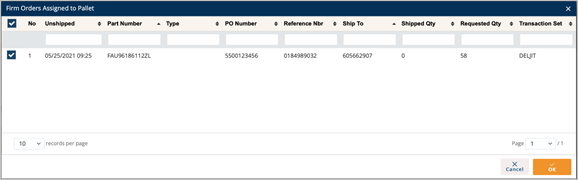
To assign orders to an outer container
1. On the Outer Containers tab of the Customer Shipment screen, choose the outer container to which you want to assign orders, and then click the Assign Orders button.
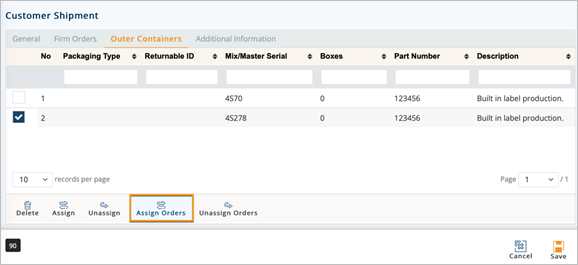
2. On the Firm Orders Assigned to Pallet window, select the firm orders that you want to assign and then click OK.
To unassign orders from an outer container
1. On the Outer Containers tab of the Customer Shipment screen, select the outer container from which you want to unassign the orders.
2. Click the Unassign Orders button.
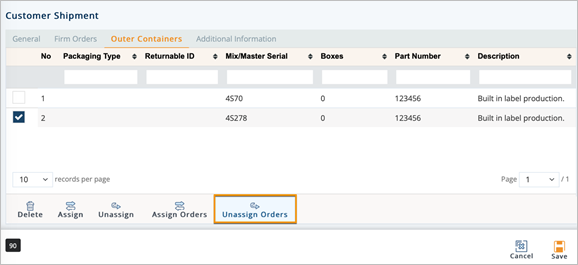
3. On the Unassign Firm Order window, select the firm orders that you want to unassign, and then click OK.

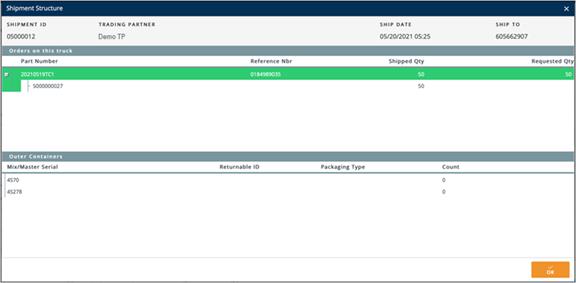
This feature will display the list of Firm Orders and list of Pallets on the truck. It may help you to see if all the serials have been assigned to the right Pallet and Firm Order.
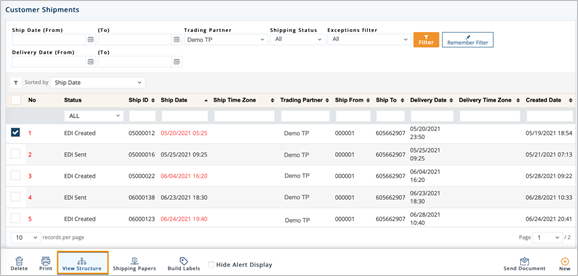
1. On the Customer Shipments menu, click Shipments.
2. On the Customer Shipments screen, select the ASN whose structure you want to view.
3. Click the View Structure icon.
4. On the Shipment Structure screen, review the structure of the selected ASN.
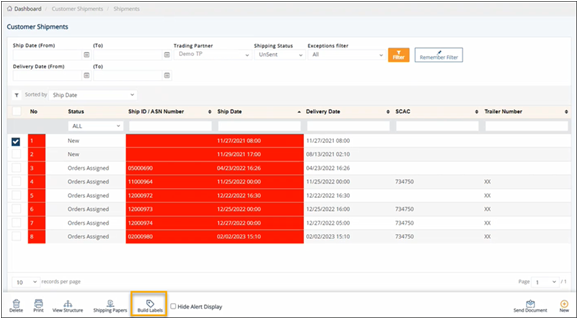
You can print labels directly from the Shipments screen. By clicking the Build Labels button, DiAutomotive prepares the labels for printing. Note that the shipments must have firm orders to build labels.
1. On the Customer Shipments menu, click Shipments.
2. On the Customer Shipments screen, select the shipment for which you want to build labels.
3. Click the Build Labels button.
The system will check whether label templates have been configured in these modules according to the following priority: 1) Trading Partner Packages, 2) Trading Partner Parts, 3) Trading Partners, and 4) Default setup by administrator. After checking, the appropriate template will be applied to your label printing job.
4. On the Review Labels message, select one of the following options to proceed.
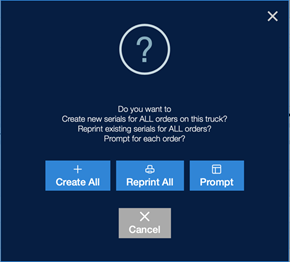
o Create All: Creates new serials for all orders.
o Reprint All: Reprints all existing serials for all orders.
o Prompt: Prompts for each order.
o Cancel: Cancels this printing.
Once the shipment has been put together and is ready to ship, you can print documents required for shipping by using the Shipping Papers icon. What you see after clicking this button depends on the requirements of that Trading Partner. For instance, items such as Quick Receives or specialized packing lists, can be found on one Trading Partner’s Shipping Papers screen, but not on others.
1. On the Customer Shipments menu, click Shipments.
2. On the Customer Shipments screen, select the ASN for which you want to print shipping documents.
3. Click the Shipping Papers icon.
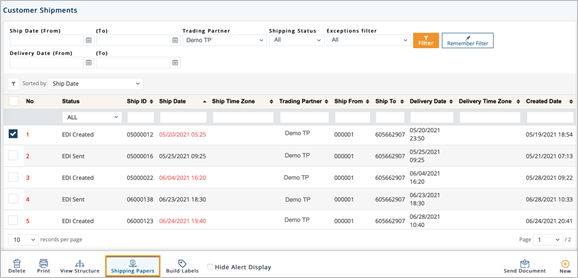
4. On the View Shipping Papers window, select the documents that you want to print. Use the following report descriptions.

§ Packing List by Container:Prints a listing by mixed or master serials showing the individual serials underneath each line item. This report can be used to verify loading.
§ Master Packing List: This report prints a Master Packing List.
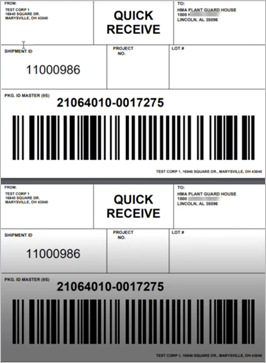
§ Quick Receive Label: Prints special bar code labels as the truck leaves.
§ Build Delivery Batch Labels: Prints labels to be applied when working with sequenced small lot shipments (Honda).
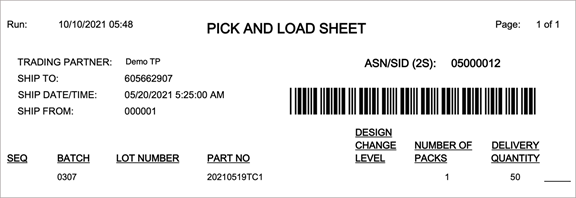
§ Pick and Load: Prints a list of orders in sequence or reverse sequence, for staging and loading.
§ Bill of Lading: Prints the standard Bill of Lading for this shipment, complete with legal text.
§ Canada Customs:Prints customs documentation for Canada.
§ US Customer ProForma Invoice: Prints customs ProForma Invoice for US border crossing.
5. Click OK to continue.
The next steps depend on the document type you choose.
The following figure assumes that you selected Pick and Load as the Document Type.
Note You may be asked if you wish to preview the report: If you do not want to print the report at this time, click OK and then close the window without printing. You can also print from the Preview screen.
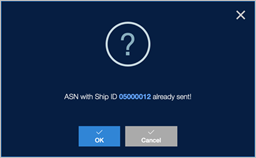
After the truck has picked up the parts that are staged for shipping, you may now send the Shipment electronically to the Trading Partner in the form of an Advance Ship Notice.
1. On the Customer Shipments menu, click Shipments.
2. On the Customer Shipments screen, select the ASN that you want to send.
3. Click the Send Document button.
o If you have not printed shipping papers for this ASN yet, you will be prompted with the Shipping Papers screen.
o If the ASN is missing a Trailer Number, you will be prompted to enter it.
4. On the notification message, click OK to proceed.
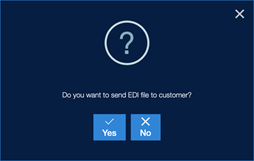
When the document is sent successfully, the system message appears. Cick Yes if you want to send an EDI file to the customer.
|
|
NOTE If you make any changes after an ASN is sent, you may need to resend the document. Also, it may be necessary to send a cancellation first. |
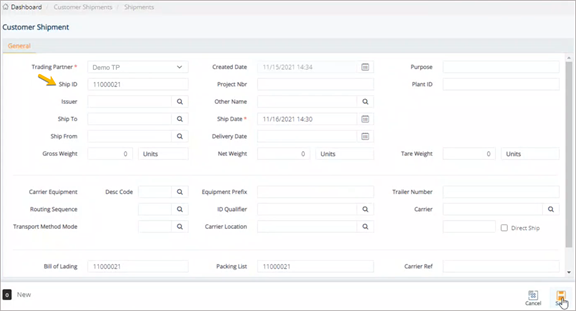
1. On the Customer Shipments menu, click Shipments.
2. On the Customer Shipments screen, click New.
3. On the Customer Shipment screen, select the Trading Partner in the drop-down list.
4. Fill out the shipment details according to the Trading Partner’s requirements. Use the following Field Definitions.
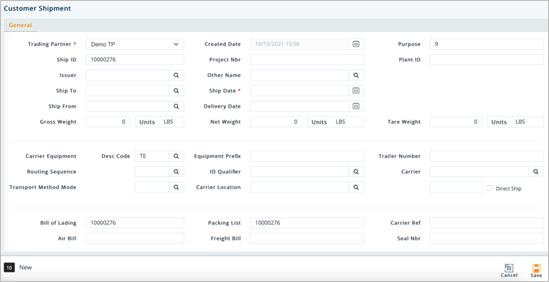
5. When you’re finished, click Save.
Field Definitions-General
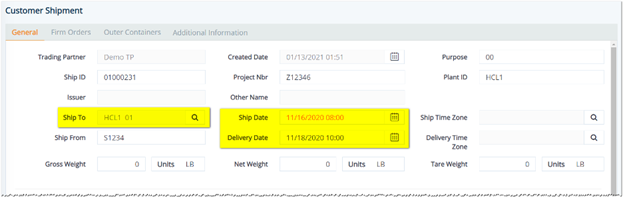
Trading Partner: The customer you are shipping to. There is no reason to change this value.
Created Date: The date when this Shipment was created.
Purpose: EDI purpose codes indicating this ASN is an original, a cancellation, a change, or a replacement (not all Trading Partners use purpose codes, default=00).
Ship ID: Shipment ID, ASN Number or truck number. This number often matches the packing list number or the BOL number.
Project Nbr and Plant ID: A Trading Partner specific field on a common screen. When the orders are assigned, these fields are often automatically populated.
Issuer: Usually the issuer.
Other Name: Other required name identifier.
Ship To: The code representing the customer’s address. Where the shipment is going to.
Ship Date and Time: The date and time when this Shipment is scheduled to ship.
Ship From: The address code of the supplier (your address).
Delivery Date: The date when this Shipment is scheduled to be delivered.
Gross Weight and Units: The gross weight of the pallet and the unit of measure.
Net Weight and Units: The net weight of the pallet and the unit of measure.
Tare Weight and Units: The tare weight of your shipment and the unit of measure.
Carrier Equipment Desc Code Equipment Type): The type of equipment used.
Equipment Prefix: Usually the SCAC code.
Trailer Number: The trailer number of the truck that this ASN is leaving on.
Routing Sequence: Default is set to B.
ID Qualifier: The code structure to identify the carrier. In general, this field is defaulted.
Carrier: Standard Carrier Alpha Code (SCAC). The code that identifies the trucking company.
Transport Method Mode: The code that represents the method in which the shipment will be transported.
Carrier Location: The location of the carrier.
Direct Ship: Indicator if this Shipment is a direct shipment.
Bill of Lading: The Bill of Lading number.
Packing List: The number of the Packing List that list the contents in the Shipment container.
Carrier Ref: The reference number used for the carrier.
Air Bill: The air bill number (if any) if the shipment is transported via air.
Freight Bill: The freight bill number, if any.
Seal Nbr: The number of the seal that remains on the container during shipping and is removed by the consignee.
To select a Carrier Identification code
1. Click the Search icon in the Carrier field.
2. On the Select Carrier Identification Code window, choose one of the Carrier Identification Codes and click Select.
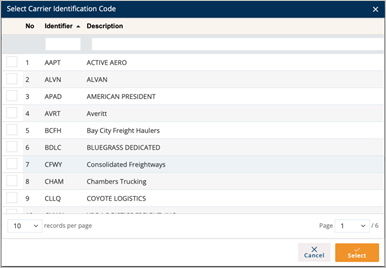
The selected Carrier Identification Code is displayed in the Carrier field.
To select a Ship To
1. Click the Search icon in the Ship To field.
2. On the Browse Ship To window, select one of the Ship To locations and click Select.
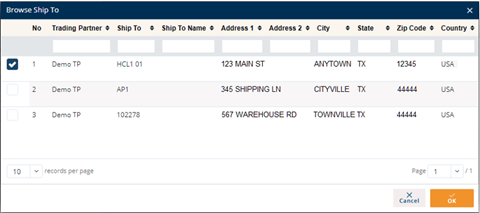
The selected Ship To is displayed in the Ship To field.
1. On the Customer Shipments menu, click Shipments.
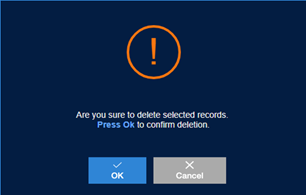
2. On the Customer Shipments screen, select the shipment that you want to remove, and then click the Delete icon.
3. On the confirmationwindow, click OK.
§ Orders are removed from the Shipment and will be available again for use on other shipments.
§ You cannot delete a shipment that has already been sent to the Trading Partner.
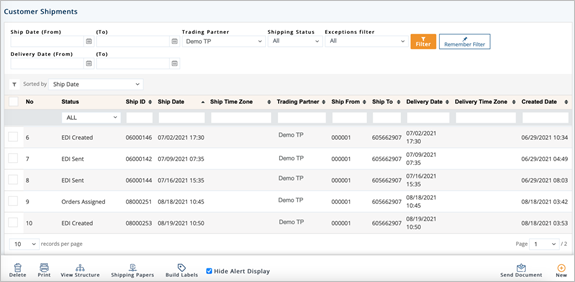
1. On the Customer Shipments menu, click Shipments.
2. On the Customer Shipments screen, enable the Hide Alert Display check box.
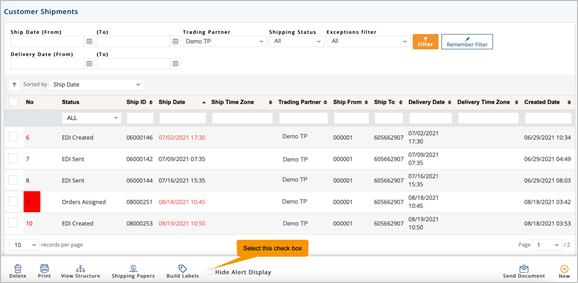
The color status (Red) will be hidden.
Unless labels and serial numbers are generated during production, it is common to generate shipping labels and create new serial records as shipments are prepared. In DiAutomotive, there are many different methods available for printing labels. The processes may differ depending on which methods are best suited for your environment and your Trading Partner’s requirements. The label printing methods in a standard installation of DiAutomotive are explained below. If you need more labeling options, such as printing labels at the production line, contact the DiAutomotive Support team.
Before you can print labels, do the following:
§ Make sure that you have the correct label formats defined in the Bar Code Label file.
§ Make sure that the Parts for which you are printing labels have a Label Format associated with them.
Most labeling methods will cross paths with the Barcode Labels window. Records can be created and changed here, or created in other DiAutomotive screens, but they are confirmed, adjusted, printed, or reprinted on the Barcode Labels screen.
1. On the Customer Shipments menu, select Barcode Labels.
2. On the Customer Barcode Labelsscreen, click the barcode label that you want to view.
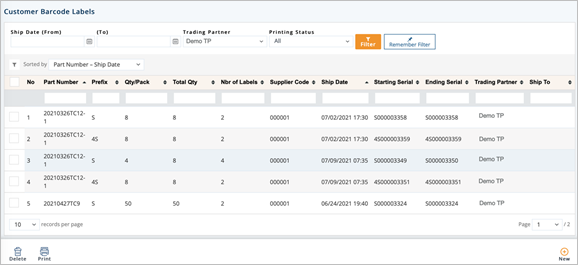
3. On the Customer Barcode Labels screen, view the details on the General tab.
tip For a full description of each field, refer to the following Field Definitions.
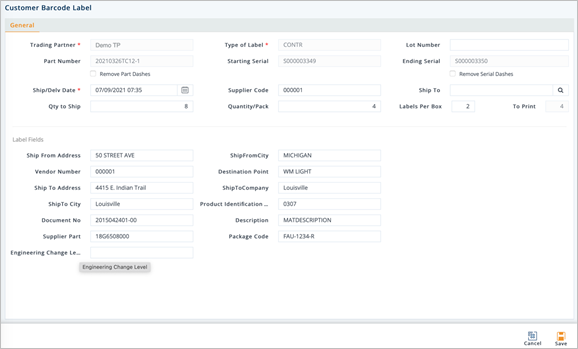
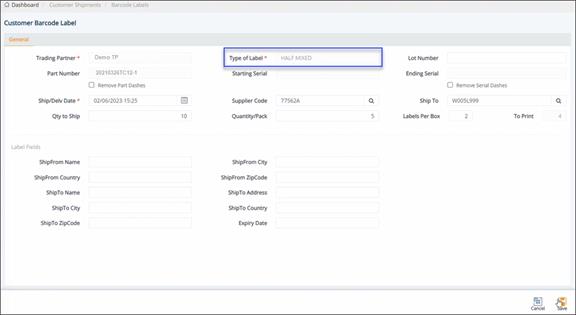
Field Definitions-General
§ Trading Partner: The code of the Trading Partner.
§ Type of Label: The barcode prefix for the packaging type, such as Containers or Master labels. Common prefixes include the following:
- Container: S, 1S, 3S
- Master: 4S or M
- Mixed Load: 5S or G
§ Lot Number: The Supplier Lot number for this batch of parts.
§ Part Number: The Trading Partner's part number.
- Remove Part Dashes: Removes dashes from part numbers on the label for Trading Partners that require it.
§ Starting/Ending Serial: The starting/ending serial number used for the Trading Partner.
- Remove Serial Dashes: Removes dashes from serial numbers for Trading Partners that require it.
§ Ship/Delv Date: The Ship or Delivery Date, depending on your Trading Partner.
§ Supplier Code: The supplier code assigned by the Trading Partner.
§ Qty To Ship: Total unit count of all containers needing labels.
§ Quantity/Pack:The number of units per container. This number will show on the Quantity field of the label. If the Qty To Ship is not divisible by Quantity/Pack, the last label will show the remaining quantity.
§ Labels per Box: The number of duplicate labels per container.
§ To Print: The estimated number of labels to print according to the current fields. Do not change this field.
§ Part Description: The description for the part.
§ Eng Change Level: The engineering/design change code for the part ordered.
§ Country: The supplier’s country in the address.
§ Supplier name, Supplier Address, Supplier City, Supplier State, and Supplier Zip code: The supplier’s address information.
The Type of Label that you selected for the Barcode Label will be applied to the print job.
1. On the Customer Shipments menu, select Barcode Labels.
2. On the Customer Barcode Labelsscreen, click the line item that you want to print.
3. Click the Print icon to start the print job. When you do this, the following tasks occur:
§ Serial Numbers are generated by DiAutomotive, Serial records are created and stored, and the label is printed.
§ A third-party label printing program will print labels that are already formatted to each Trading Partner’s requirements.
§ Most, if not all of the information on the label will be provided by DiAutomotive data from a comma-separated file that is generated when you click Print.
You can manually create a new Barcode Label record and select the Type of Label template that you want to apply to the print job. If you use this feature, the label templates selected in any other modules will not take effect.
1. On the Customer Shipments menu, click Barcode Labels.
2. On the Customer Barcode Labelsscreen, click New.
3. On the General tab, select the Trading Partner in the drop-down list.
4. To select the Type of Label template, do the following:
a. Click the Search icon in the Type of Label field.
b. On the Select Label Type window, choose the label type that you want to use and click Select.
The selected label type is displayed in the Type of Label field.

Note Always select a value for the Type of Label field first before the other fields.
§ BATCH: Batch labels.
§ CONTR: Container labels.
§ MASTR: Master labels.
§ MIXED: Mixed load labels.
§ QKRCV: Quick receive labels.
5. To select the Part Number, do the following:
a. Type the first few numbers or the entire Part Number which you would like to print.
§ Always enter the Part Number field second before the other fields.
§ This may populate information which was previously set as the default in the Parts file.
§ Some fields are only populated when Print is executed.
§ Some fields are dependent on the Trading Partner.
ALTERNATIVE You can also click the Search icon in the Part Number field. On the Browse Parts window, choose the part number that you want to use and click Select.
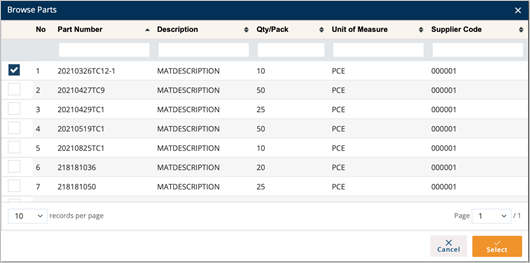
The selected part number is displayed in the Part Number field.
6. To select the Supplier Code, do the following:
a. Click the Search icon in the Supplier Code field.
b. On the Browse Supplier Code window, choose the supplier code that you want to use and click Select.
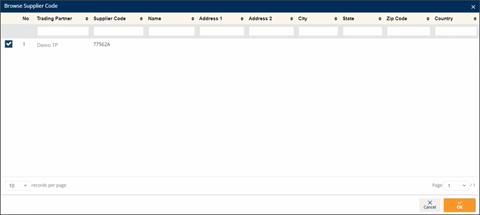
The selected Code is displayed in the Supplier Code field.
7. Type the total unit count for this print job:
§ DiAutomotive will use Qty To Ship/Quantity/Pack to calculate the number of labels to print.
§ If Qty To Ship/Quantity/Pack does not result in a whole number, a message prompt will be displayed when you save the record. You can click OK and continue if needed. A label for a partial container will be printed.
8. Fill out any additional non-default and relevant details that are specific to the containers that you are printing, for example, lot numbers, weights, dates, or other Trading Partner specific requirements. When you are finished, click Save.
|
|
NOTES · Some fields require you to create multiple print jobs. For instance, if you print a large number of containers that have multiple Lot numbers, you will need to insert one print job per lot number in order to assign the correct lot numbers to their containers. · Make sure that you create good workflow documentation about each Trading Partner for quality assurance purposes. |
1. On the Customer Shipments menu, select Barcode Labels.
2. On the Customer Barcode Labelsscreen, select the label file that you want to remove, and then click the Delete icon.
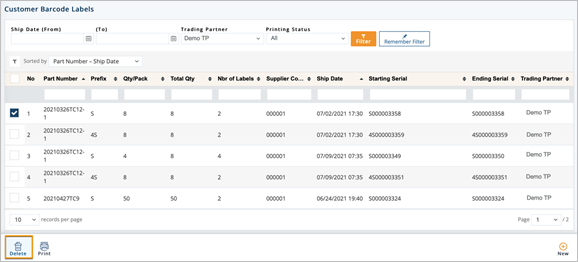
3. On the confirmation window, click OK.

TruckLoad is used to scan and assign products to the staged shipments. The purpose is to ensure that the proper serials and quantities are loaded onto the truck using a very simple scanning process with real-time feedback.
TruckLoad can optionally print barcode serials in real time for each serial scanned. That means an internal barcode serial label can be scanned and a new Trading Partner’s specific serial label can be printed.
TruckLoad uses a wired or wireless keyboard wedge type scanner. As you scan, the scanned item (Pallet Serial, Mixed Load or Master Serial, Container Management, or Container Serial) is added to the shipment. Container serials are added to pallets and attached to orders. Order quantities are verified and updated. TruckLoad will stop you if you try to over-ship or if you scan a part number that is not on the truck.
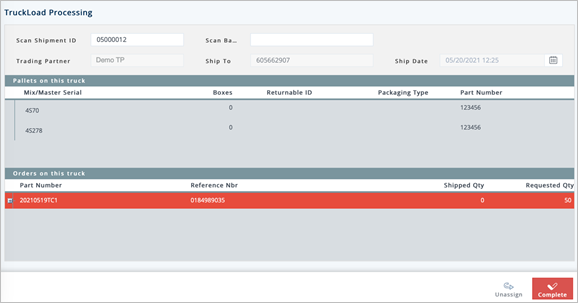
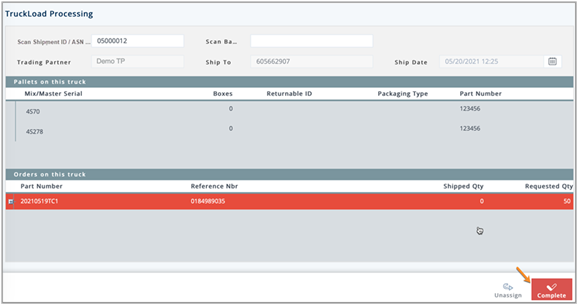
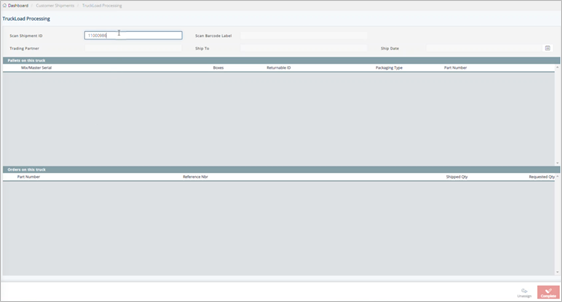
1. On the Customer Shipments menu, click TruckLoad Processing.
2. On the Truckload Processing screen, scan the barcode for this shipment (on the pick list) in the Scan Shipment ID field.
Note You can also type the Shipment ID followed by the tab key.
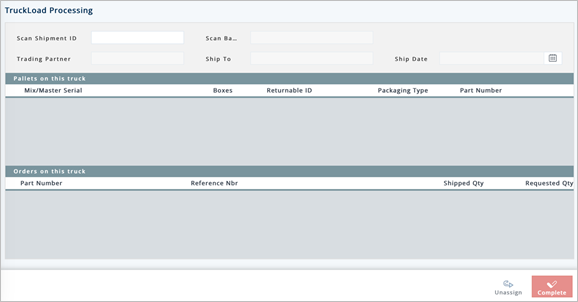
3. On the system message window, click OK to continue.
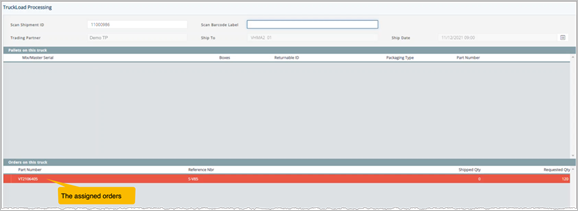
The corresponding details of the scanned shipment ID are displayed.
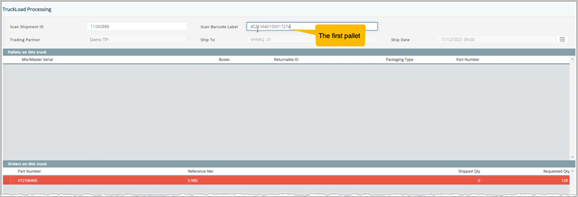
4. Scan the serial number from a master or mixed pallet label for the first pallet on this shipment. Alternatively, you can scan 4S or 5S into the Container field to print new master or mixed pallet labels (the labels will not print until the quantities are determined). As you scan, the display is updated.
5. Scan the serial number of the first container label. After Truckload validates that the serial’s part and quantity belong to the shipment, it is assigned to both the matching order and the master or mixed pallet label that was scanned most recently. By default, TruckLoad will print the Trading Partner shipping label immediately afterward.
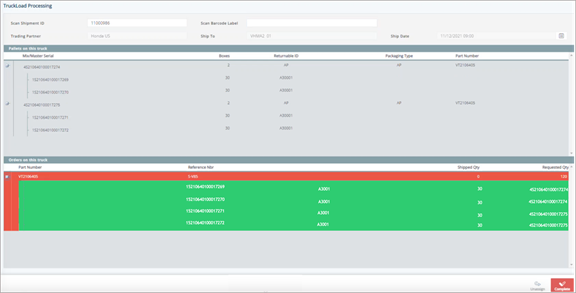
6. Continue scanning containers until you complete the pallet. If there are more pallets to scan, return to Step 2. Completed part order lines will be highlighted in green, while incomplete lines will be red.
Mix/Master Serial: The barcode serial number of the Mixed or Master label.
Boxes: The number of boxes in a container.
Pallet Serial: The serial for the pallet used which indicates the type of packaging with a unique identifier.
Pallet Type: The code for the pallet or container used.
Part Number: The part number of this pallet or container used.
Reference Nbr: The reference number from the original document for this order.
Shipped Qty: The number of units shipped or staged to ship.
Requested Qty: The number of units ordered by the Trading Partner.
To complete the scanning process
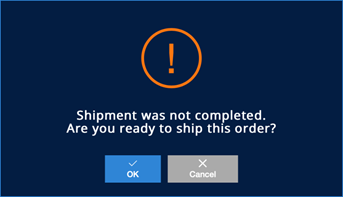
1. When the shipment is complete, TruckLoad will automatically continue. However, if you are short shipping, click Complete.
Label Templates in TruckLoad
The system will check whether label templates have been configured in these modules according to the following priority: 1) Trading Partner Packages, 2) Trading Partner Parts, 3) Trading Partners, and 4) Default setup by administrator. After checking, the appropriate template will be applied to the print job.
2. On the system message window, click OK to continue.
|
|
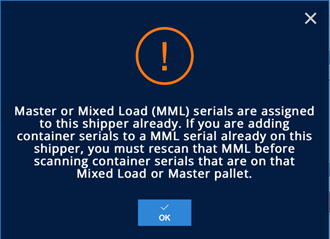
NOTES 1. TruckLoad will not accept scanning more than the ordered quantity. An error will appear. 2. TruckLoad will not accept scanning parts that were not ordered for this shipment. An error will appear. 3. Shipments are updated in DiAutomotive during the TruckLoad scanning. 4. Truckload may be used to assign packaging details, such as pallet types, pallet serials, and Container Managements. Create a bingo card to scan these additional details. These barcodes must be scanned prior to the serial which you are assigning the packaging details to. |
Other Prefixes/Codes Recognized by TruckLoad
§ PLS – Followed by characters, PLS is the pallet asset tag for a master or mixed load serial. It should be scanned before the master or mixed load serial. Example: PLS12345678AP.
§ PLT – Followed by characters, PLT is the pallet type for a master or mixed load serial. It should be scanned before the master or mixed load serial. Example: PLTAP.
§ RTN or B – Followed by characters, RTN or B is the returnable container asset tag for a container serial. It should be scanned before the container serial. Example: RTN23456789D1.
§ OK1 – Is the same as clicking Complete.
§ ESC – Is the same as clicking Cancel.
Remove Container Serials from a Shipment
1. On the Customer Shipments menu, click TruckLoad Processing.
2. On the TRUCKLOAD PROCESSING screen, scan the barcode for this shipment (on the pick list) in the Scan Shipment ID field.
3. Select the individual container serial and click the Unassign button.
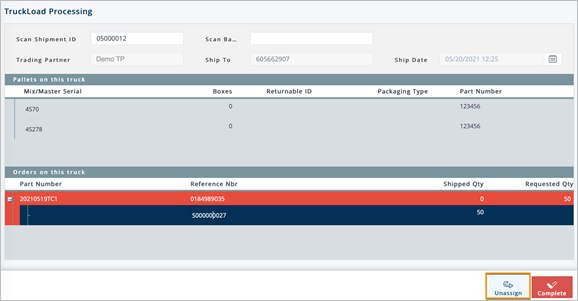
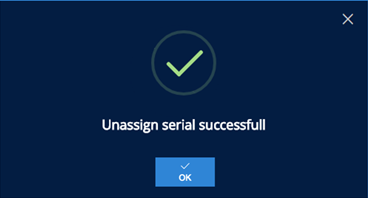
4. This will remove the container serial from the order and from the master or mixed load serial. On the confirmation message, click OK.
TruckLoad FGActive
TruckLoad FGActiveis applied to 3PL. With TruckLoad FGActive mode, you only need to scan the serial number from a master or mixed pallet label for the pallets, and then the inner containers included in the pallets will be automatically loaded.
Prerequisites
§ A shipment with the Shipment ID for being scanned by TruckLoad FGActive mode.
§ Assign firm order(s) to the shipment on the Firm Orders tab.
Scanning in TruckLoad FGActive
1. On the Customer Shipments menu, click TruckLoad Processing.
2. On the TruckLoad Processing screen, scan the barcode for this shipment (on the pick list) in the Scan Shipment ID field.
Note You can also type the Shipment ID followed by the tab key.
tip Refer to the Field Definitions – TruckLoad section.
The orders assigned to the shipment are displayed in the Orders on this truck section.
3. Scan the serial number from a master or mixed pallet label for the first pallet on this shipment.
The inner containers included in the pallet are loaded.
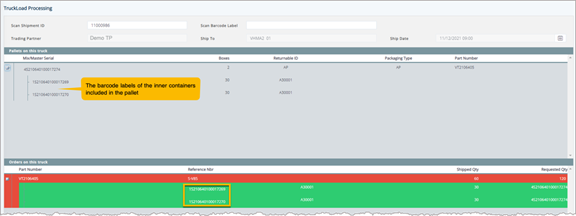
4. Continue scanning the serial number from a master or mixed pallet label for the next pallet on this shipment. If there are more pallets to scan, return to Step 3. Completed part order lines will be highlighted in green, while incomplete lines will be red.
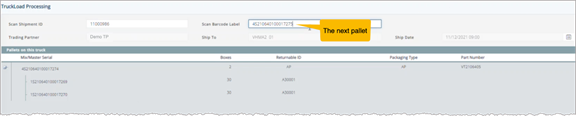
The inner containers included in the pallet are loaded.
Also, the Print view of the pallet label and its inner containers is displayed.
In DiAutomotive, an outer container is defined as a container that holds other containers. Each outer container record should hold container serials, rather than individual parts.
1. On the Customer Shipments menu, click Outer Containers.
2. On the Customer Outer Containers screen, click the container that you want to view.
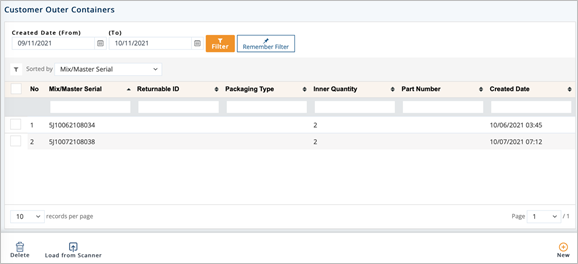
3. On the Customer Outer Container screen, select the General, Dates/Shipping, IPP Tag, Other, or Inner Containers tabs to view the corresponding details.
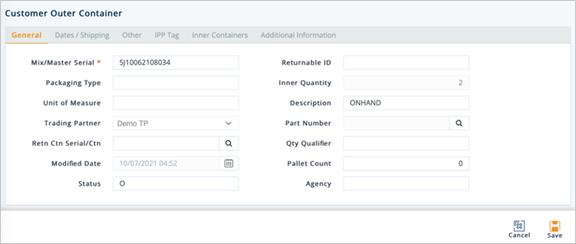
General tab
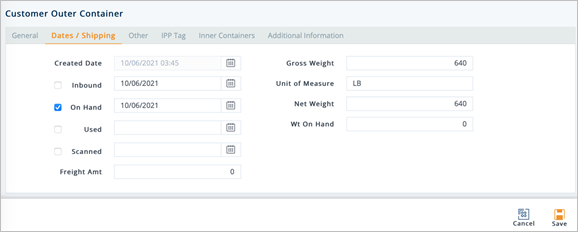
Dates/Shipping tab
Other tab
IPP Tag tab
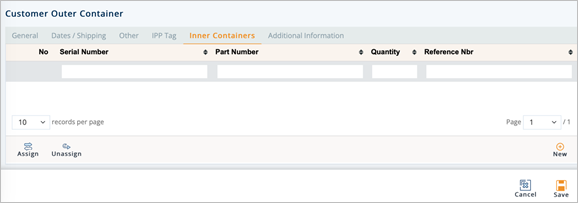
Inner Containers tab
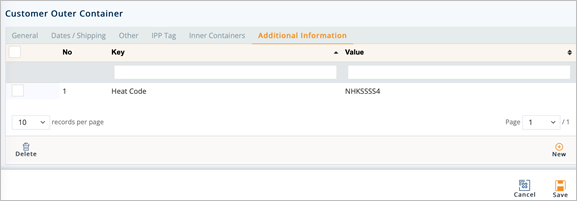
Additional Information tab
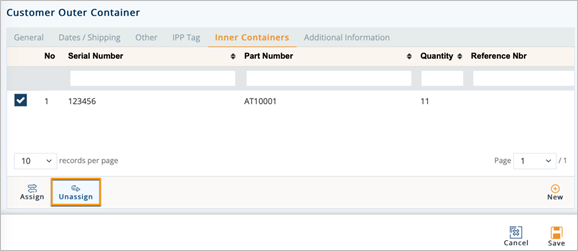
Work with Inner Containers
To add a container serial to the pallet
1. On the Inner Containers tab, click New.
2. On the Inner Container window, fill out the details of the new container on the General, Dates/Shipping, IPP Tag or Other tabs accordingly.
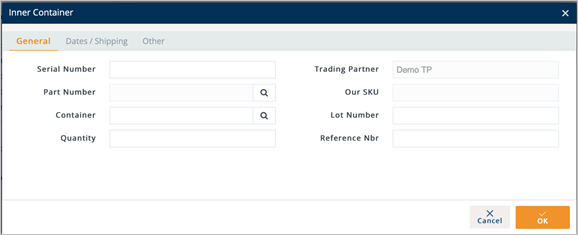
3. When you’re finished, click OK.
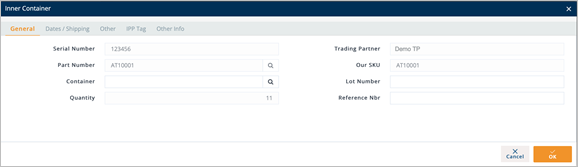
To view the serial details
1. On the Customer Outer Container screen, click the inner container that you want to view.
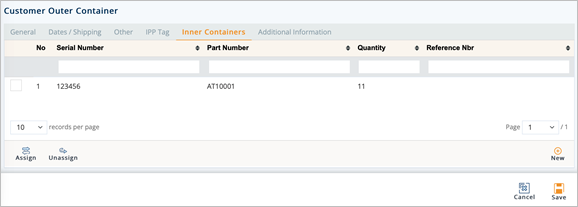
2. View the serial details on the Inner Container window.
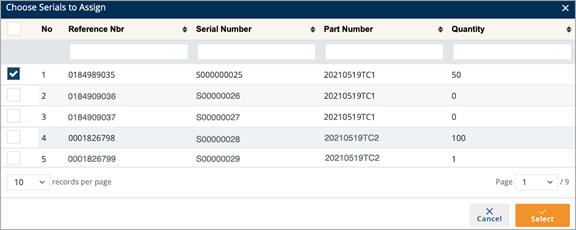
To assign a container serial to the pallet
Parts may be put into inventory in full pallets ready to ship. Shipping users may want to only scan or assign the pallets to the Shipments they are working on without having to assign container serials. Known as Inventory Scanning, assigning the serials to Pallet records before they have an intended Shipment can save you time. Generally done by scanning, you can manually assign the serials using these steps:
1. On the Inner Containers tab, click the Assign icon.
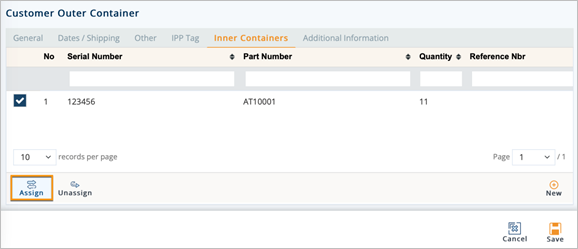
2. On the Choose Serials to Assign window, select the serials that you want to assign, and then click Select.
To unassign an inner container from a customer outer container
ð On the Inner Containers tab of the Customer Outer Container screen, select the container that you want to unassign, and then click the Unassign icon.
Outer container records are created by printing labels under the Customer Shipments > Barcode Labels menu item. In the rare event that you must manually enter an outer container record, follow the instructions below. Please note that you should only do so if you are instructed by a DiAutomotive technician or the DiAutomotive Support team.
1. On the Customer Shipments menu, click Outer Containers.
2. On the Customer Outer Containers screen, click New.
3. On the Customer Outer Container screen, select the Trading Partner in the drop-down list.
4. Fill out the details of the new outer container. Use the following Field Definitions.
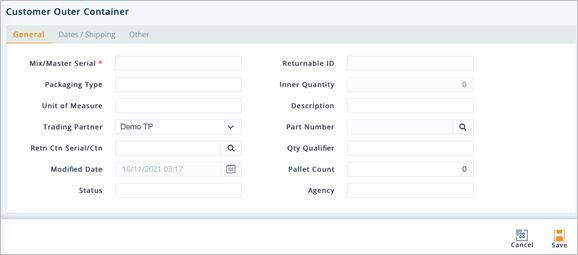
5. When you’re finished, click Save.
Field Definitions-GENERAL
§ Mix/Master Serial:The barcode serial number of the Mixed or Master label.
§ Pallet Serial: Indicates the type of packaging with a unique identifier, for example, asset tag.
§ Pallet Type: The code for the pallet or container used.
§ Inner Quantity: The number of boxes on this pallet or in this container.
§ Unit of Measure: The unit of measure for the weight.
§ Description: The description for the source of the data.
§ Trading Partner: The ID code of the Trading Partner.
§ Part Number: If this is a Master serial, the part number of all the containers is listed here.
§ Retn Ctn Serial/Ctn: The Returnable Container Serial Number, if used.
§ Qty Qualifier: The qualifier for the quantity, if used.
§ Modified Date:The date when the palletized container record was changed.
§ Pallet Count: The number of pallets of this Type (only used if not serialized).
§ Status: The pallet status:
- O: On hand
- N: Inbound
- L: Assign
- U: Use
§ Agency: The code for the agency responsible for the Returnable Container.
Field Definitions-DATES/SHIPPING
§ Created Date: The date this Pallet record was created.
§ Inbound: The date this pallet was shipped from another location, if used.
§ On Hand: The date the pallet arrived at our location, if used.
§ Used: The date this pallet was shipped out.
§ Freight Amt: The cost of freight.
§ Gross Weight: The gross weight of the pallet.
§ Unit of Measure: The unit of measure used.
§ Net Weight: The net weight of the pallet.
§ Wt On Hand: The weight on hand in inventory.
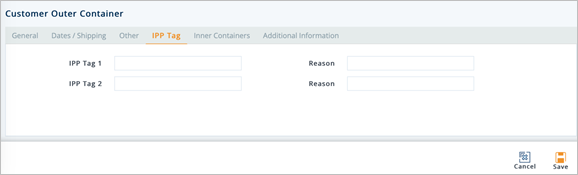
Field Definitions-IPP TAG
§ IPP Tag 1/2: The IPP Tag number.
§ Reason: Date The reason for tracking the part during the transportation process.
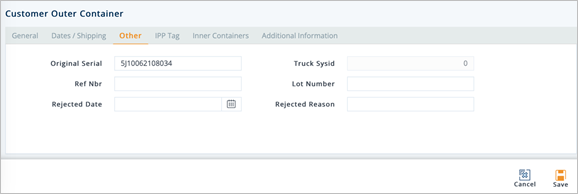
Field Definitions-OTHER
§ Original Serial: The serial number may change. The original serial is stored here.
§ Ref Nbr: In some cases, a reference number is recorded here.
§ Truck Sysid: The internal identifier given to the truck.
§ Lot Number: In rare cases, a lot number is recorded on master serials.
§ Rejected Date: The date when the entire pallet was rejected. This pallet will not be available to ship.
§ Rejected Reason: The reason why the entire pallet was rejected.
To select a part number
1. On the General tab, click the Search icon in the Part Number field.
2. On the Browse Parts window, choose the part number and click Select.
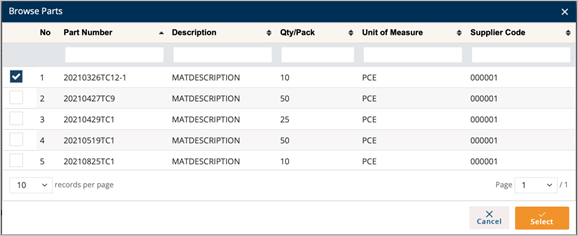
The selected part number is displayed.
To select a returnable container
1. On the General tab, click the Search icon in the Retn Ctn Serial/Ctn field.
2. On the Browse Returnable Containers window, choose the returnable container and click Select.
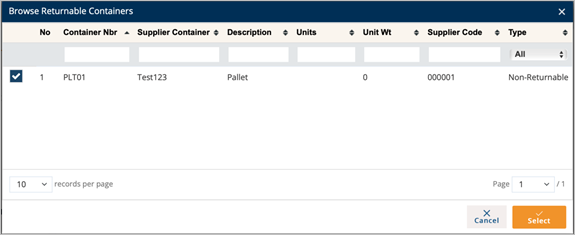
The selected returnable container is displayed.
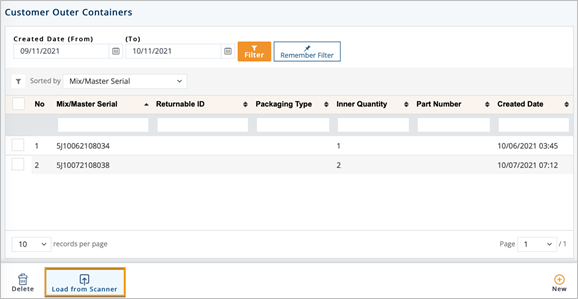
If you use scanning to preload outer containers for inventory purposes, clicking Load from Scanner will allow you to upload serial information into inventory in DiAutomotive. If you use this method of scanning, you can only scan the outer containers onto the Shipments (when it comes time to ship) instead of scanning both the outer containers and the serials.
1. On the Customer Shipments menu, click Outer Containers.
2. On the Customer Outer Containers screen, click the Load from Scanner button.
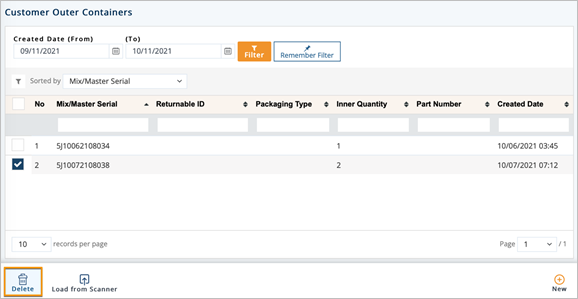
In the rare event that deleting an outer container record is necessary, follow the steps below.
1. On the Customer Shipments menu, click Outer Containers.
2. On the Customer Outer Containers screen, select the container that you want to remove, click the Delete icon, and then click OK on the confirmation message.
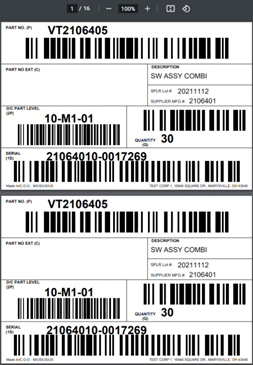
When a new container label is printed in DiAutomotive, the information about that container is stored in the Inner Containers file, which can be used to find information such as:
§ Serial number
§ Supplier lot number
§ Date when the label was printed, production was scanned, and shipment was scanned
§ Package weight
§ Returnable code used
§ Connection to orders and pallets
§ Part number and SKU
§ Quantity of units in this container
Serial Definition
DiAutomotive provides you the ability to generate or import serial records for the purposes of internal tracking, shipping, and lot tracing. Serial record creation begins with printing barcode labels. As labels are printed, whether it is a container or a mixed/master label, DiAutomotive will assign a new serial number to it. Container serials are found in the Customer Inner Containers window, and mixed and master serials are found on the Customer Outer Containers window. The characters in a DiAutomotive-generated serial number consist of:
§ An internal container serial counter, increments at +1 per label printed.
- In general, this counter remains the same across Trading Partners and serial types. For example, 00000001 = Honda Container, 00000002 = GM Pallet.
§ Trading Partner conformances
- Scanned Serial prefixes (may be removed in EDI raw data as spec requires)
- Padded characters 00000001
- Required codes such as the Supplier code or DUNS number
- Honda spec example: “1S”+<supplier code>+<DiAutomotive 8-digit serial number>
1. On the Customer Shipments menu, click Inner Containers.
2. On the Customer Inner Containers screen, click the inner container that you want to view.
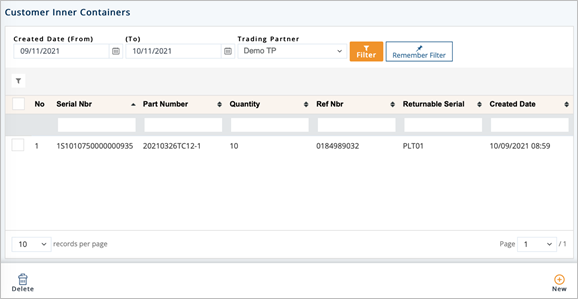
3. On the Customer Inner Containerscreen, select the General, Dates/Shipping, IPP Tag or Other sections to view the corresponding details.
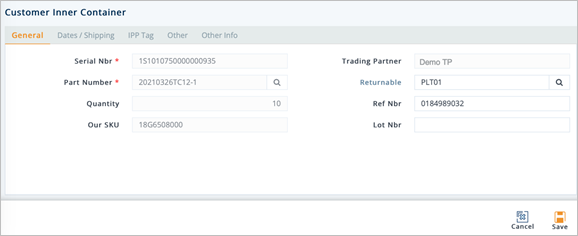
General tab
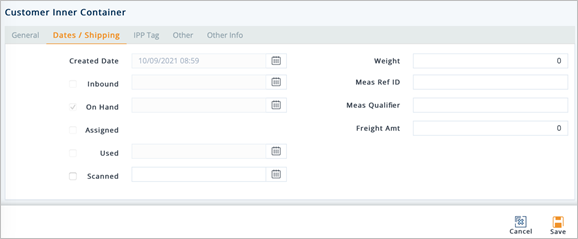
Dates/Shipping tab
IPP Tag tab

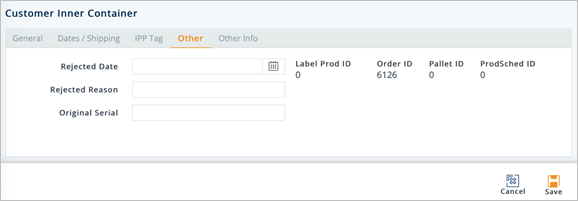
Other tab
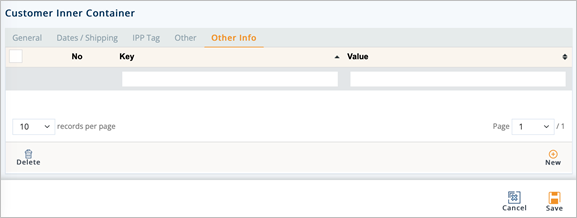
Other Info tab
There is generally no reason to manually create a new inner container record unless your goal is to troubleshoot an issue. The standard methods for creating serial records can be found in the shipping and label printing screens (see Print a Barcode Label). To view the most common areas to print labels, click here: Barcode Labels. On occasion, there may be times when you need to correct a single inner container record. For example, if an order is canceled but the inner container is still on the order, you can use this screen to make the inner container available for shipping again. If you need to consistently add inner container records from external sources, contact the DiAutomotive Support team to discuss the options.
Here are the manual creation steps:
1. On the Customer Shipments menu, select Inner Containers.
2. On the Customer Inner Containersscreen, click New.
3. On the Customer Inner Container screen, select the Trading Partner in the drop-down list.
4. Fill out the details of the new inner container. Use the following Field Definitions.
5. When you’re finished, click Save.
Field Definitions-General
§ SerialNbr: Bar-coded serial number.
§ Part Number: Part Number for this Part.
§ Quantity: Quantity in this container.
§ Our SKU: Your Company’s Part Number.
§ Returnable: Record identifying the returnable container of the serial. Clicking the  button will allow you to select an existing record. If misspelled, this selection box will still appear.
§ Ref Nbr: The document reference number for this order. DiAutomotive will add this number when printing labels from the Firm Orders screen or Shipments (ASN) screen.
§ Lot Nbr: Lot Number for this serial.
Field Definitions-Dates/Shipping
§ Created Date: The date when this label was printed or the serial was created.
§ Inbound: Date it arrived from another location, usually when it was scanned in.
§ On Hand: Scanned as usable for shipping into DiAutomotive.
§ Assigned: The date when this serial was assigned to an ASN or an order.
§ Used: The date it was used/shipped out.
§ Weight: The weight of this box serial.
§ Meas Ref Id: Type of measurement.
§ Meas Qualifier: Measurement qualifier (N=Net, G=Gross).
§ Freight Amt: The freight cost.
Field Definitions-IPP Tag
§ IPP Tag 1/2: The IPP Tag number.
§ Reason: The reason for tracking the part during the transportation process.
Field Definitions-Other
§ Rejected Date: The date when the 861 (Receiving Advice) rejected the part.
§ Rejected Reason: The reason from the 861 for the rejection.
§ Original Serial: The serial number may change. The original serial is stored here.
1. On the Customer Shipments menu, select Inner Containers.
2. On the Customer Inner Containersscreen, select the inner container file that you want to remove, and then click the Delete icon.
3. On the confirmation message, click OK.

