
IMPORTANT NOTE
Firm Orders on the Customer Demand Mgt screen and the ones on the Customer Finance screen have similar functions. The main difference between them are the purpose of use and types of users.
The Firm Orders file contains all “firmed” shipment requests from the Trading Partner based on incoming EDI data. Each Firm Order is defined by the Trading Partner specifications as some combination of part number, ship date, ship to, and reference number from the incoming document. Although the definition of Firm Order may differ between Trading Partners, each of their specifications are preloaded into TrueAuto. Firm Orders are always displayed as unique records in the Firm Orders file. When they are ready to ship, Firm Orders are then attached to user-created shipments called ASNs through a process called assignment.
|
IMPORTANT NOTE Firm Orders on the Customer Demand Mgt screen and the ones on the Customer Finance screen have similar functions. The main difference between them are the purpose of use and types of users. |
1. On the Customer Finance menu, click Firm Orders.
TIP Use the Filter panel to search for firm orders.
2. On the Customer Firm Orders screen, click the order that you want to view.
Note For a full description of each field, refer to the Field Definitions in the next section.
3. On the Firm Order Detail screen, select the General, Inner Containers, Allowance Charge, Other Info, and History tabs to view the corresponding details.
TIP Click the View more link to expand the details.

Field |
Definition |
Status |
The Firm Order’s status. Each Firm Order listed on the Customer Firm Orders screen has a value in the Status column. These statuses indicate the latest actions completed on the order. Below are the codes and definitions of every Firm Order status: - New: Record is untouched by any user. - Viewed: Record has been opened and saved by a user. - Assigned to Shipment: Record has been assigned to ASN. - Labels Created: Labels have been generated. - Labels Scanned: Labels have been printed. - Documents Printed: Documentation has been printed. - Staged: Allows the user to generate Product Activity records without generating EDI. - Shipment EDI Created: ASN has been generated. - Shipment EDI Sent: ASN has been transmitted. - Cancelled: Record has been cancelled by a user. - Assigned to Invoice: Record has been assigned to Invoice. - Invoice EDI Created: Invoice has been generated. - Invoice EDI Sent: Invoice has been transmitted. |
Ship To |
The Ship To code representing the customer’s address. |
Part Number |
The Trading Partner's requested part number, found on the EDI release. |
Part Type |
Unique identifying codes assigned to each part type if shown on the EDI release. |
Ship Date |
The projected date when units will be shipped. |
Shipped Qty |
The number of units shipped, or staged to ship on an ASN. |
Requested Qty |
The number of units ordered by the Trading Partner. |
Unit of Measure |
The unit of measure used. |
Qty/Pack |
The number of units of a part in each shipping container. |
External Nbr |
The number connecting TrueAuto firm orders with an order from an external system. This number is automatically assigned when TrueAuto exports a release. |
Reference Nbr |
The reference number from the original document if shown on the EDI release. This has multiple uses, such as identifying each line item of a PO. For example, Delivery Order Number. |
Supplier Part |
The supplier’s SKU or the internal part number used to cross-reference when you export to an ERP/MRP Inventory Control system. |
Purchase Order |
The document reference number of the Purchase Order. |
Product ID |
The Product Identifier. |
Assigned ID |
The Line Number or assigned ID for invoices and POs as shown on the EDI release. |
Trading Partner |
The ID code of the Trading Partner. |
Original ID |
The Firm Order ID may change. The original Firm Order ID is stored here. |
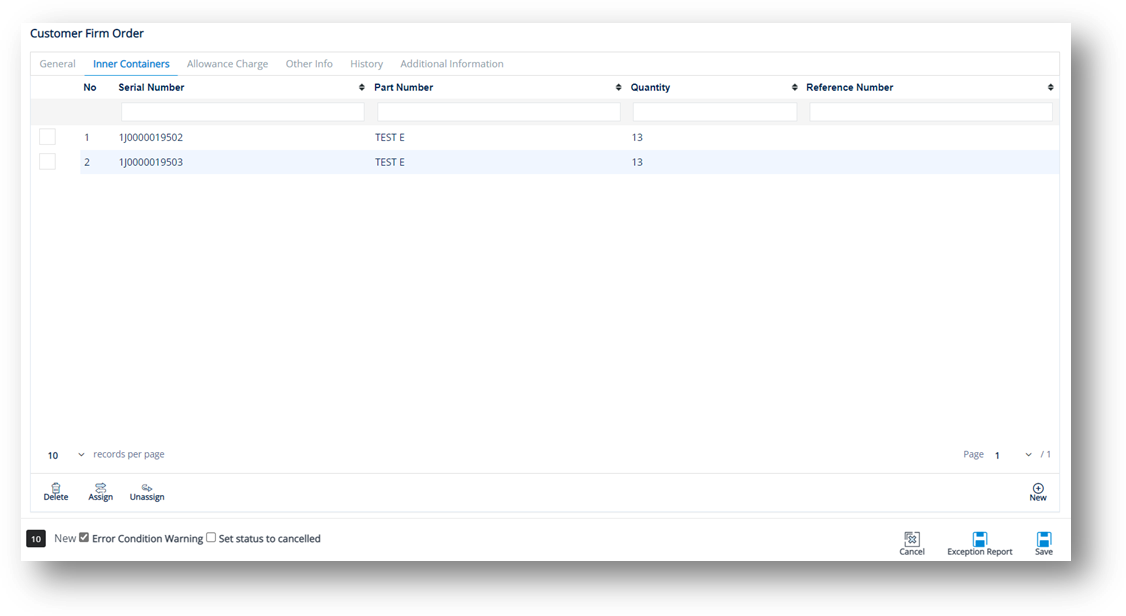
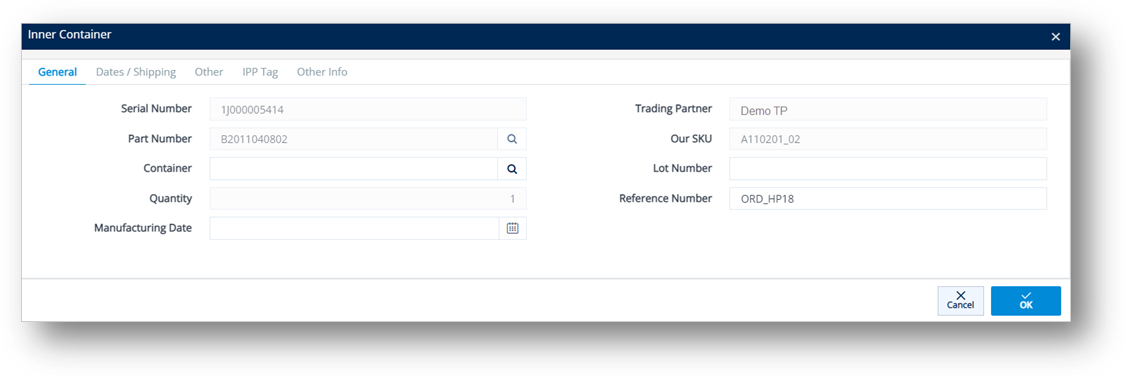
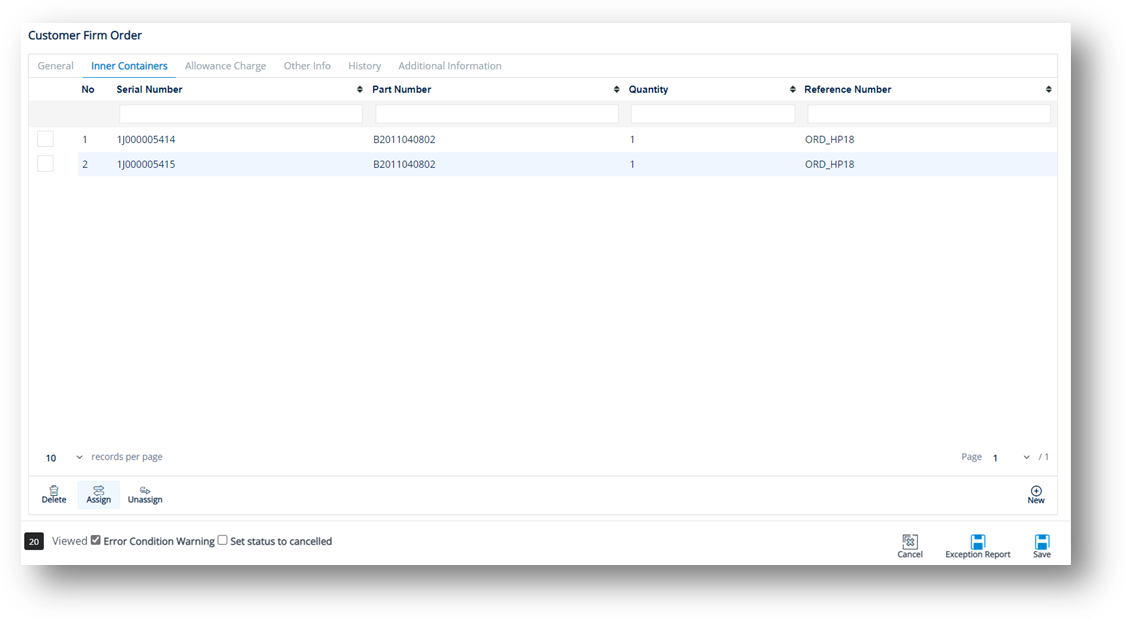
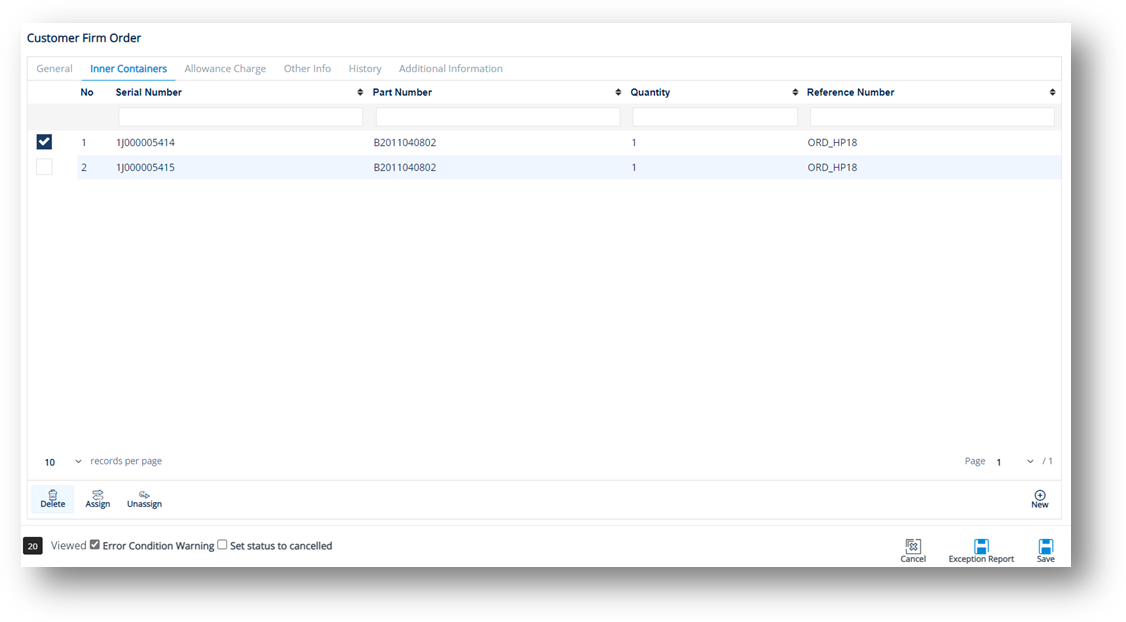
1. On the Inner Containers tab of the Firm Order Detail screen, click the container that you want to view.
2. On the Inner Container window, select the General, Dates/Shipping, IPP Tag, or Other tabs to view the corresponding details.
1. On the Inner Containers tab of the Firm Order Detail screen, click New.
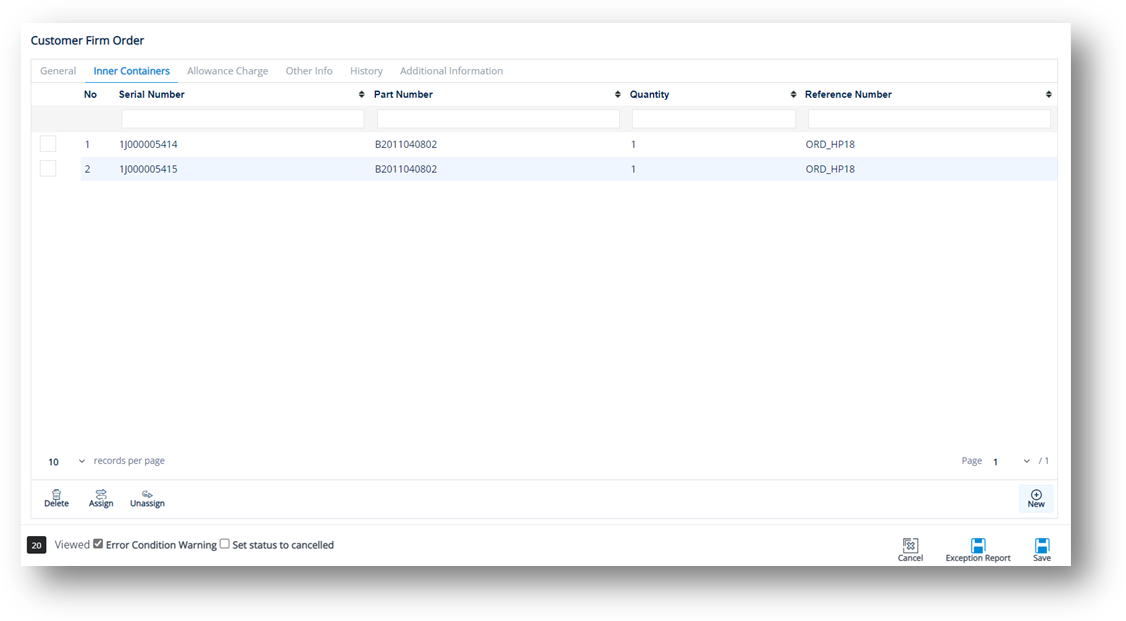
The Inner Container window appears.
2. Fill out the details of the new serial on the General, Dates/Shipping, IPP Tag or Other tabs.
1. On the Inner Containers tab of the Firm Order Detail screen, click the Assign icon.
2. On the Choose How to Assign window, select one of the following options and click OK:
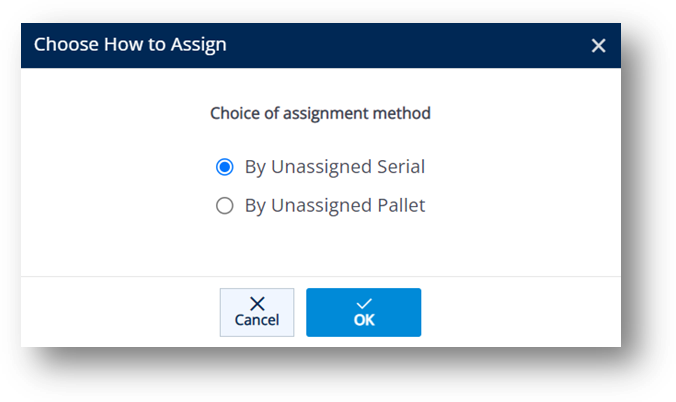
· By Unassigned Serial: Shows all available serials from inventory for that part.
· By Unassigned Pallet: Shows mixed master serials from inventory for that part.
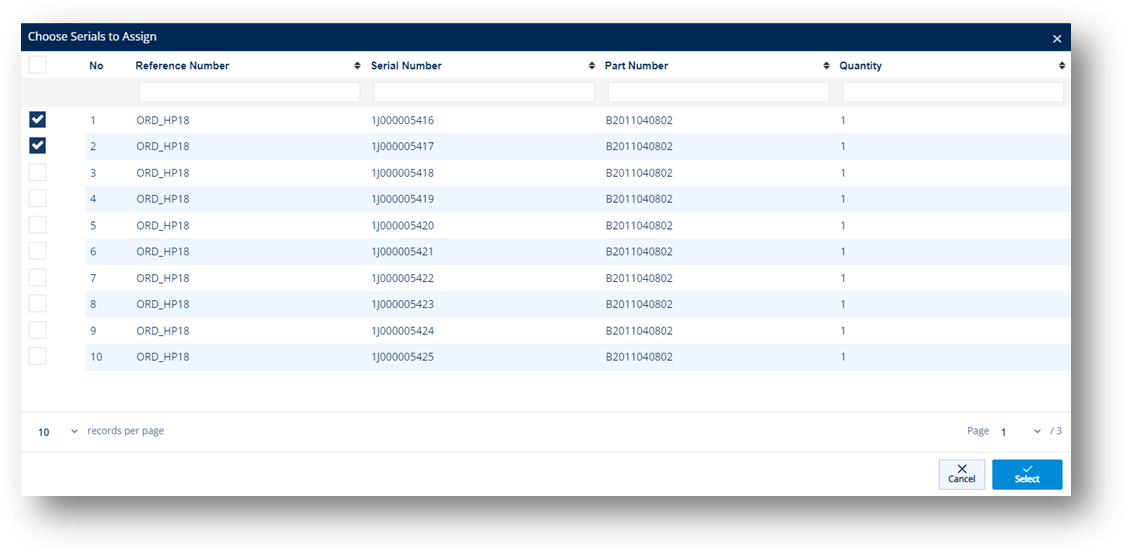
3. If you select the By Unassigned Serial option, choose the serials that you want to assign on the Choose Serials to Assign window.
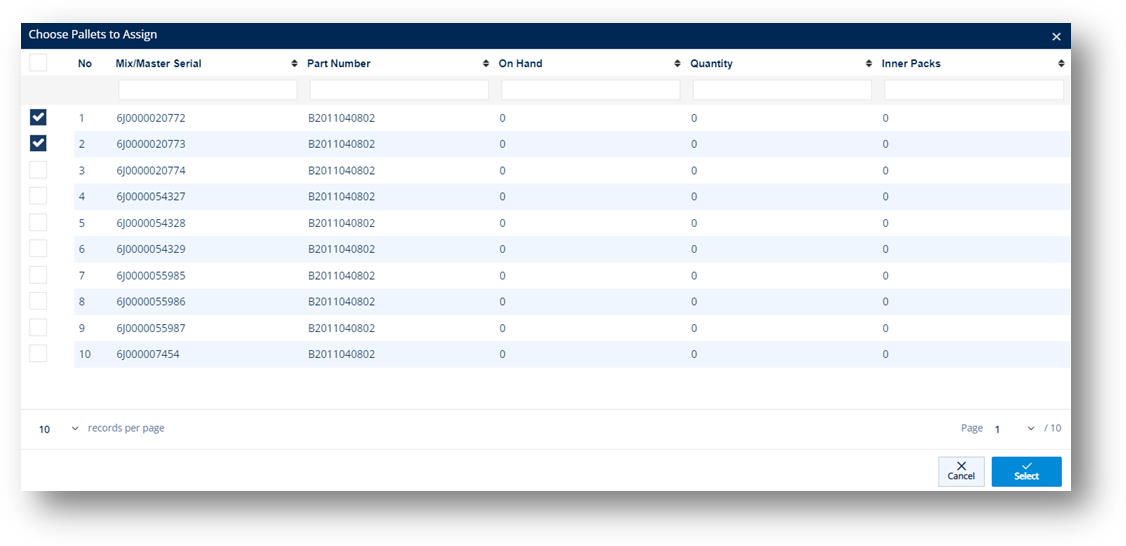
4. If you select the By Unassigned Pallets option, choose the pallets that you want to assign on the Choose Pallets to Assign window.
ð On the Inner Containers tab of the Firm Order Detail screen, select the container that you want to unassign, and then click the Unassign icon.
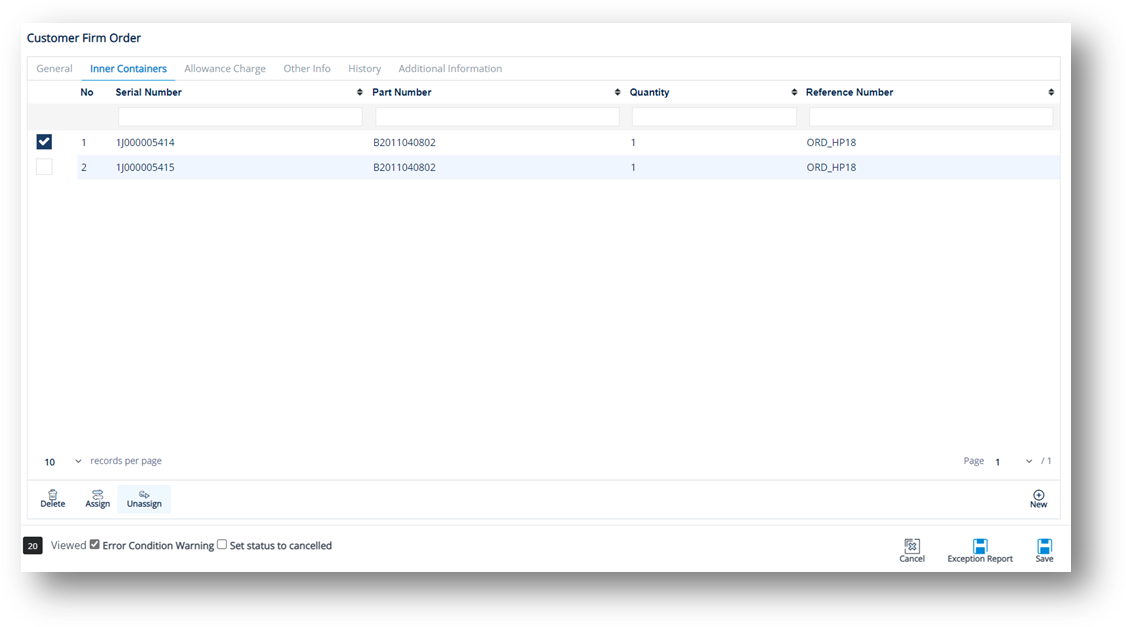
ð On the Inner Containers tab of the Firm Order Detail screen, select the container that you want to remove, and then click the Delete icon.
1. On the Firm Order Detail screen, switch to the Allowance Charge tab.
2. On the Allowance Charge tab, click New.
3. On the Adding Allowance Charge Line Items window, do the following:
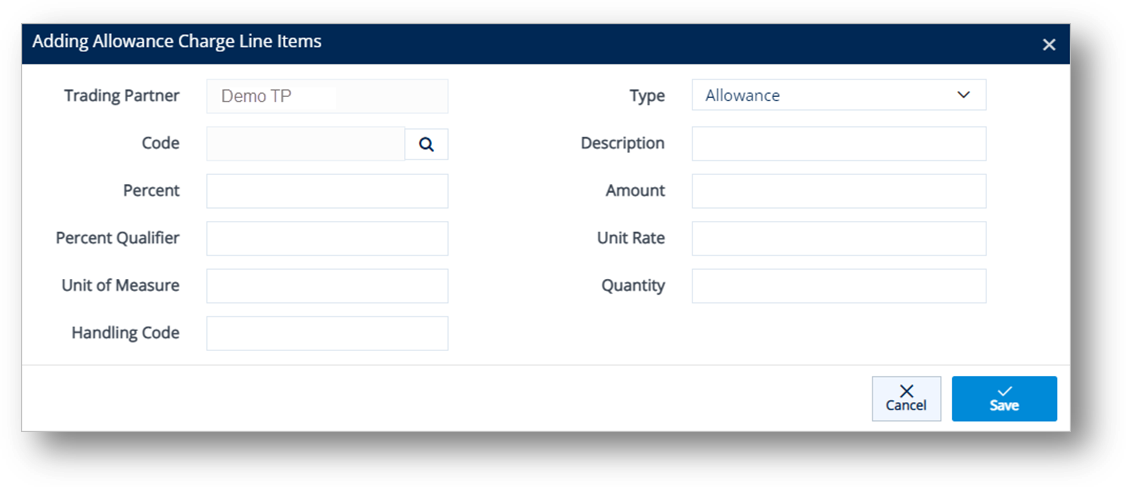
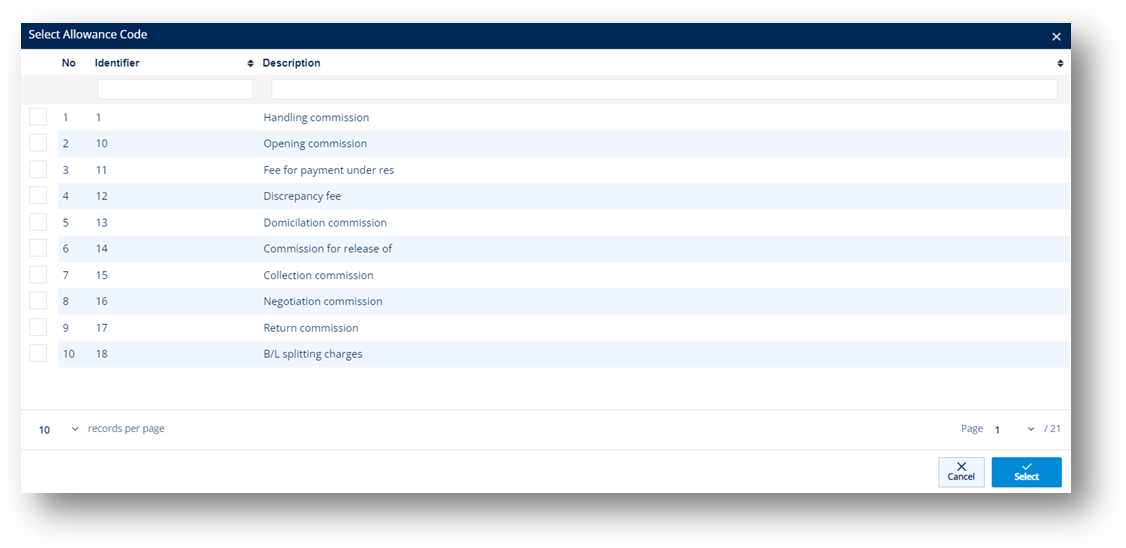
a. Select a Code.
i. Click the Search icon in the Code field.
ii. On the Select Allowance Code window, select the Allowance or Charge Code.
iii. Click Select.
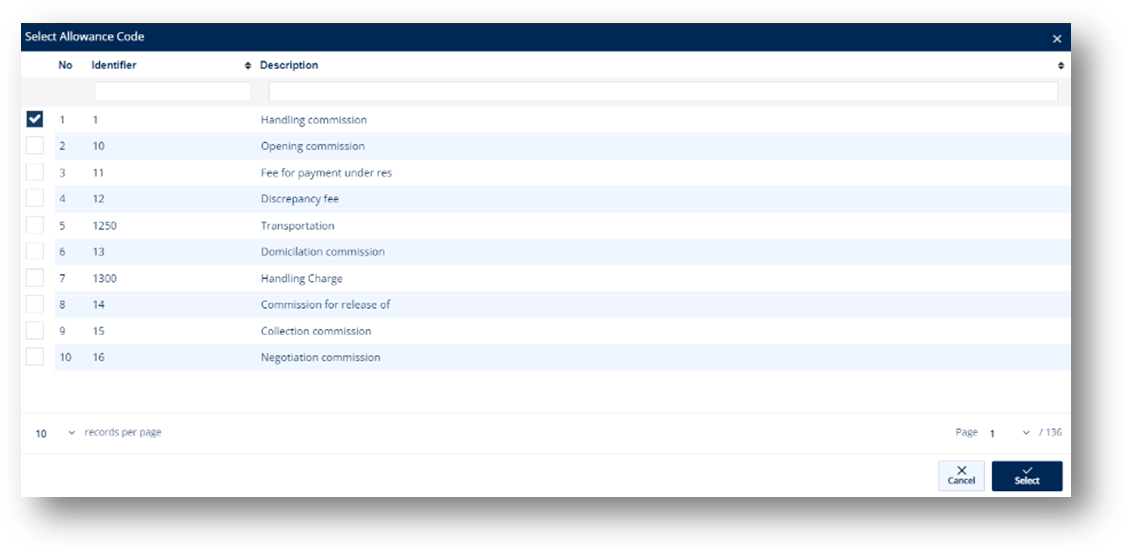
The selected Allowance or Charge Code is loaded in the Code field.
TIP You can add more allowance or charge options to the Code dropdown list by referring to steps in Cross Reference Library.
b. Select Allowance or Charge in the Type dropdown list.
c. Enter the Percent, Percent Qualifier, Amount, Unit Rate, Unit of Measure, Quantity, and Handling Code in the boxes.
4. Click Save.
A new Allowance or Charge is added to a Firm Order.
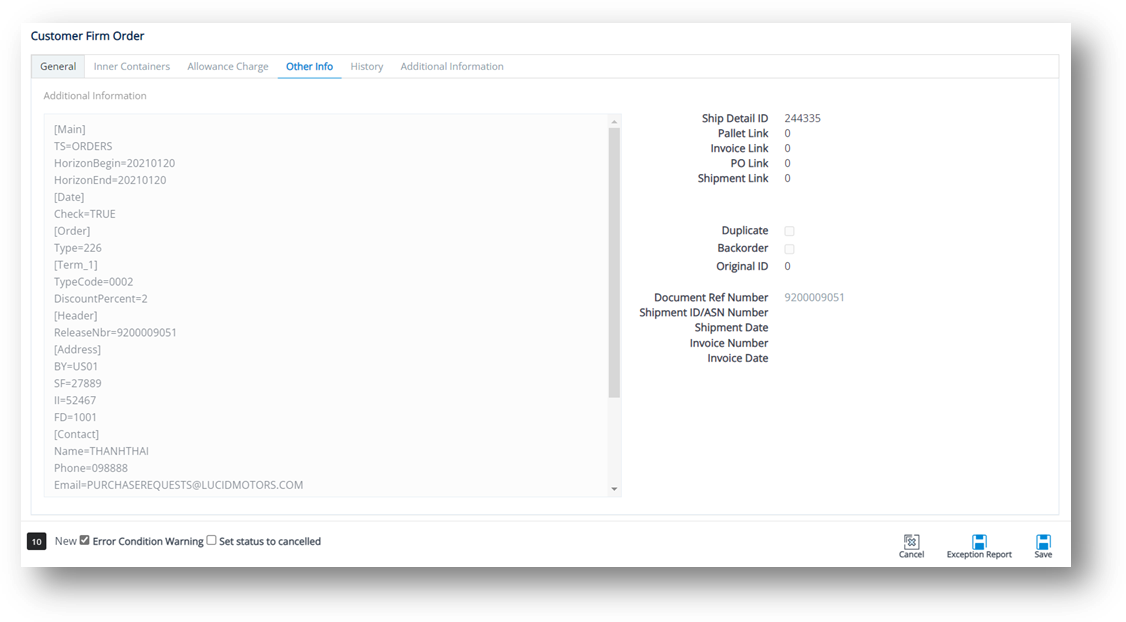
1. On the Customer Firm Order screen, switch to the Other Info tab.
2. On the Other Info screen, click the Document Ref Number link.
3. On the Incoming Document window, click the EDI button.
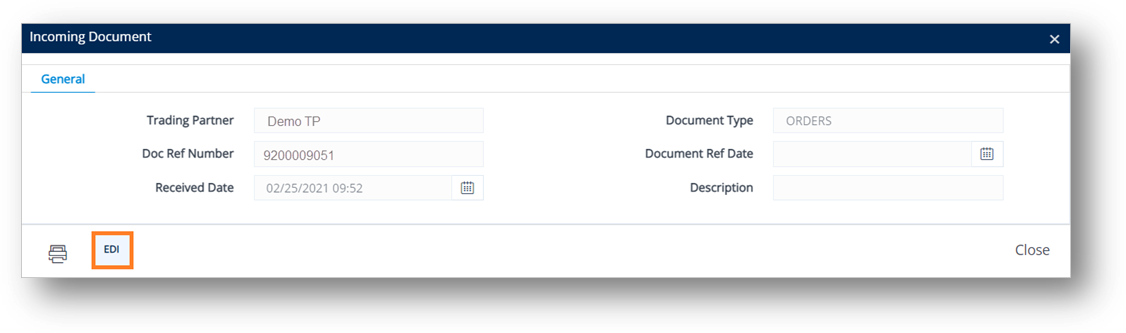
The EDI window displays the raw EDI for the selected incoming document.
4. On the Incoming Document window, click the Print icon.
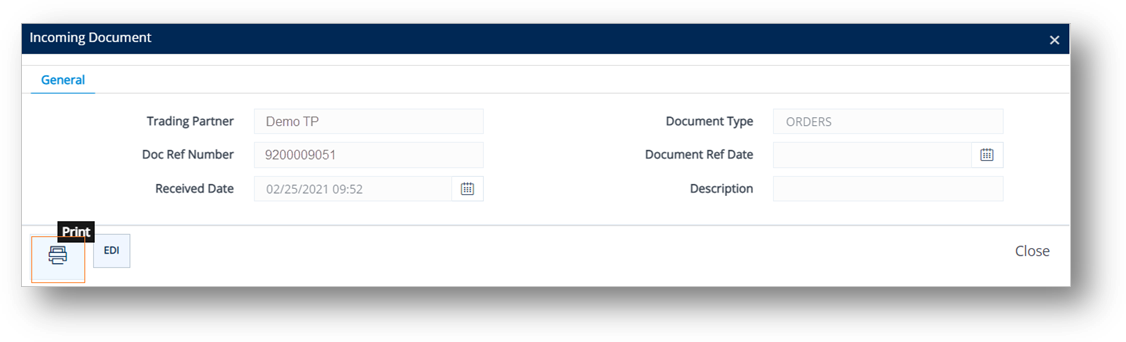
The Incoming Document is displayed in a new window.
Note For more information, refer to Incoming Documents.
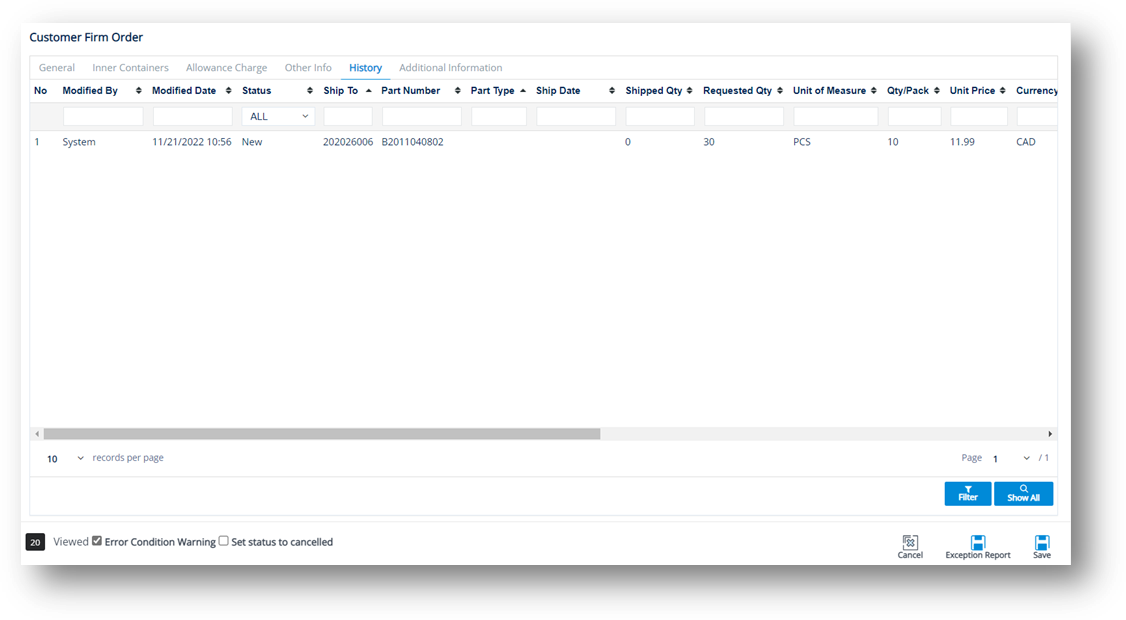
This feature displays all the processing that has occurred to a firm order. After you save the changes made to a firm order, the previous firm order will be stored on the History tab.
For instance, if you save the deletion of a ship serial from a firm order on the Firm Order Detail page, you can then view the previous Shipped Quantity for this firm order in the history.
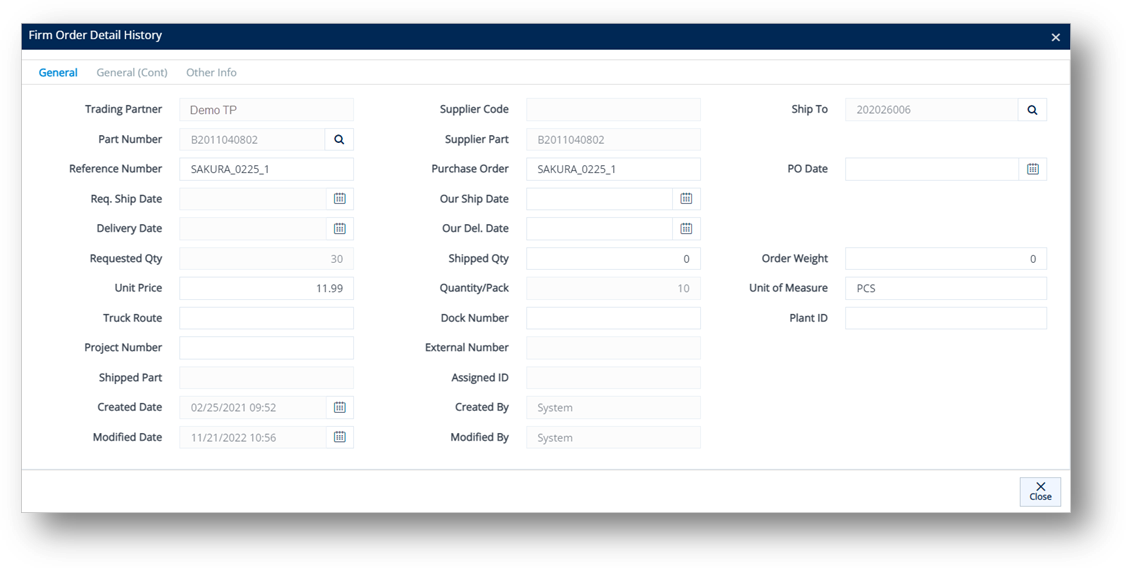
1. On the Customer Firm Order screen, switch to the History tab.
2. On the History tab, click the order whose history records you want to view.
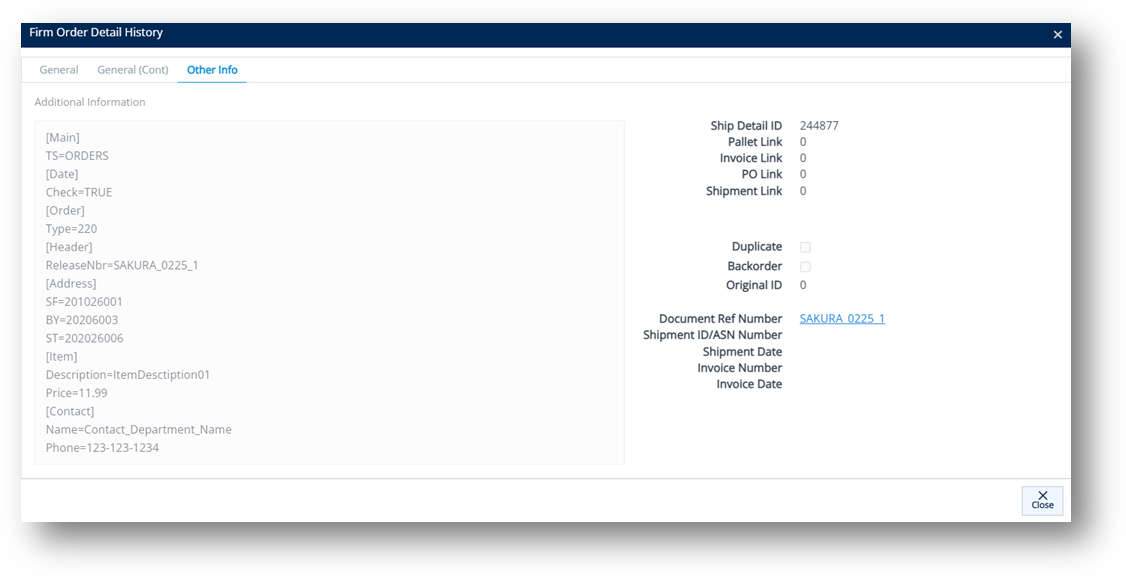
3. On the Firm Order Detail History window, select the General, General (Cont.), or Other Info tabs to view the corresponding details.

|
NOTE You can view and print an incoming EDI document on the Other Info tab by referring to the steps in working with the Other Info tab. |
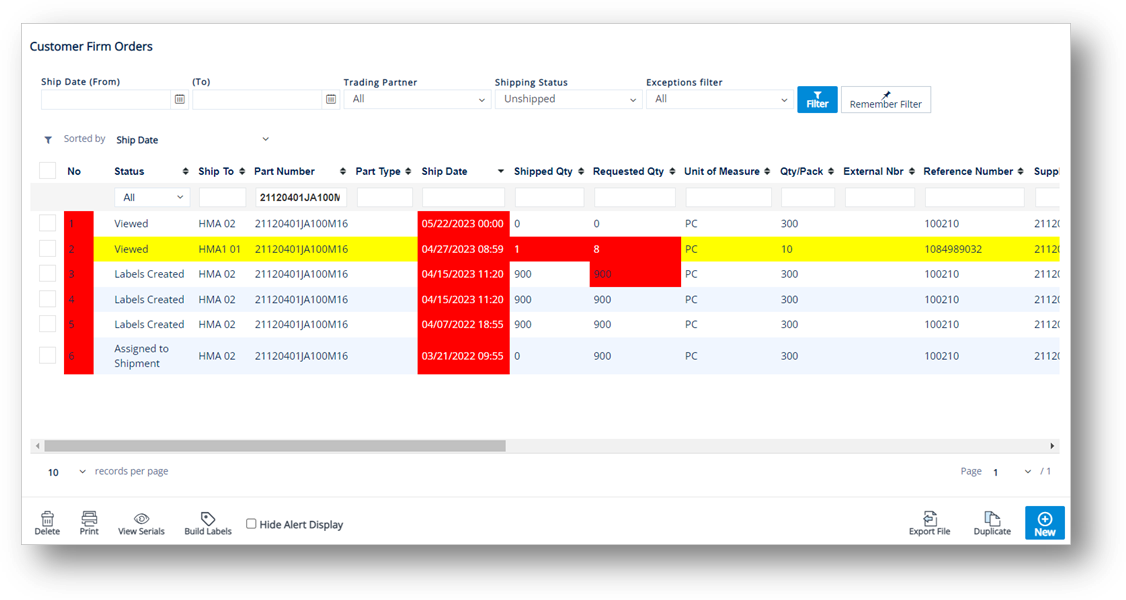
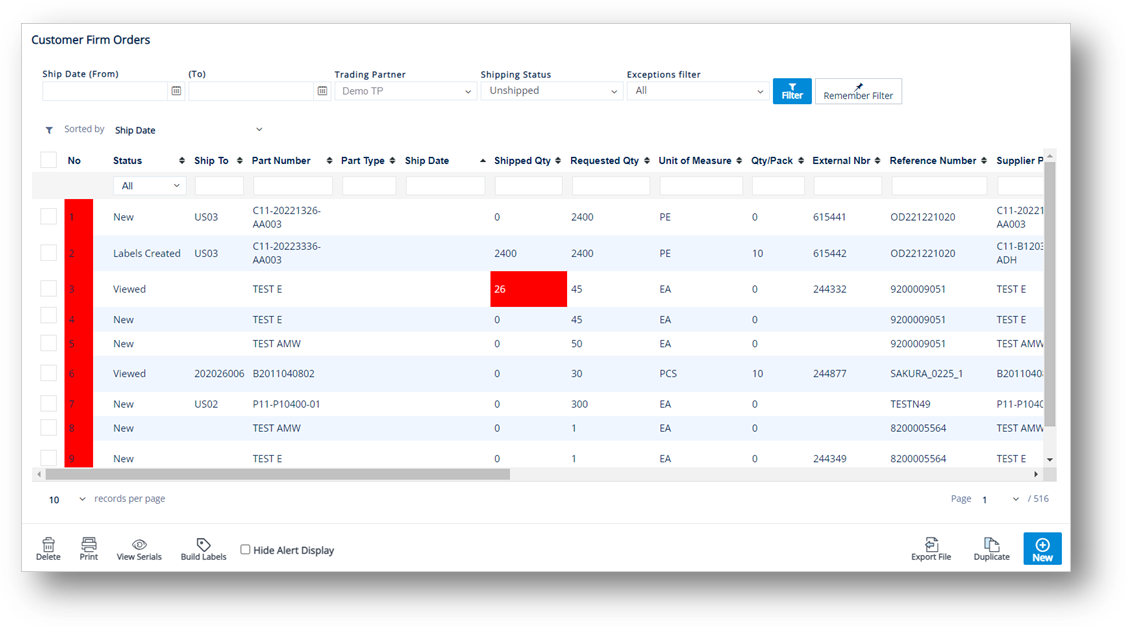
TrueAuto makes the use of the colors to show you something that may need attention. The following shows how they are used in the Customer Firm Orders file.
· Red Ship Date Text:
The firm order is overdue and unshipped. Requires attention. Decide if it is still a valid firm order, and then postpone the ship date, ship the order, or delete it.
· Red Ship Date Highlighted:
There is no TP requested ship date or our ship date. Because this order’s ship date is unknown, attention from the user is required to add it, or contact TrueAuto Support if there are problems with the EDI transfer process.
· Red Shipped Quantity and Part Number:
The shipped quantity is higher than 0 and does not match the requested quantity.
· Yellow Highlight over Part Number:
A warning flag has been turned on. You cannot ship this order until the flag is removed. The most common cause for a yellow firm order is: During processing, TrueAuto found that the firm order is a replacement for another order that has already been assigned to an ASN. In terms of replacement logic, TrueAuto considers any order assigned to an ASN as shipped, and therefore unchangeable. Hence, the original firm order remains unchanged and the new firm order is added to the Firm Order file in yellow, and cannot be shipped against. This behavior can be altered.
The View Serials icon will display a pop-up window showing all the Serial Numbers that have been assigned to the highlighted Order. If labels have not been printed or serials have not been assigned, this window will be blank. You can use this window to either verify accuracy, adjust serial record information, or reprint labels as needed. An example would be to change returnable types or lot numbers. Be careful not to make changes here that will create inconsistencies between TrueAuto records and the printed labels. It is possible to create serial records here when troubleshooting special cases of missing serials.
1. On the Customer Finance menu, click Firm Orders.
2. On the Customer Firm Orders screen, select the order that you want to view.
3. Click the View Serials icon.

4. On the Inner Containers window, click the serial that you want to view.
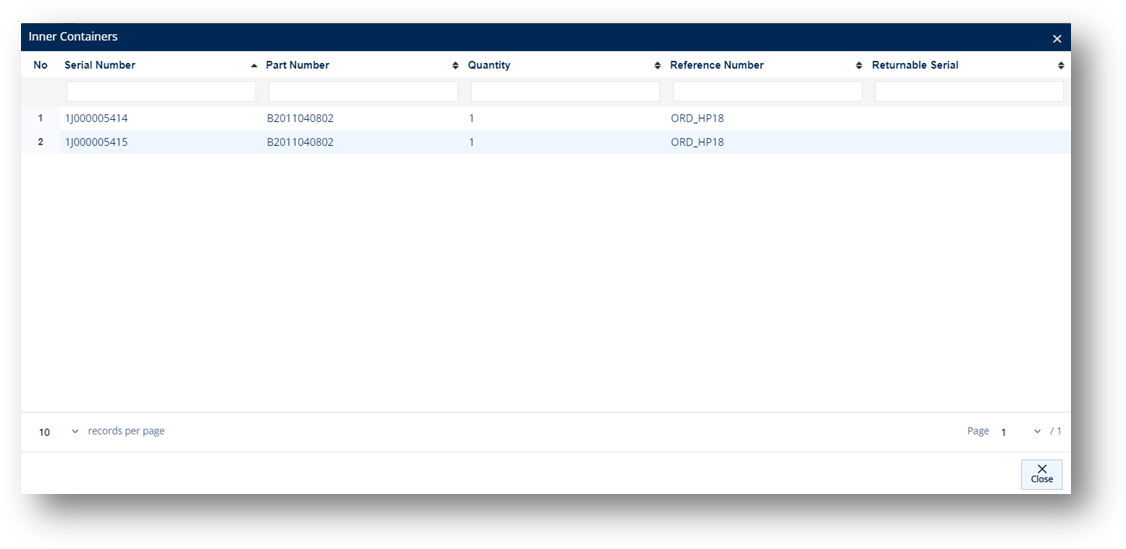
5. On the Inner Container window, select the General, Dates/Shipping, IPP Tag or Other tabs to view the corresponding details.
Field |
Definition |
Serial Number |
The barcode serial number. |
Part Number |
Part Number for this Part. |
Our SKU |
Your Company’s Part Number (or Stock Keeping Unit). |
Returnable Serial |
Record identifying the Container Management of the serial. |
Lot Number |
Lot Number for this serial. |
Quantity |
Quantity in this container. |
Reference Nbr |
The reference number from the original document for this order. TrueAuto will add this number when printing labels from the Orders screen or ASN screen. |
Field |
Definition |
Created Date |
The date when this label was printed or the serial was created. |
Order Weight |
The weight of this box serial. |
Inbound |
The date when this serial arrived from another location, usually when it was scanned in. |
Measure Ref ID |
Type of measurement. |
On Hand |
Scanned as usable for shipping into TrueAuto. |
Measure Qualifier |
Measurement qualifier (N=Net, G=Gross). |
Assigned |
The date when this serial was assigned to an ASN or order. |
Used |
The date when it was used/shipped out. |
Freight Amt |
The freight cost. |
Field |
Definition |
Rejected Date |
The date when the 861 (Receiving Advice) rejected the part. |
Rejected Reason |
The reason from the 861 for rejection. |
Original Serial |
The serial number may change. The original serial is stored here. |
Field |
Definition |
IPP Tag 1/2 |
The IPP Tag number. |
Reason |
The reason for tracking the part during the transportation process. |
Though it is seldom used, it is possible to print labels from the Firm Order file before the orders have been assigned to ASNs. By clicking the Build Labels button, TrueAuto prepares the labels for printing.
1. On the Customer Finance menu, click Firm Orders.
2. On the Customer Firm Orders screen, select the order for which you want to build labels.
3. Click the Build Labels button.
The system will check whether label templates have been configured in these modules according to the following priority: 1) Trading Partner Packages, 2) Trading Partner Parts, 3) Trading Partners, and 4) Default setup by administrator. After checking, the appropriate template will be applied to the print job.
4. On the completed labels message, click OK.
Note If the Firm Order already has labels for printing, the Review Labels message will appear. Then, select one of the options:
· OK: Creates new serials for the selected part.
· Cancel: Cancels this printing.
The Firm Orders file shows you a list of shipment requests from your Trading Partners. It is the file that contains information for parts orders, quantities, and the date when they are requested. You can analyze Firm Orders at a higher level by manipulating the data into different views through TrueAuto reports. To print a report or export data from the Firm Order file, click the Print icon.
1. On the Customer Finance menu, click Firm Orders.
2. On the Customer Firm Orders screen, select the order that you want to print.
3. Click the Print icon.
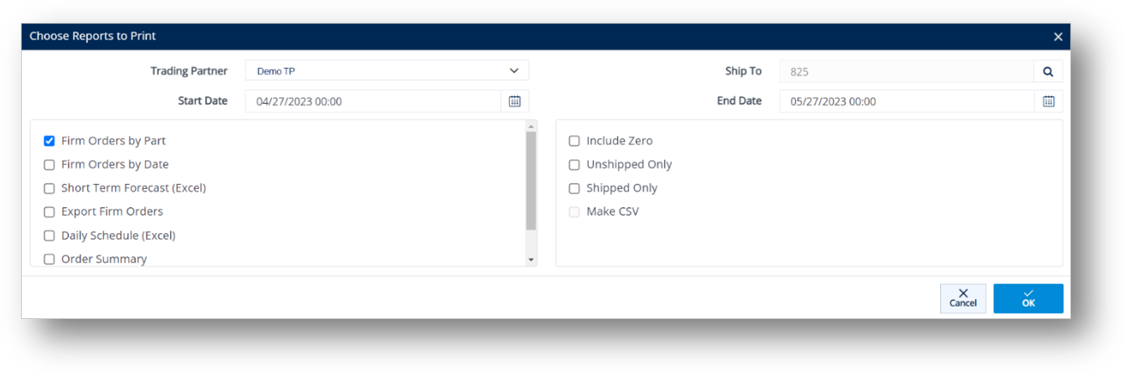
4. On the Choose Reports to Print window, do the following:
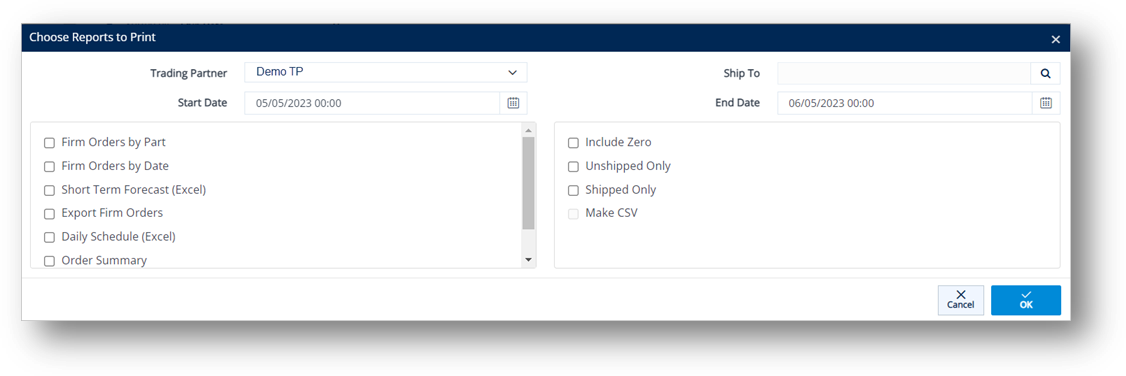
a. Select the Trading Partner in the dropdown list.
b. Select the Ship To.
i. Click the Search icon in the Ship To field.
ii. On the Browse Ship To window, choose the Ship To and click Select.
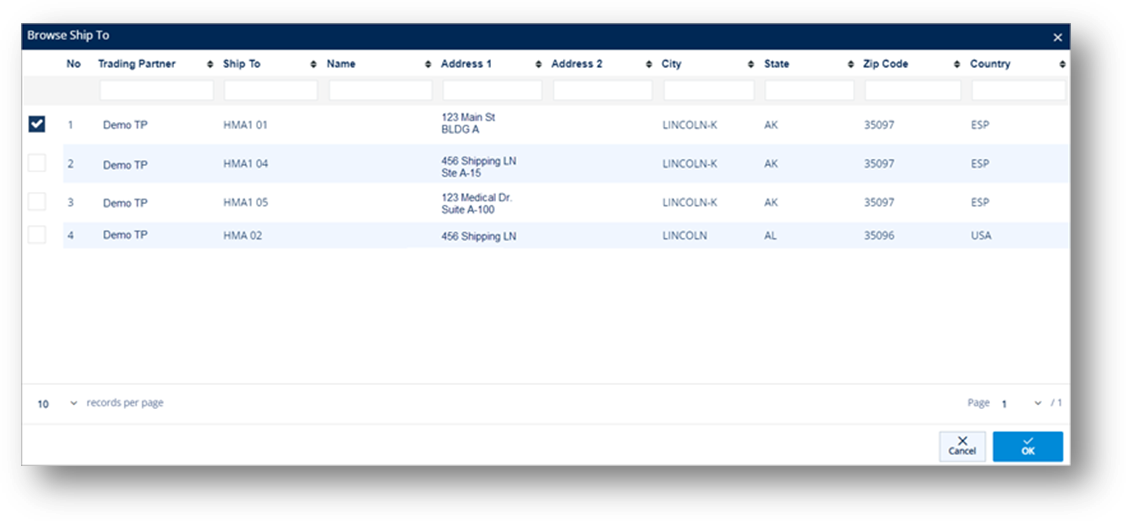
The selected Ship To is loaded.
c. Select the Start Date and End Date from the calendars.
d. In the left pane, select the reports that you want to print.
· Firm Orders by Part: Creates a report with the part numbers grouped together.
· Firm Orders by Date: Creates a report with the orders grouped by date.
· Short Term Forecast (Excel): Creates Excel-based Firm Orders.
· Export Firm Orders: Creates a .csv file with date, time, part, reference, quantity, ship to, description, and unit price.
· Daily Schedule (Excel):Exports data to Excel and includes all parts for the Trading Partner, the LineSide work center (if appropriate), and the details of each order for the date range.
· Order Summary: Prints a list of shippers with orders showing either the balance remaining, or all orders if you select the Include Zero option.
· Order Change History: Prints a report with the historical changes made to the order.
e. In the right pane, select one or more of the following options:
· Include Zero: Includes zero-quantity orders.
· Unshipped Only: Includes only unshipped orders.
· Shipped Only: Displays shipped Orders.
· Make CSV: Creates a Comma-Separated Value file for this report.
f. Click OK to print or review the report.
g. On the Print Preview message, click OK to continue.
The report is displayed accordingly.
Firm Orders are added automatically as data is received from Trading Partners. For Trading Partners that send and receive EDI, manually creating a Firm Order runs the risk of being rejected due to missing system-specific information which you may not have. If the Trading Partner sends EDI and you suspect a Firm Order should be manually added, contact the TrueAuto Support team to evaluate if inserting a Firm Order can be avoided, or if it is possible to duplicate an existing Firm Order instead.
For non-EDI Trading Partners, it may be a common occurrence to manually create Firm Orders. TrueAuto suggests that you create a master list of Firm Orders: one per part number, Ship To number, and order number.
1. On the Customer Finance menu, click Firm Orders.
2. On the Customer Firm Orders screen, click New.
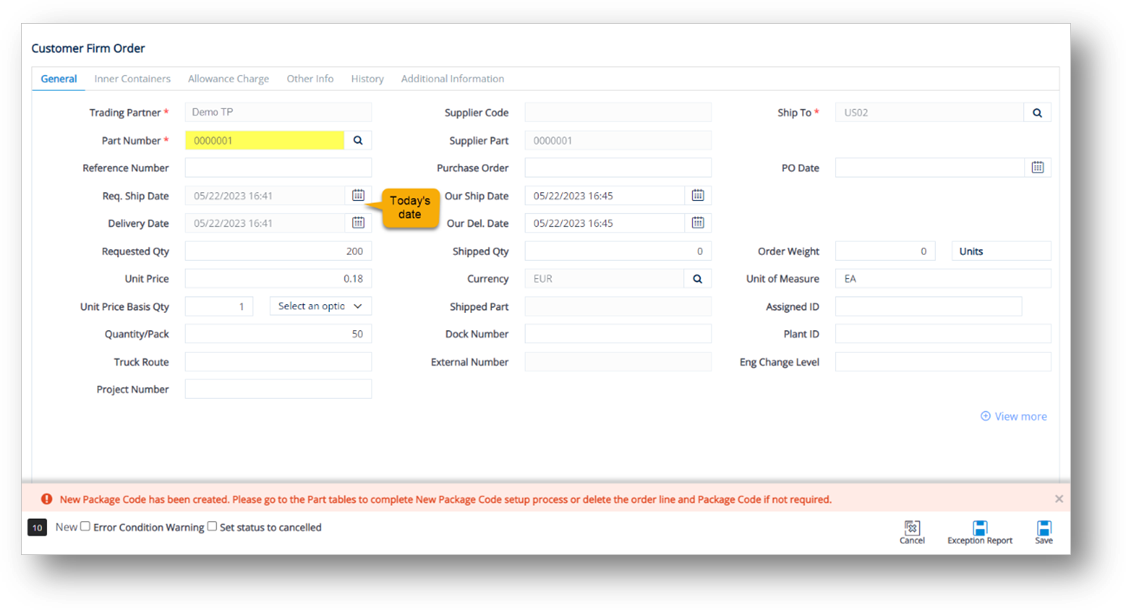
3. On the Firm Order Details screen, select the Trading Partner in the dropdown list.
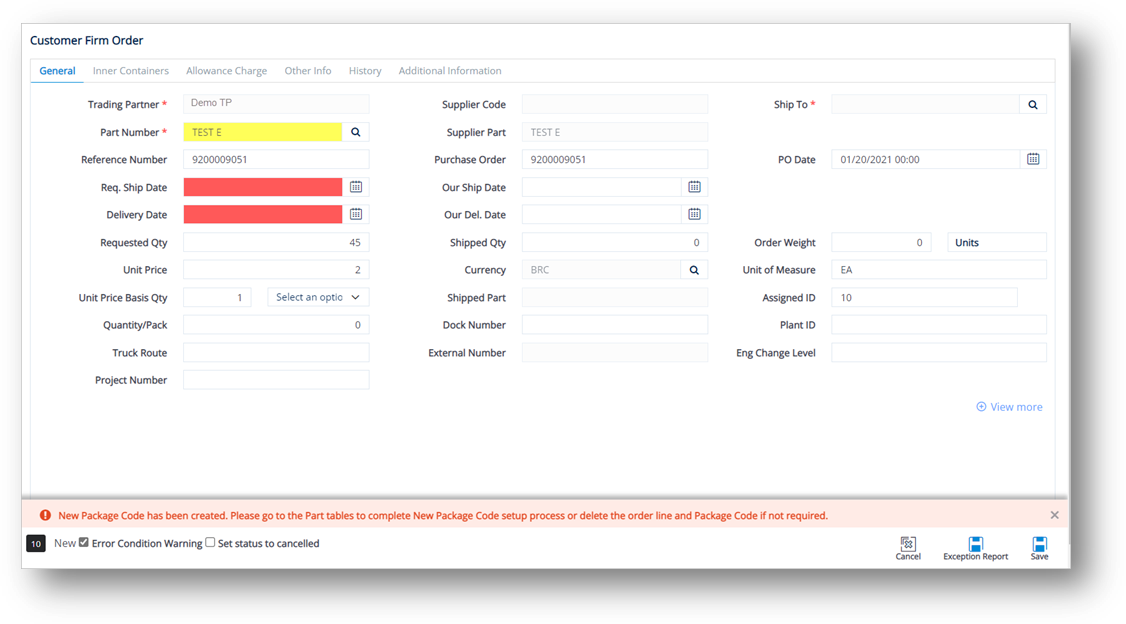
4. Fill out the details of the new Firm Order on the General tab. Use the following Field Definitions.
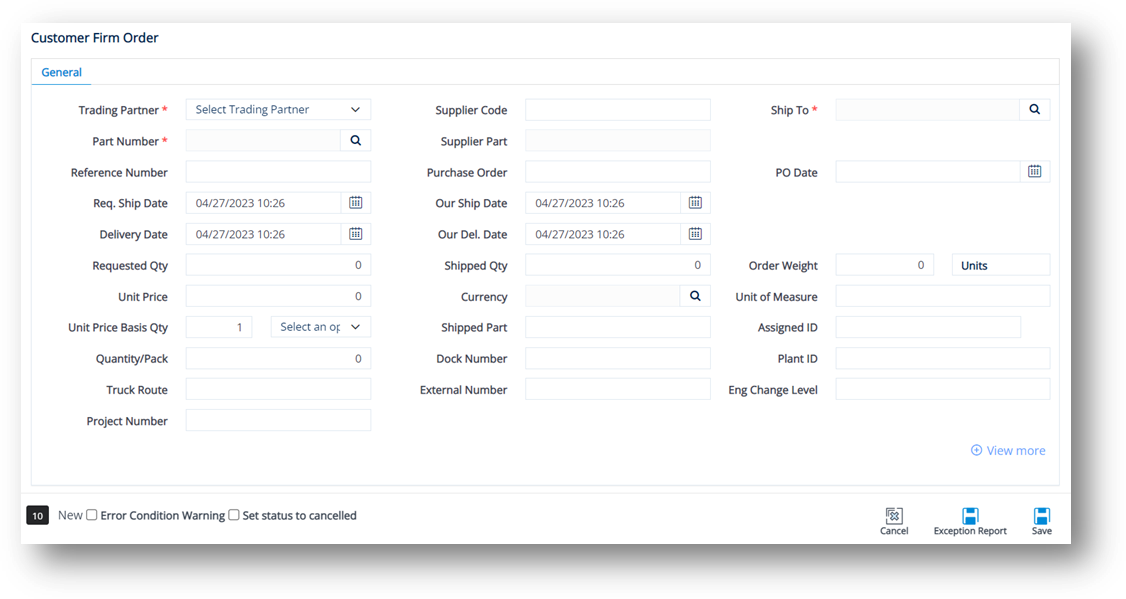
5. When you’re finished, click Save.
Field |
Definition |
Trading Partner |
The Trading Partner ID code. |
Supplier Code |
Your Supplier Code assigned by the Trading Partner. |
Ship To |
The Ship To code for the truck’s destination, found on the EDI release. |
Part Number |
The Trading Partner's requested part number, found on the EDI release. |
Supplier Part |
The supplier’s SKU or the internal part number used to cross-reference when you export to an ERP/MRP Inventory Control system. |
Reference Nbr |
The reference number from the original document if shown on the EDI release. This has multiple uses, such as identifying each line item of a PO (for example, Delivery Order Number or Ran Number). |
Purchase Order |
The document reference number for the Purchase Order. |
PO Date |
The date when the purchase order was created. |
Req. Ship Date |
The date when the Trading Partner wants the order to be shipped, found on the EDI release. |
Our Ship Date |
Your date when the order is to be shipped. |
Delivery Date |
The projected date when the parts will arrive at the Ship To location. |
Our Del. Date |
Your date when the parts will arrive at the Ship To location. |
Requested Qty |
The number of units ordered by the Trading Partner, found on the EDI release (may be in the form of Cumulative quantities). |
Shipped Qty |
The number of units shipped, or staged to ship on the Shipment (ASN). |
Order Weight |
The total weight of all units in this order. |
Unit Price |
Price of an individual piece. |
Quantity/Pack |
The number of units of a part in each shipping container. |
Unit of Measure |
The unit of measure used. |
Truck Route |
Some Trading Partners provide truck routing information. If used, this number is found on the EDI release and depending on the specifications, it may be added to the ASN’s Carrier field. |
Dock Nbr |
Larger plants may have one Ship To, but multiple receiving docks. If used, this number is found on the EDI release. |
Plant ID |
The identifier of the company. |
Eng Change Level |
The engineering/design change code for the part ordered. |
Project Nbr |
The number of the involved project. |
External Nbr |
The number connecting TrueAuto firm orders with an order from an external system. This number is automatically assigned when TrueAuto exports a release. |
Shipped Part |
The parts shipped. |
Assigned ID |
The Line Number or assigned ID for invoices and POs as shown on the EDI release. |
Part Type |
Unique identifying codes assigned to each part type if shown on the EDI release. |
Substitute Part |
The vendor replacement part or alternate part number. |
Product ID |
The Product Identifier. |
Job Sequence |
The order in which to load containers on a trailer or pack parts in a container. |
Line Feed |
The Line Feed location from the order as shown on the EDI release. |
Document |
The Document Reference Number in EDI. For example, the Document Ref. No. of the EDI 862 document is BSS02. |
Reserve LF |
The Reserve Line Feed, if any. |
Order Received |
The date when the order was received. |
Order Status |
The codes that TrueAuto uses to assign the Firm Order’s status. |
Modified By |
The user ID of the last person who saved a change to the Firm Order. |
1. On the General tab of the Firm Order Details screen, click the Search icon in the Part Number field.
2. On the Browse Parts window, choose the Part file and click Select.
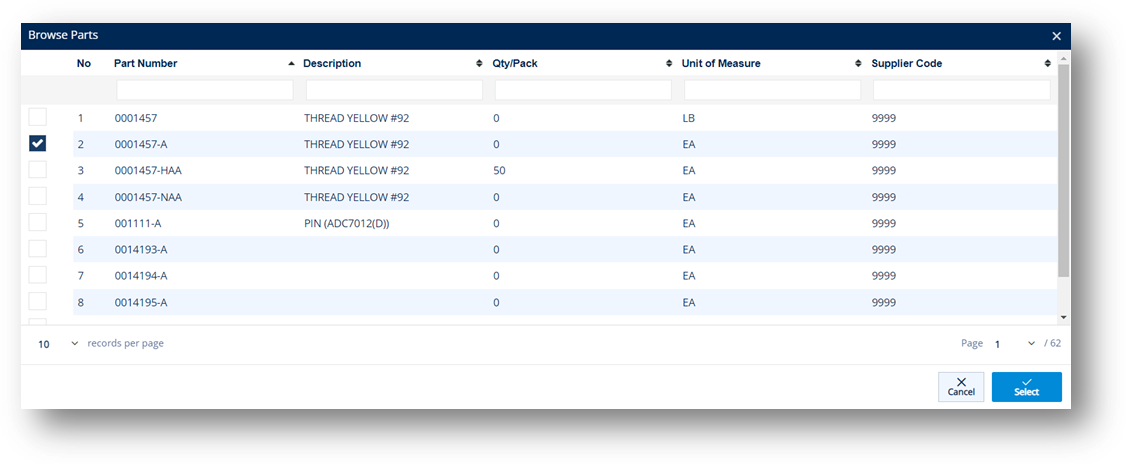
The selected part is loaded in the Part Number field on the Firm Order Detail screen.
1. Click the Search icon in the Ship To field.
2. On the Browse Ship To window, choose the Ship To and click Select.
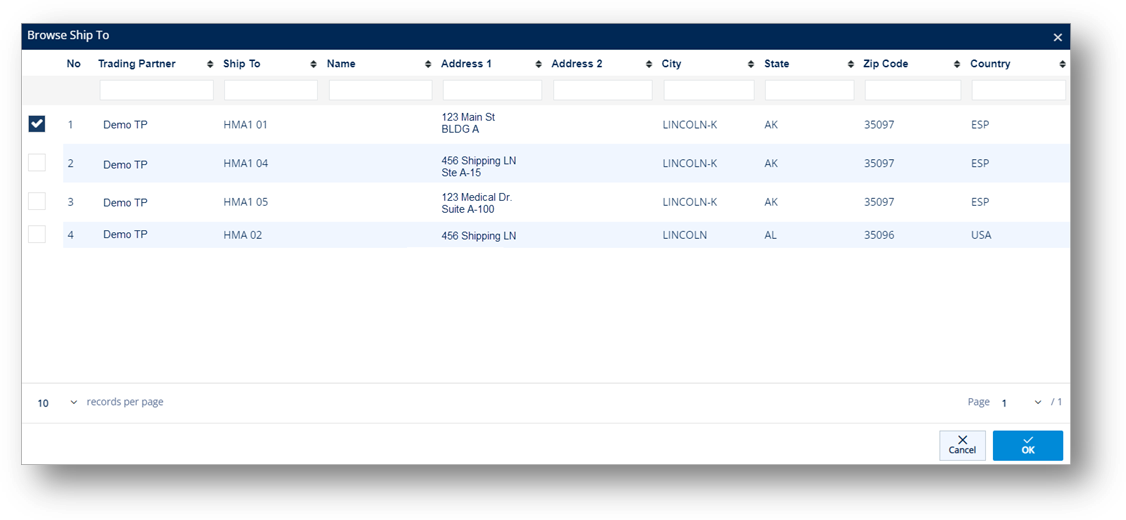
The selected Ship To is loaded in the Ship To field on the Firm Order Detail screen.
1. Click the Search icon in the Currency field.
2. On the Select Currency Code window, choose the Currency and click Select.
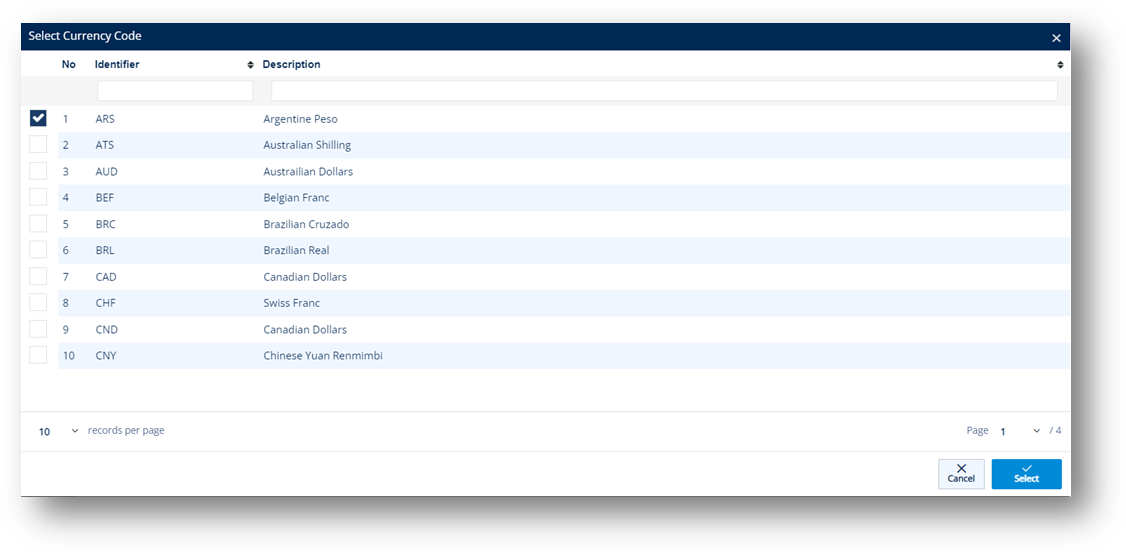
The selected Currency is loaded in the Currency field on the Firm Order Detail screen.
1. On the Customer Finance menu, click Firm Orders.
2. On the Customer Firm Orders screen, do one of the following:

|
NOTE You can also use information from the Planning file (Customer Demand Management > Forecast) as a source for this duplication. Sometimes a Trading Partner will want you to ship against a planned or forecasted order, even though it was not sent as a Firm Order using EDI. |
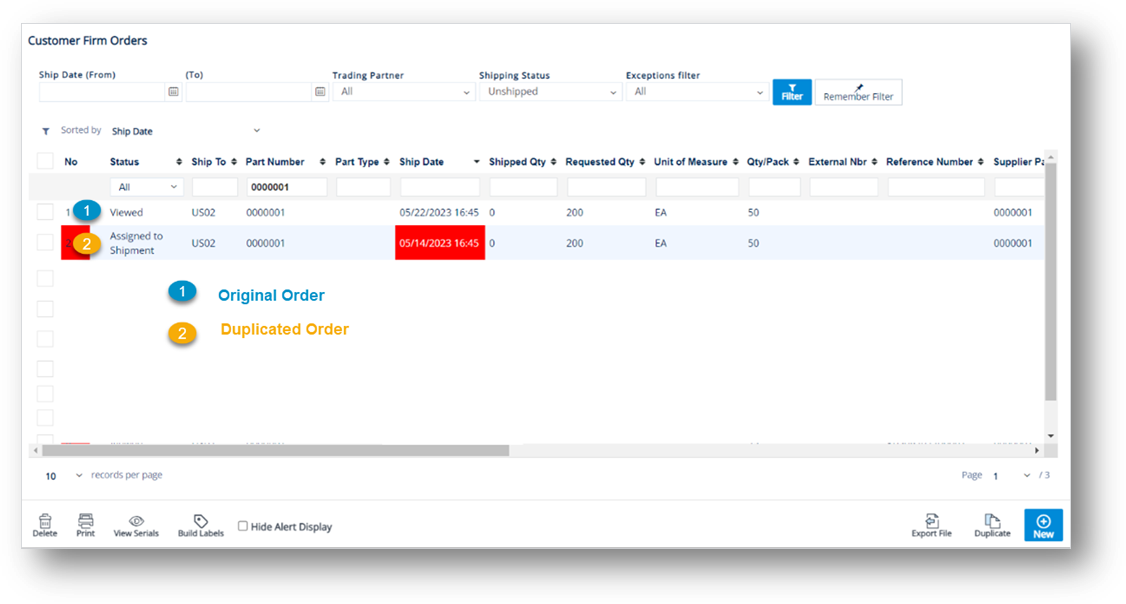
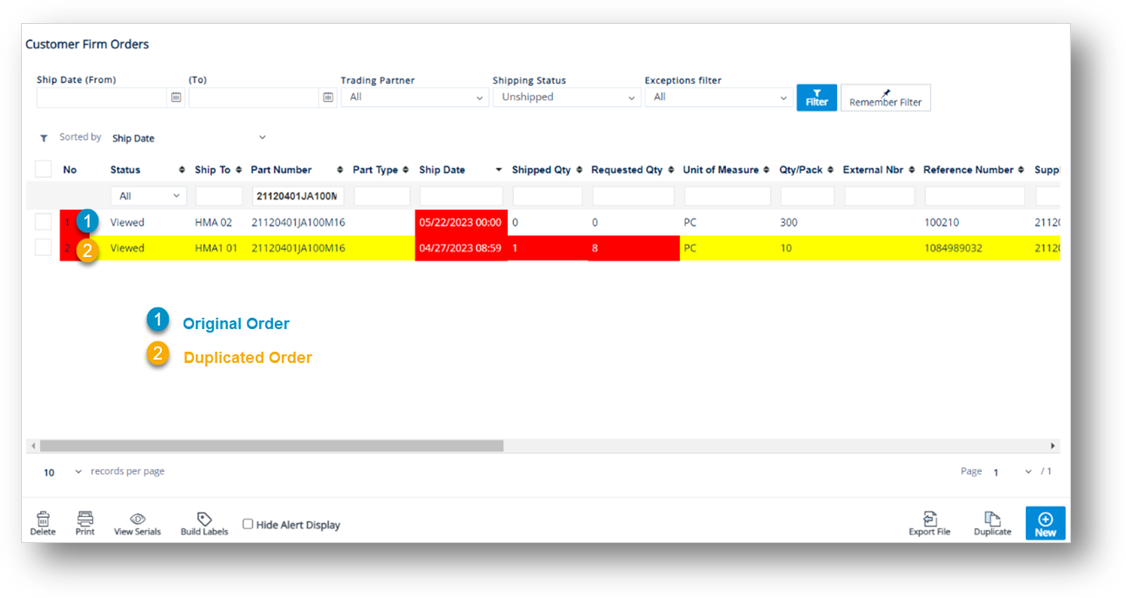
· To duplicate a Firm Order: Select the order that you want to duplicate, click the Duplicate button, and then choose the Highlighted Firm Orders option.
a. On the confirmation message, click OK.
b. On the Customer Firm Order window, make changes as needed for the duplicated order.
|
NOTE · The only change made is that the Ship Dates and Delivery Dates are set to today’s date. · You are only able to modify editable fields, such as Reference Number, Purchase Order, Requested Qty, Shipped Qty, Order Weight, etc. · The default fields cannot be changed. |
c. When you’re finished, click Save.
The Firm Order is duplicated.
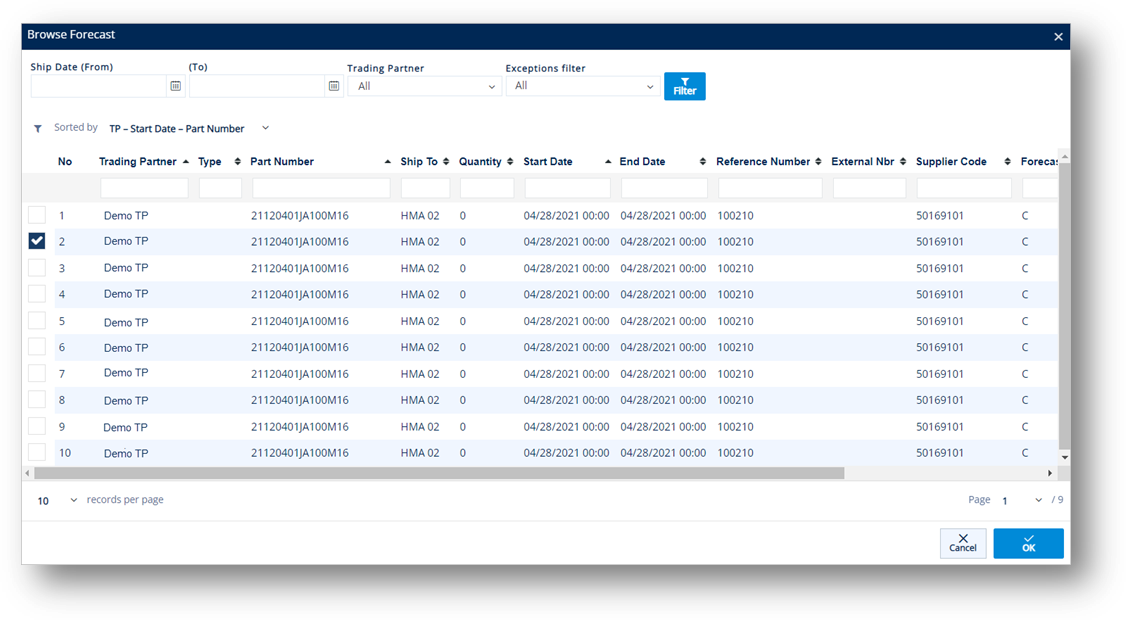
· To duplicate a Planning Order: Click the Duplicate button, and then choose the Select Planning Orders option.
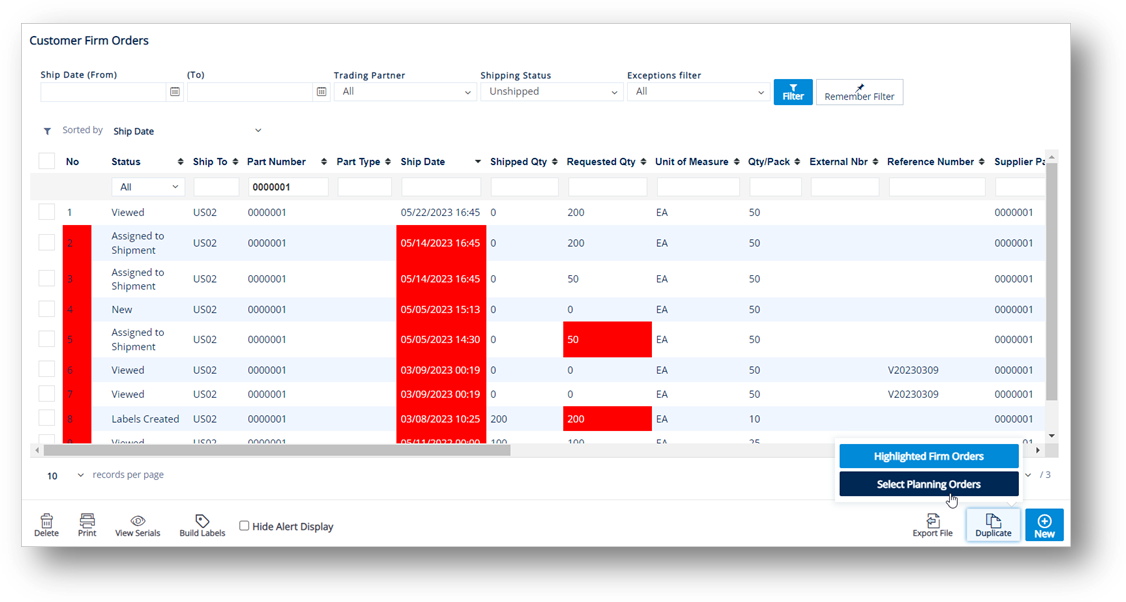
a. On the Browse Forecast window, choose the planned orders for this Trading Partner.
b. Click OK.
c. On the confirmation message, click OK.
d. On the Customer Firm Order window, make changes as needed for the planned order.
|
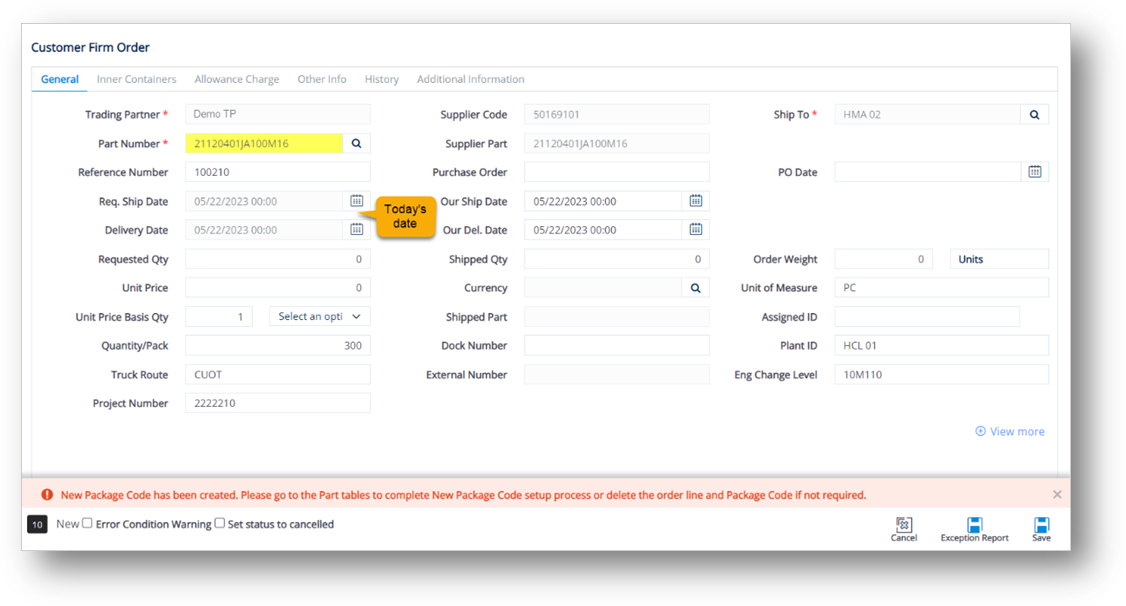
NOTE · The only change made is that the Ship Dates and Delivery Dates are set to today’s date. · You are only able to modify editable fields, such as Requested Qty, Shipped Qty, Order Weight, Quantity/Pack, etc. · The default fields cannot be changed. · The time period between the Our Ship Date and Our Delivery Date will be copied from the original order to the duplicated order. In the example screenshot above, the time period is 15 hours. |
e. When you’re finished, click Save.
The Firm Order is duplicated.
Only delete Firm Orders that are definitely no longer scheduled to ship. Deleting live orders will result in missed shipments.
1. On the Customer Finance menu, click Firm Orders.
2. On the Customer Firm Orders screen, select the order that you want to remove, and then click the Delete icon.
3. On the confirmation message, click OK.
1. On the Customer Finance menu, click Firm Orders.
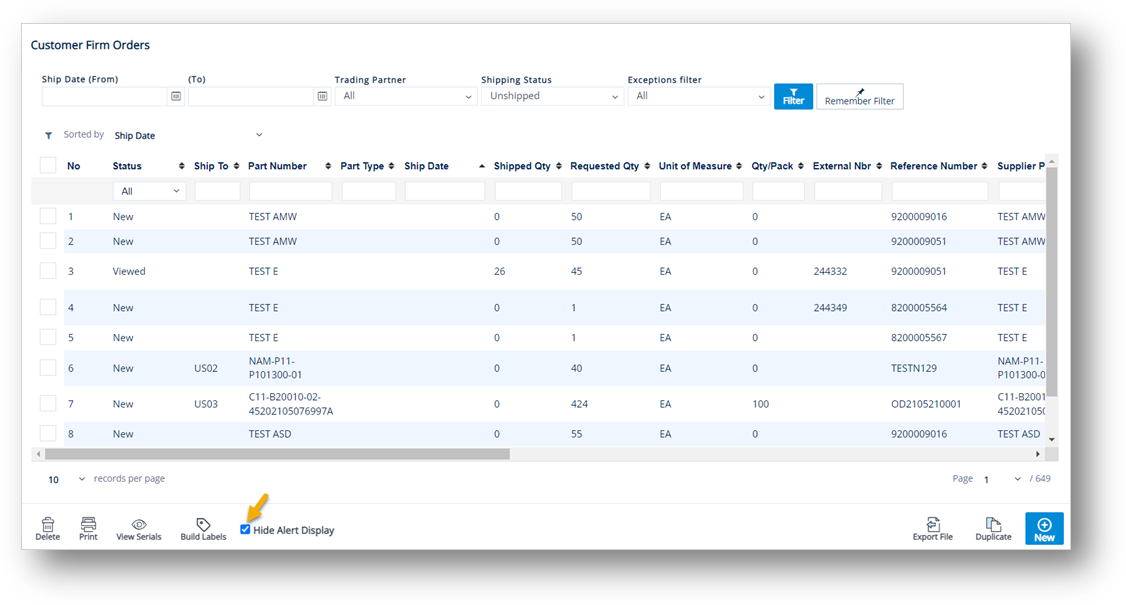
2. On the Customer Firm Orders screen, select the Hide Alert Display checkbox.
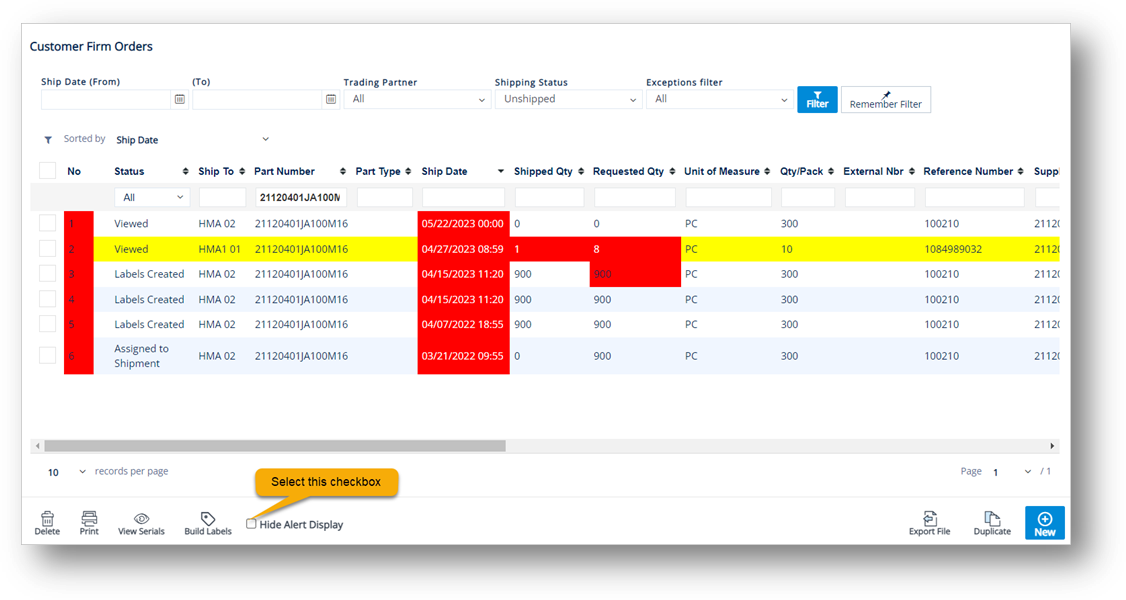
The color statuses (Red & Yellow) will be hidden.
An EDI Invoice, known in X12 as an 810 and in EDIFACT as an INVOIC, can be created in TrueAuto if that Trading Partner has an 810 Outgoing Form. If your Trading Partner does not require EDI invoices, you may still use TrueAuto’s invoices for traceability or paperwork.
1. On the Customer Finance menu, click Invoices.
2. On the Customer Invoices screen, click the invoice that you want to view.

3. On the Customer Invoice screen, select the General, Terms, Allowance Charge, Details, or Other Info tabs to view the corresponding details.
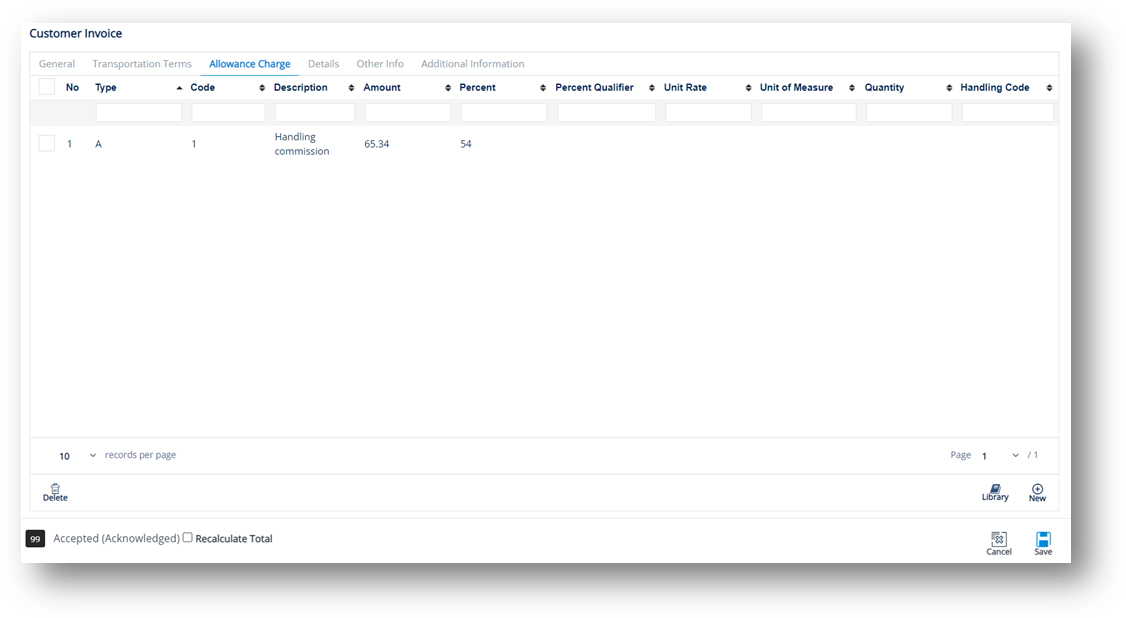
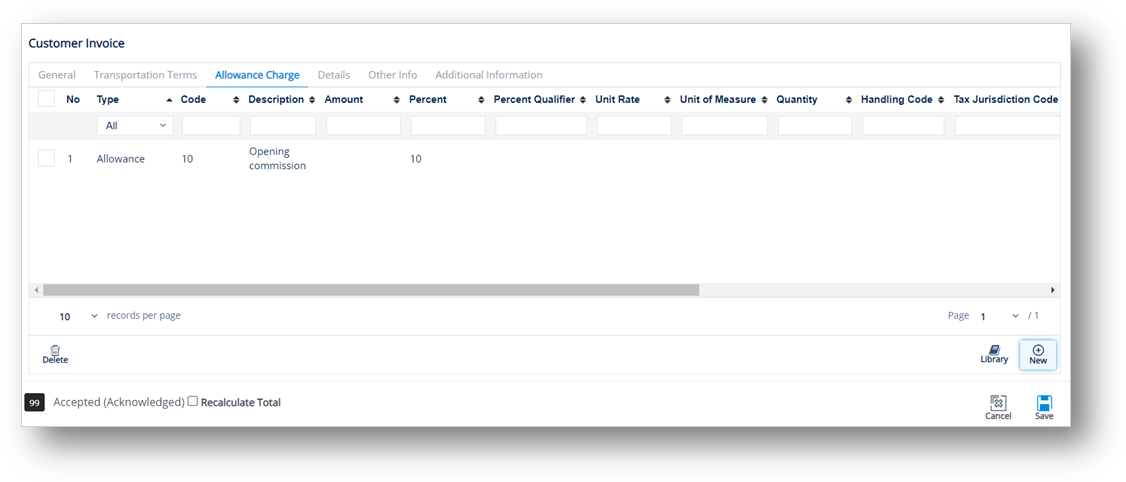
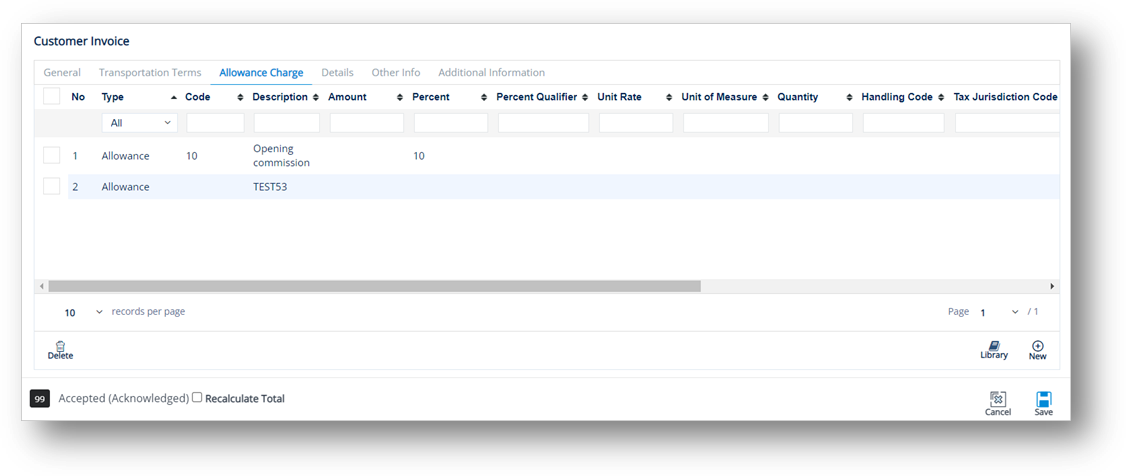
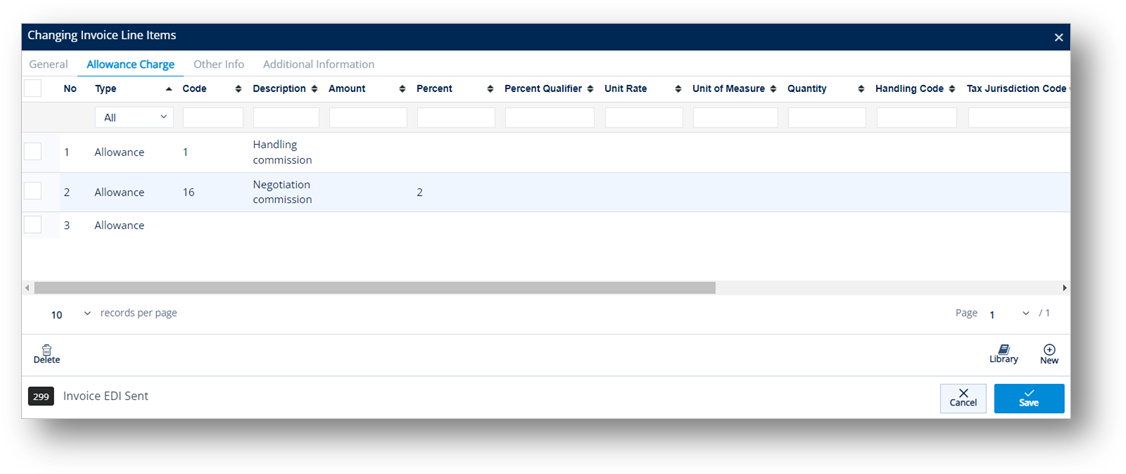
1. On the Customer Invoice screen, switch to the Allowance Charge tab.
2. On the Allowance Charge tab, click New.
3. On the Adding Allowance Charge Line Items window, do the following:
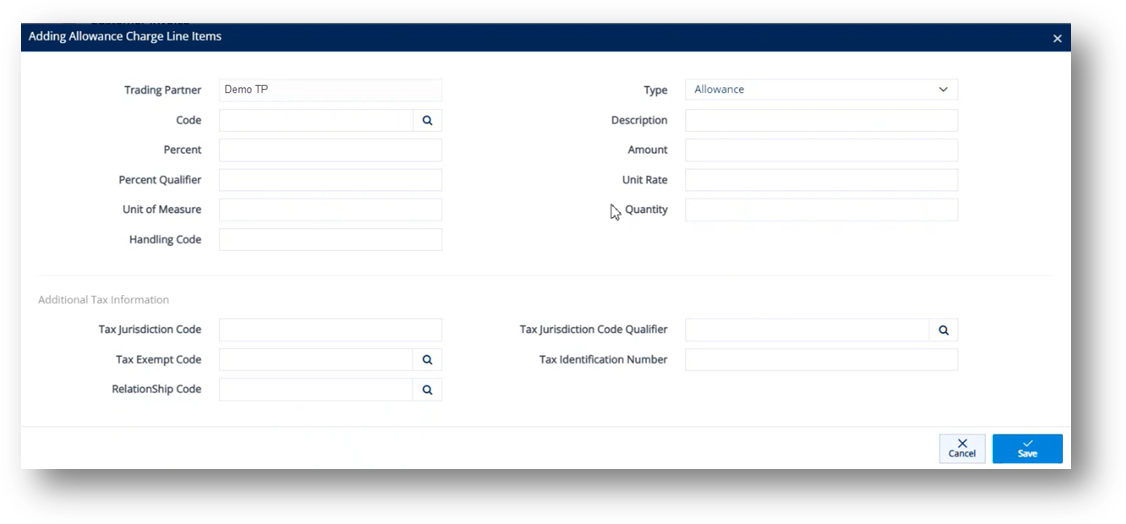
a. Select a Code.
i. Click the Search icon in the Code field.
ii. On the Select Allowance Code window, select the Allowance or Charge Code.
iii. Click Select.
The selected Allowance or Charge Code is loaded in the Code field.
Note You can add more allowance or charge options to the Code dropdown list by referring to steps in Cross Reference Library.
b. Enter the Percent.
c. Select Allowance or Charge in the Type dropdown list.
d. Enter the Description.
e. Enter the Amount.
4. Scroll down to the Additional Tax Information section, and do the following:
a. Enter the Tax Jurisdiction Code.
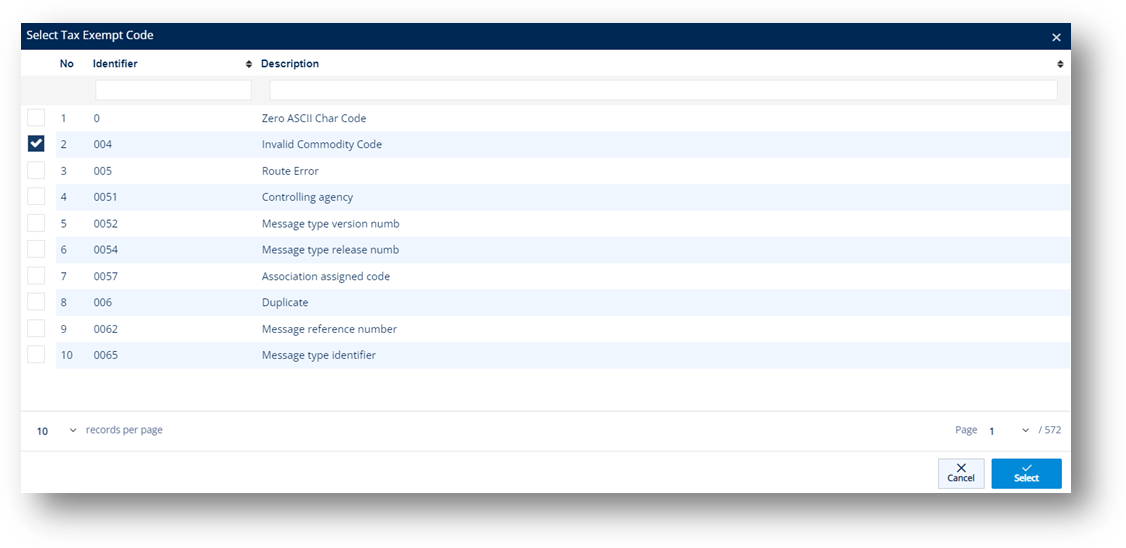
b. Select the Tax Exempt Code.
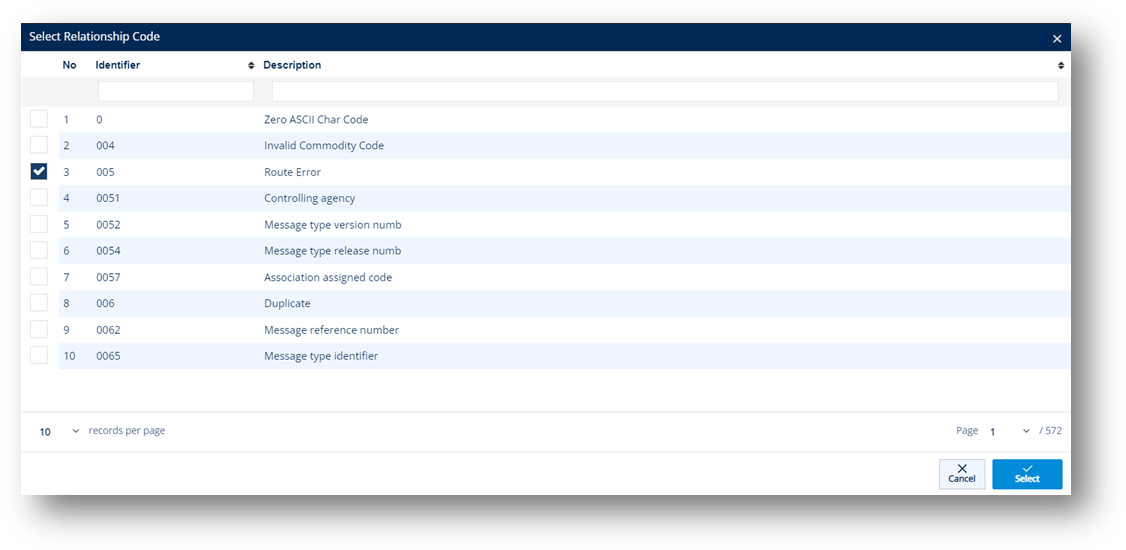
c. Select the Relationship Code.
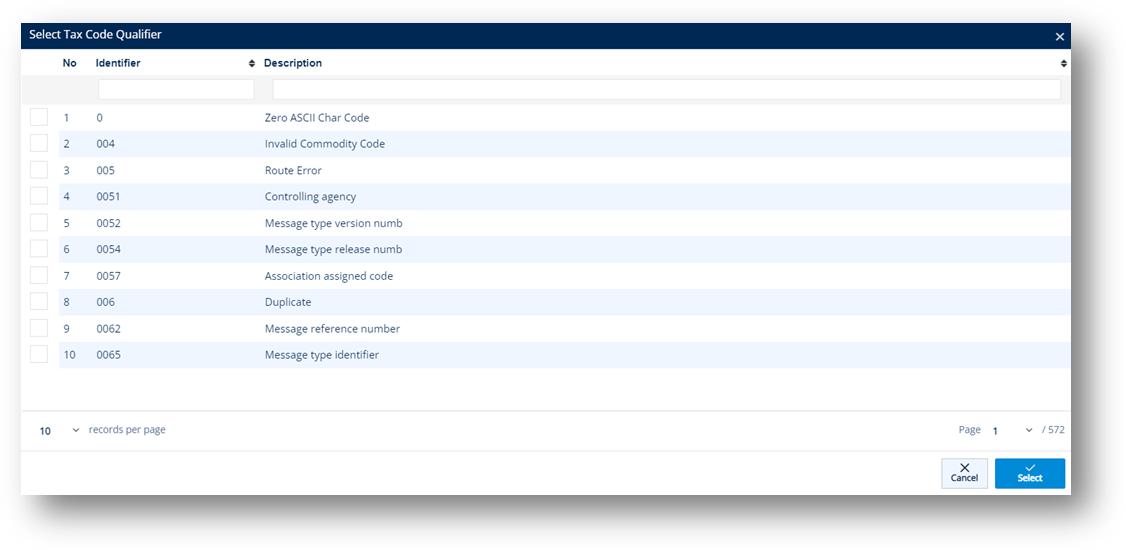
d. Select the Tax Jurisdiction Code Qualifier.
e. Enter the Tax Identification Number.
5. Click Save.
A new Allowance or Charge is added to the Invoice.
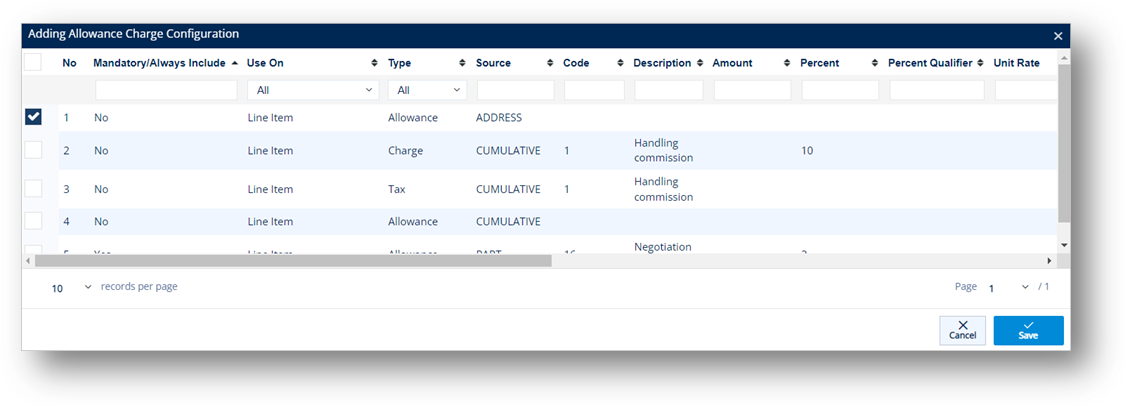
With the Library feature, you can assign a configured Allowance or Charge that is saved in the Library, to an Invoice. These configured records are set up in Trading Partner Parts, Ship To Cumulatives, and Addresses.
|
IMPORTANT NOTE If Ship To Cumulatives, Trading Partner Parts, and Addresses whose Allowances or Charges have similar Types and Codes, only one record is available in the list based on the order of precedence of Ship To Cumulatives > Trading Partner Parts > Addresses. For example: If a Ship To Cumulative record and an Address record whose Allowance or Charge has the same Type = A, same Code = 1, only the Ship to Cumulative record is displayed in the list. |
For this case, the Allowance or Charge record will be saved in Invoices > Allowance Charge.
1. On the Customer Invoice screen, switch to the Allowance Charge tab.
2. On the Allowance Charge tab, click the Library button.

3. On the Adding Allowance Charge Configuration window, select the Allowance or Charge you want to use.

4. Click Save.
The Allowance or Charge is added to the Invoice.
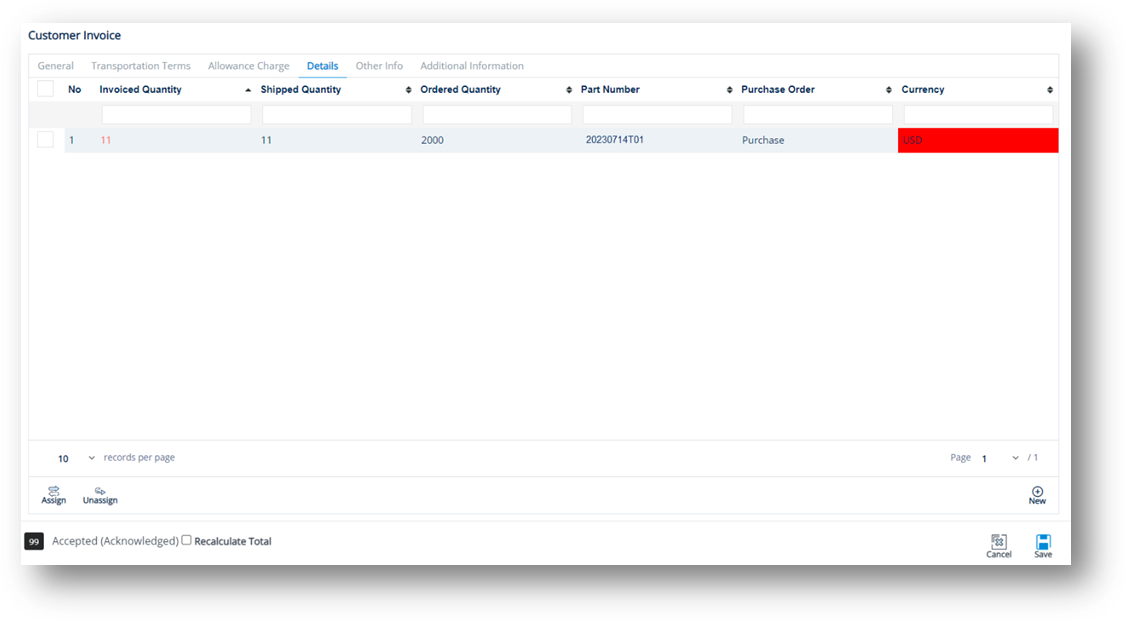
In this case, the Allowance or Charge record will be saved in Invoices > Details > Allowance Charge.
1. On the Customer Invoice screen, switch to the Details tab.
2. On the Details tab, click the Invoice that you want to view.
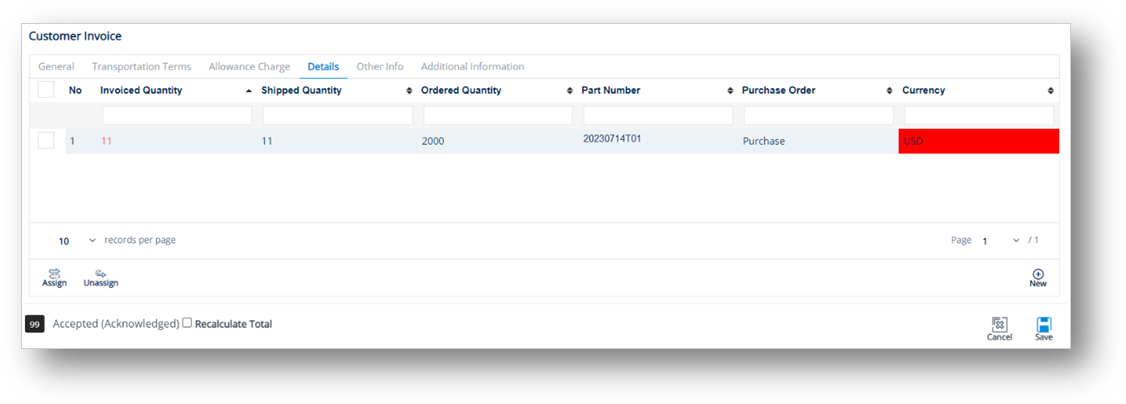
3. On the Changing Invoice Line Items window, switch to the Allowance Charge tab, and then click the Library button.
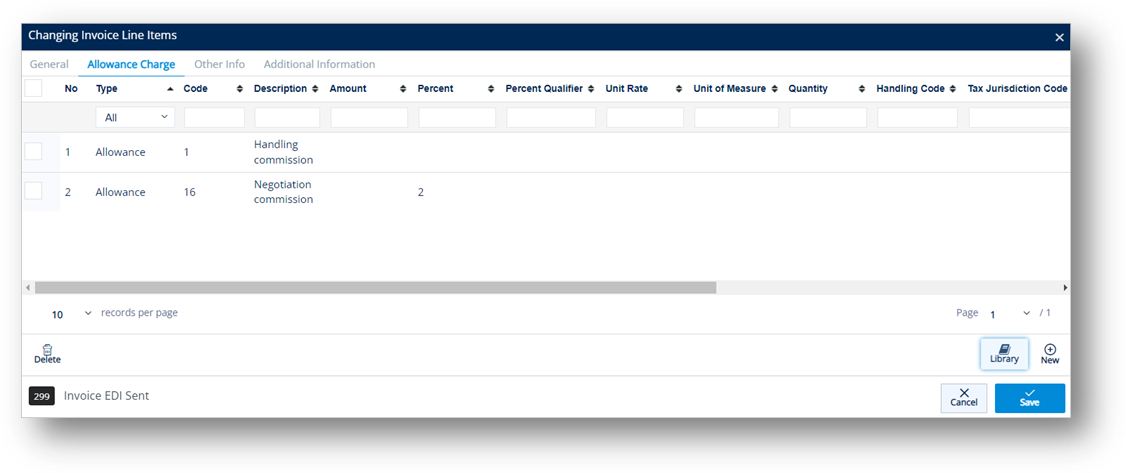
4. On the Adding Allowance Charge Configuration window, select the Allowance or Charge that you want to use.
Note For more details, refer to the Important Note mentioned above.
5. Click Save.
The Allowance or Charge is added to the Invoice.
This section describes the steps on how the Amount field on the Customer Invoice screen is automatically calculated, as follows:
Amount = The Total Sum of Line Items Amount + Sum of Allowance Charge Header + Tax Amount
TIP For more information, refer to:
1. Total Sum of Line Items Amount
2. Sum of Allowance Charge Header
3. Tax Amount
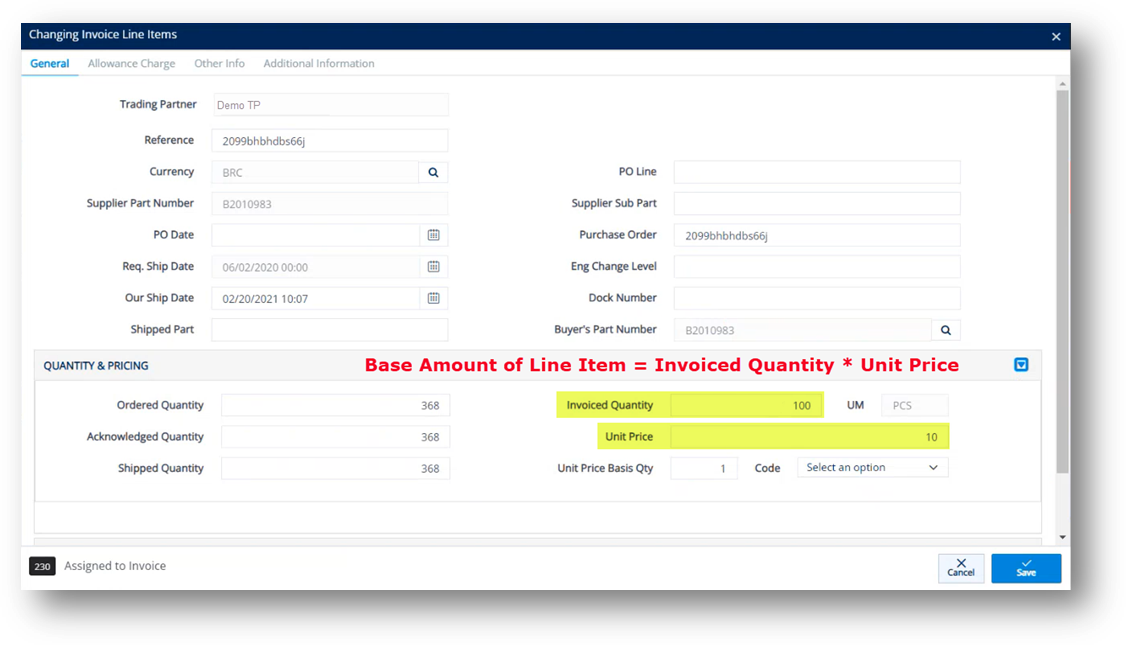
The Total Sum of Line Items Amount = the Sum of (Base Amount of Line Item +/- Amount of Allowance Charge Line Items)
· Base Amount of Line Item = Invoiced Quantity * Unit Price
· Amount of Allowance Charge Line Items
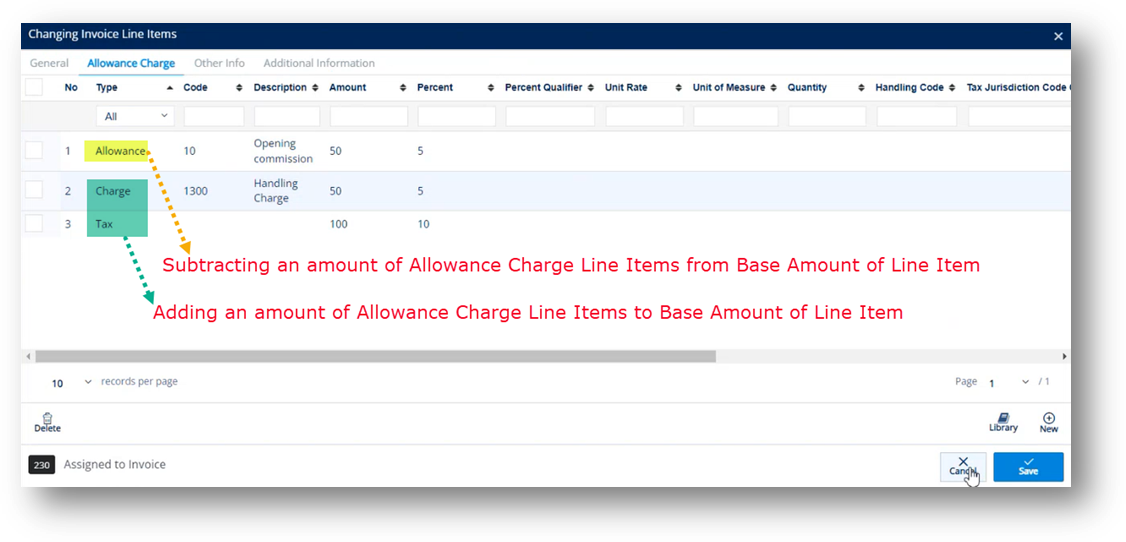
Adding/Subtracting the amount of Allowance Charge Line Items to/from Base Amount of Line Item will be decided by Type.
- Allowance: Subtracting the amount of Allowance Charge Line Items from the Base Amount of Line Item.
- Charge and Tax: Adding the amount of Allowance Charge Line Items to the Base Amount of Line Item.
There are 2 cases:
1) If the Type and Code fields in Allowance Charge Header are similar to the ones in Allowance Charge Line Item, the Amount of Allowance Charge Header will be skipped (NOT added to the Total Invoice Amount).
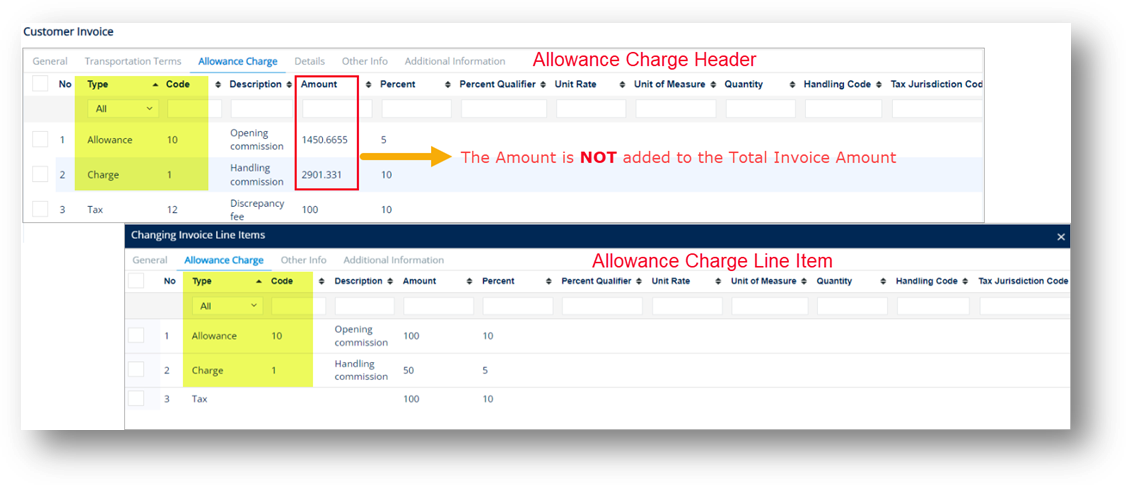
2) If the Type and Code fields in Allowance Charge Header are different from the ones in Allowance Charge Line Item, the Amount of Allowance Charge Header will be added to the Total Invoice Amount.
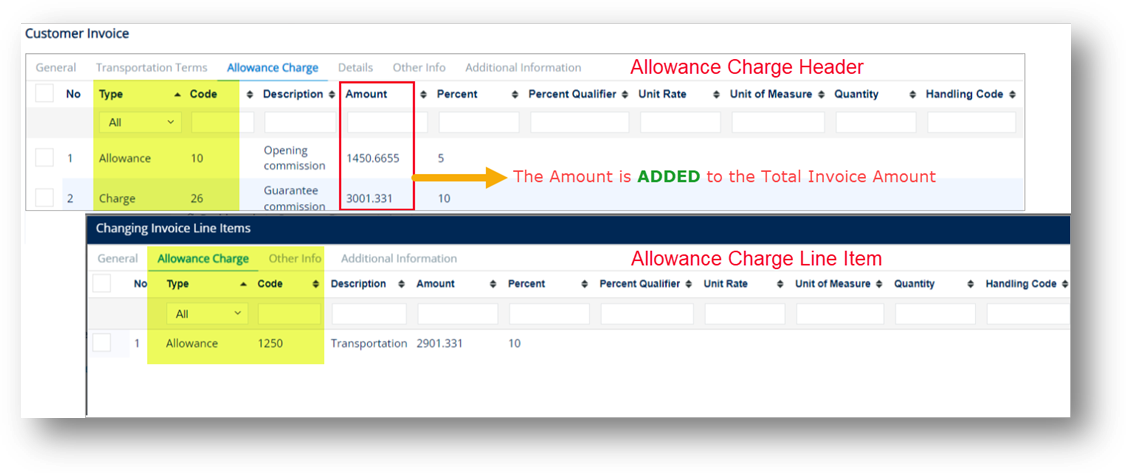
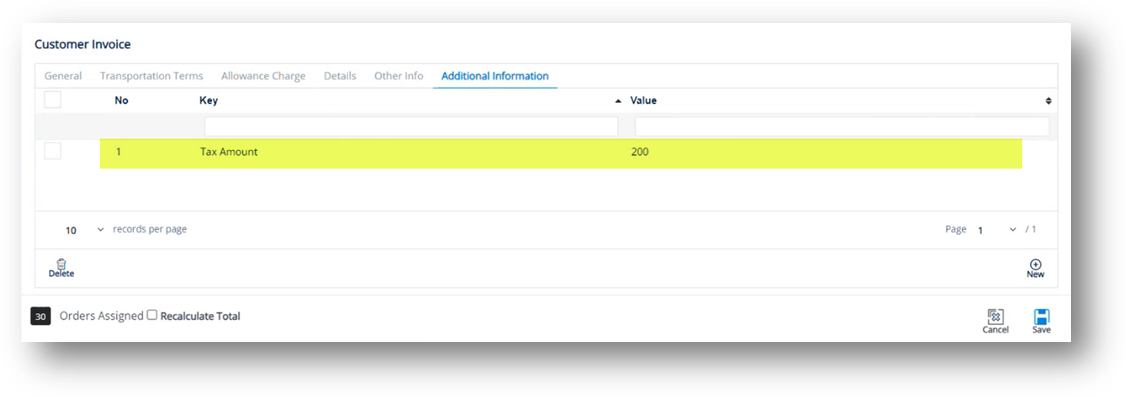
The Tax Amount field will also be checked. If there is a value in this field, the Tax Amount field will be added to the Total Invoice Amount.
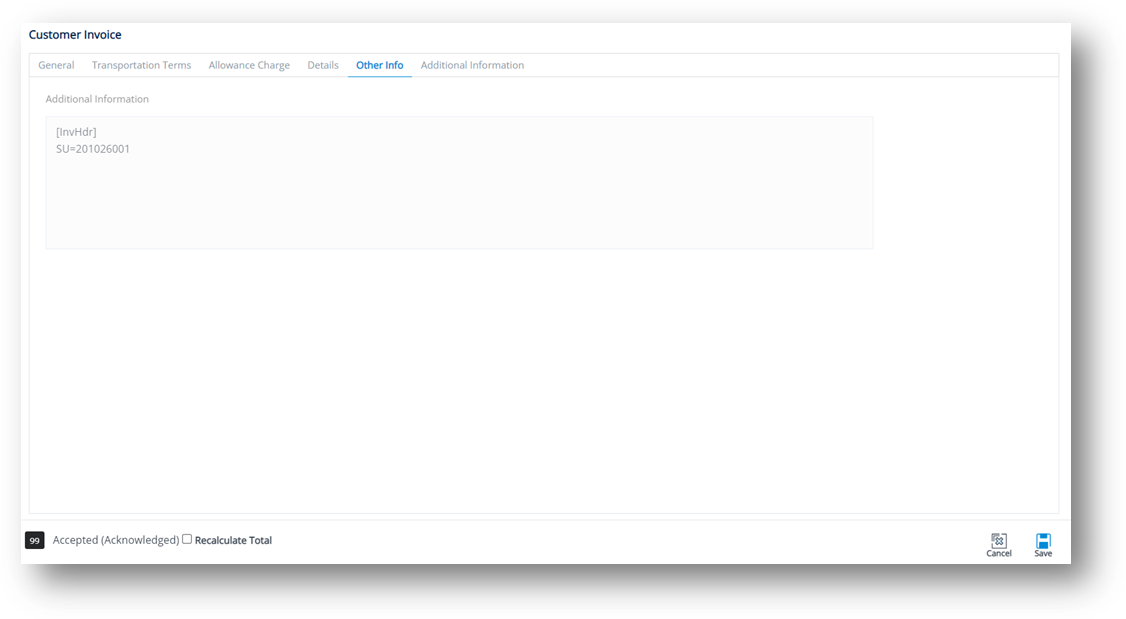
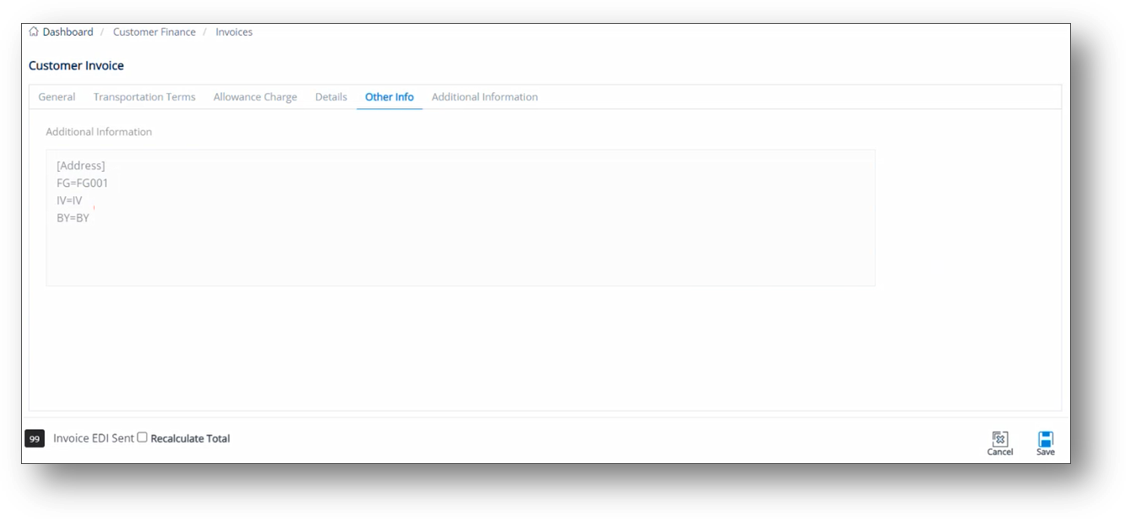
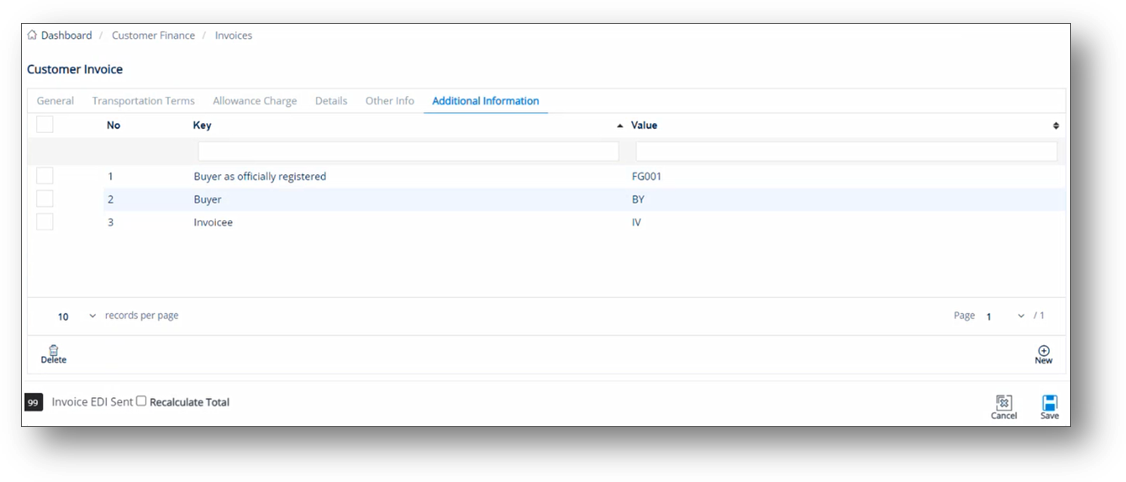
An invoice includes several types of addresses such as Ship To, Ship From, Remit To Code, and Bill To. Apart from these standard fields, the additional invoice addresses are taken from incoming documents to the Other Info tab.
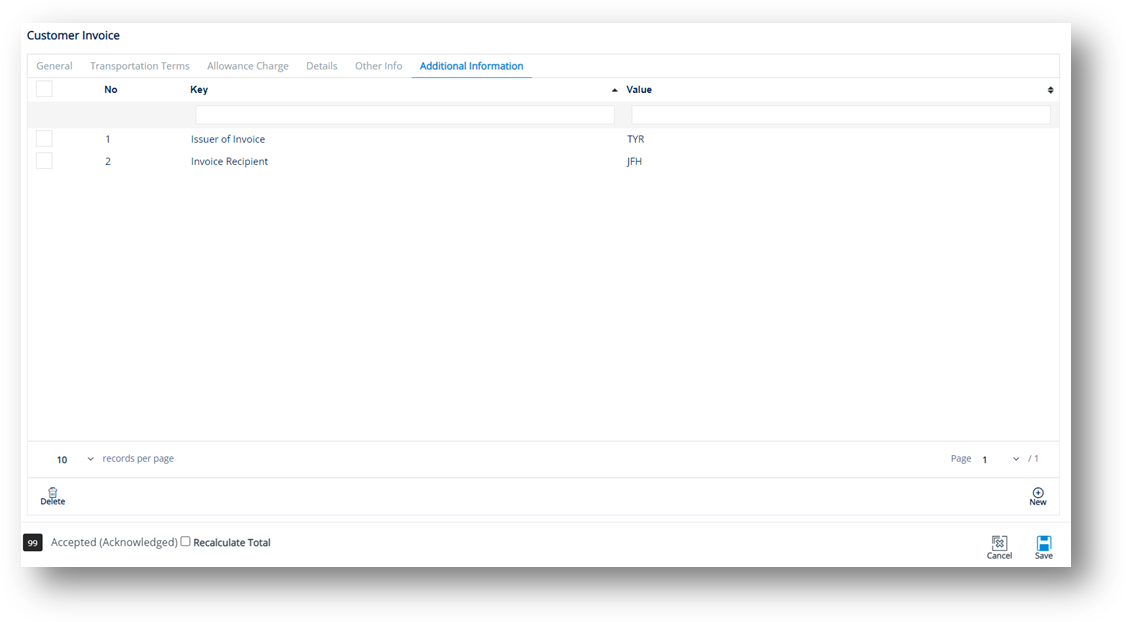
While the imported data on the Other Info tab is read-only, the corresponding data on the Additional Information tab can be customized. The Codes (such as FG, IV, and BY) on the Other Info tab can be converted into editable Keys on the Additional Information tab right after being imported successfully into the system.
Example:
Code Type on the Other Info tab |
Key imported into the Additional Information tab |
FG |
Buyer, as officially registered. |
IV |
Invoicee (recipient of the invoice). |
BY |
Buyer. |
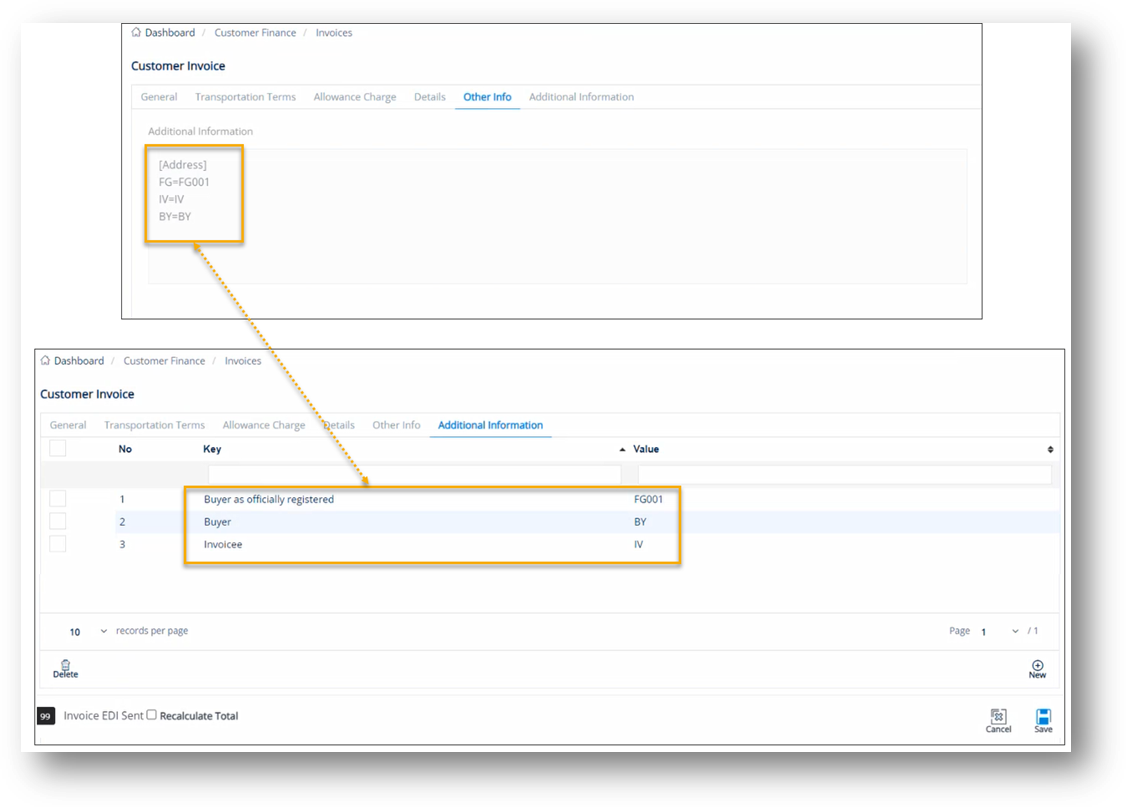
1. On the Customer Invoice screen, click the Other Info tab to view the imported additional invoice addresses, which are in read-only mode.
2. Next, switch to the Additional Information tab. You will see that the additional invoice addresses are automatically converted into editable Keys.
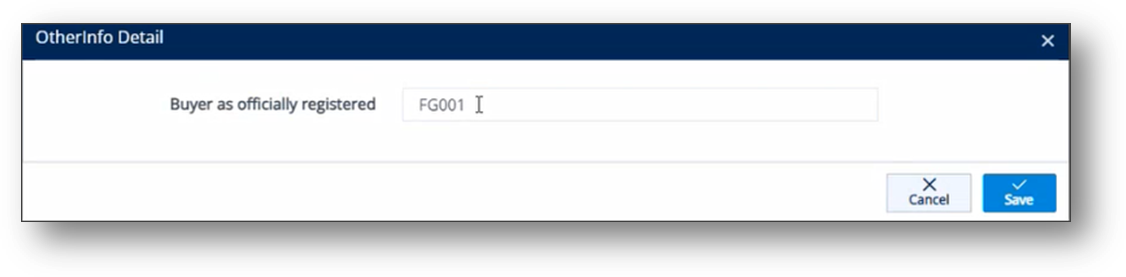
3. Open the record that you want to modify.
4. On the next window, change the value in the box, and then click Save.
Before:
After:
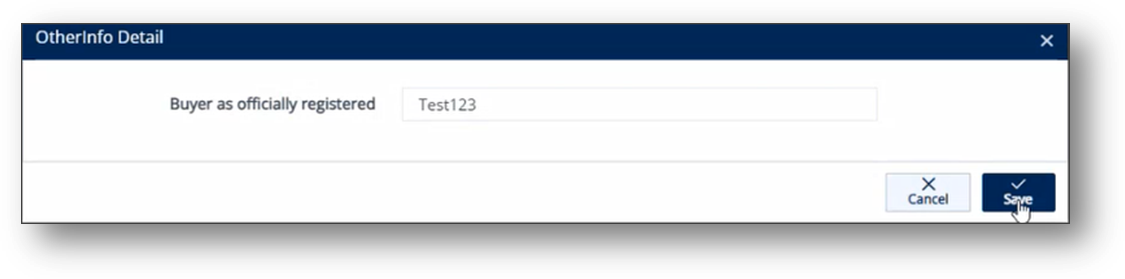
The Value is updated.
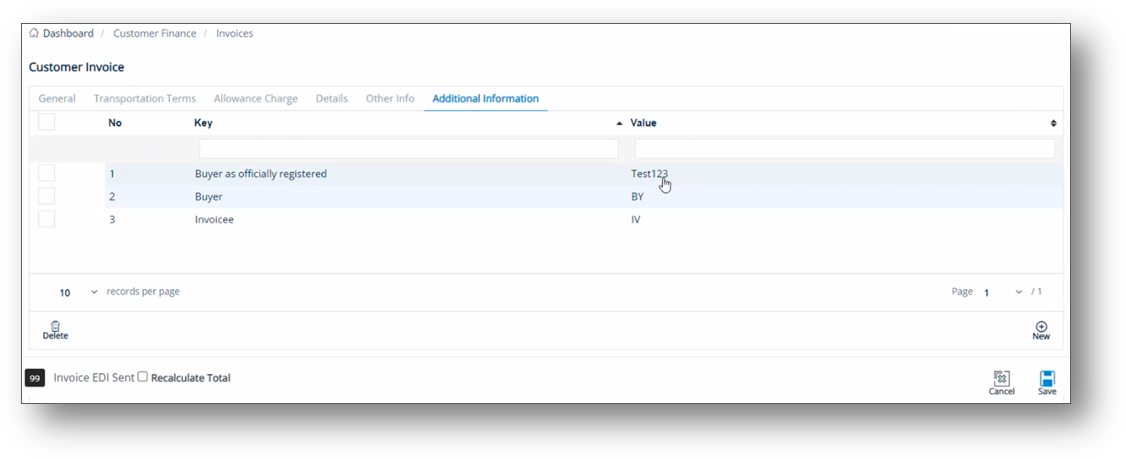
5. Click Save to save the changes to the invoice.
|
NOTE § On the Additional Information tab, the Address Value corresponds to an Address Code in TrueAuto. See the examples below: - FG001 Value corresponds to the “FG001” Address Code.
- Test123 Value corresponds to the “Test123” Address Code.
§ For the details of the Address Value on the Additional Information tab, refer to the Settings > Addresses menu. If the Address Code has NOT been set up, the exported invoice will have “null” data for that Address. |
1. On the Customer Finance menu, click Invoices.
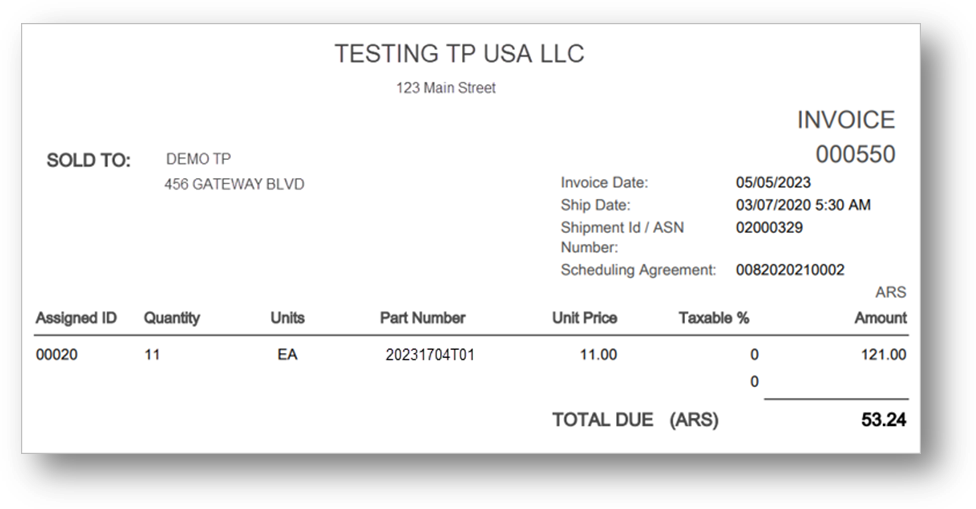
2. On the Customer Invoices screen, select the invoice, and then click the Print Detail button.
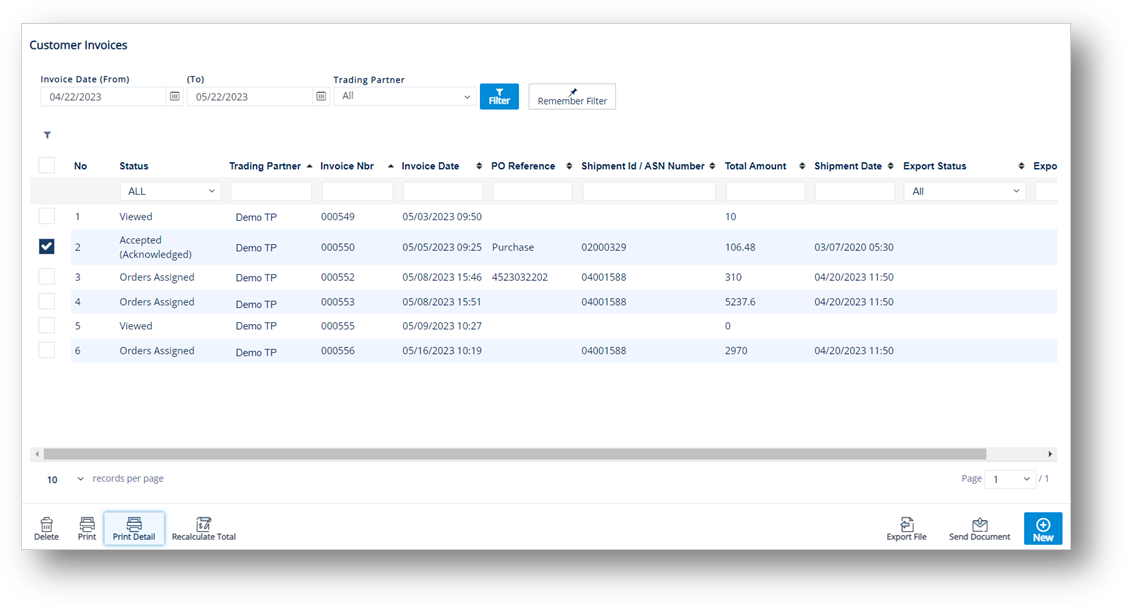
The Invoice report is displayed.
1. On the Customer Finance menu, click Invoices.
2. On the Customer Invoices screen, select the invoice, and then click the Recalculate Total button.

3. On the confirmation window, click OK.
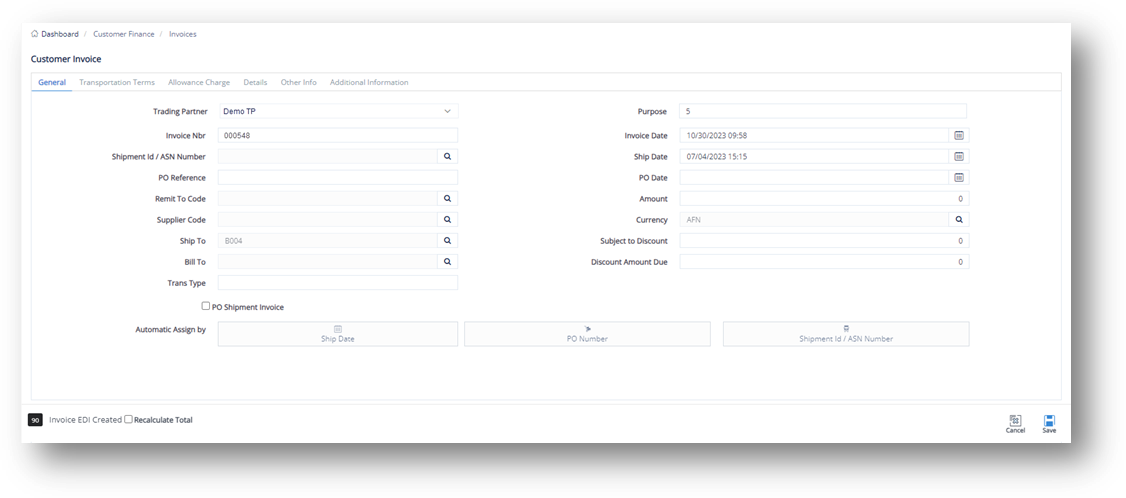
1. On the Customer Finance menu, click Invoices.
2. On the Customer Invoices screen, click New.
3. On the Customer Invoice screen, fill out the form. Use the following Field Definitions.
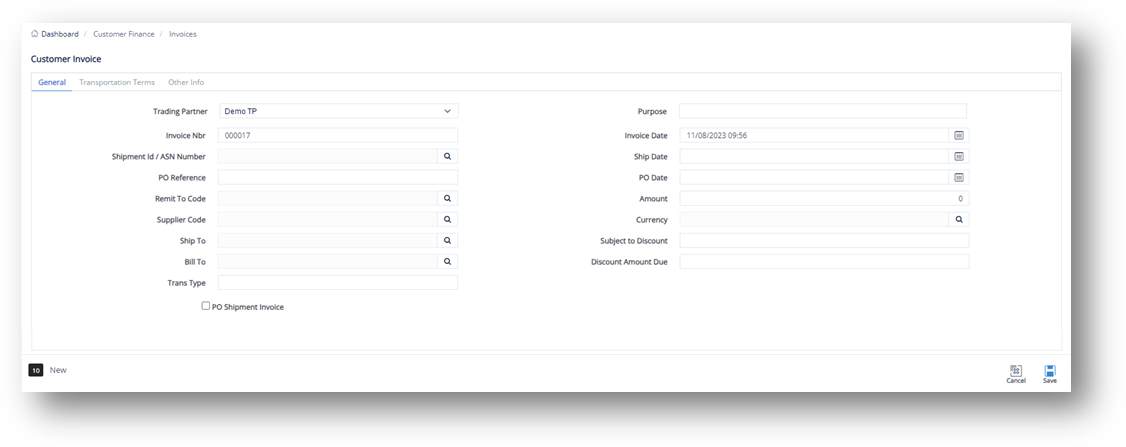
4. When you’re finished, click Save.
Field |
Definition |
Trading Partner |
The Trading Partner code. |
Purpose |
Indicates the invoice’s purpose code. |
Invoice Nbr |
The invoice number. |
Invoice Date |
The date when the invoice was generated. |
Shipment Id |
The ASN number. |
Ship Date |
The date when the order was shipped. |
PO Reference |
The purchase order record. |
PO Date |
The date when the purchase order was created. |
Remit to Code |
The address code for remittance. |
Amount |
This field is calculated from the Line Item totals. |
Supplier Code |
The Supplier Code assigned by the Trading Partner. |
Currency |
The currency code. |
Ship To |
The Ship To code representing the customer’s address. |
Bill To |
The Bill To code representing the recipient’s address. |
Subject to Discount |
The amount on the invoice on which a discount will be applied. |
Trans Type |
The type of transaction (850, 855, or 860). |
Discount Amount Due |
The percentage amount of the discount that is due. |
PO Shipment Invoice |
Indicator if this invoice is for a PO shipment. |
Life Cycle |
This field is for internal processing and should never be changed. |
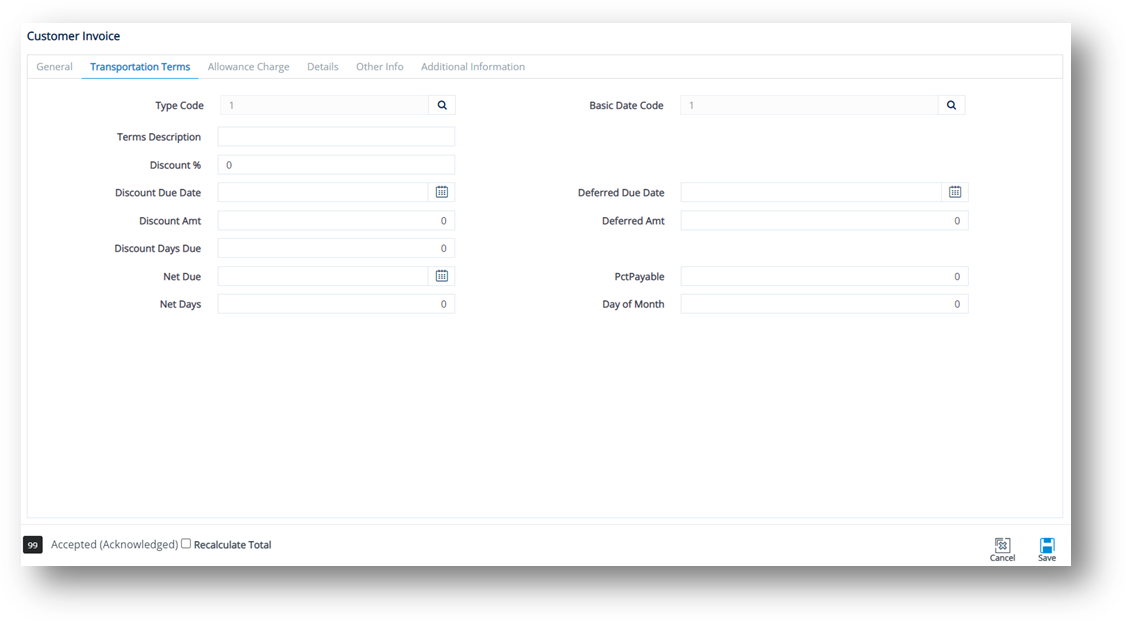
Field |
Definition |
Type Code |
The code used for this type of invoice. |
Basis Date Code |
The code used for the method of applying the VAT (Value Added Tax) to the price at which the goods or services will be invoiced. |
Terms Description |
The terms of the deal and available methods of payment. |
Discount % |
The allowed percentage that will be deducted from the invoice. |
Discount Due Date |
The date when the discount is due. |
Deferred Due Date |
The due date on which the invoice payment is delayed. |
Discount Amt |
The percentage amount of the discount. |
Deferred Amt |
The amount of the invoice that will be delayed. |
Discount Days Due |
The number of days in which the allowed discount is due. |
Net Due |
The balance of the invoice that is due, after calculating discounts and/or other charges, fees, allowances, etc. |
Pct Payable |
The percent of Invoice Payable. |
Net Dates |
The dates when the net balance is due, for example Net 10, Net 15, Net 30, etc. This means that the balance is due in 10, or 15, or 30 days after the date of the invoice. |
Day of Month |
The day of the month on which the invoice is due. |
Additional information that is used in specific sections of the invoice, for example Purchase Order dates.
Use the Send Document feature to send an 810 Invoice to your trading partner.
1. On the Customer Finance menu, click Invoices.
2. On the Customer Invoices screen, select the invoice that you want to send, and then click the Send Document button.
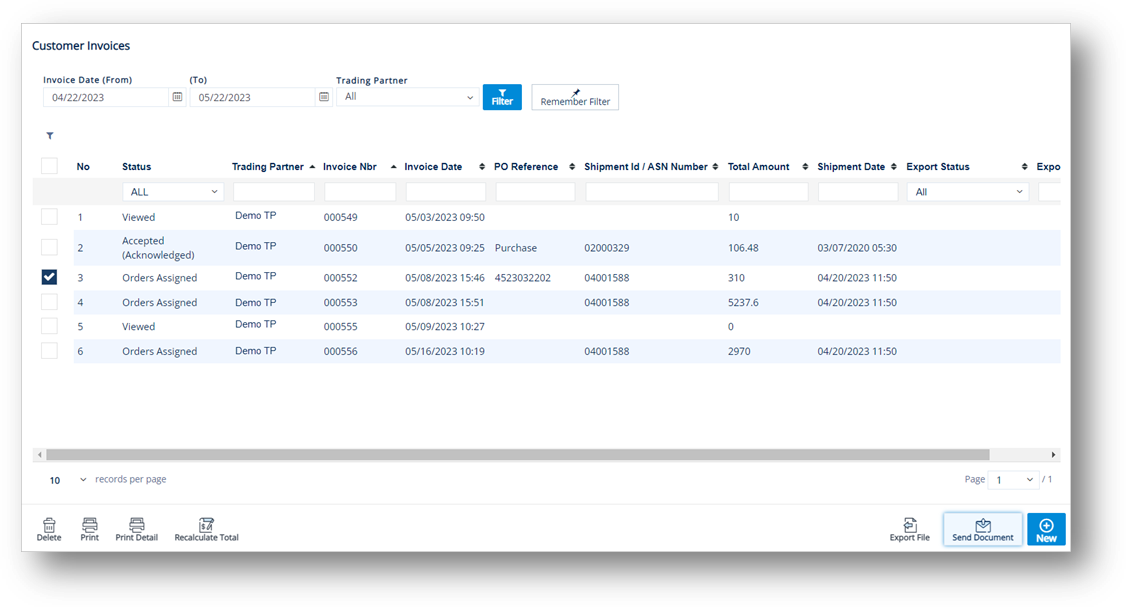
3. On the notification window, click OK.
The Status of the document becomes Invoice EDI Created.
1. On the Customer Finance menu, click Invoices.
2. On the Customer Invoices screen, select the invoice that you want to remove, and then click the Delete icon.

3. On the confirmation window, click OK.
|
NOTE Firm Orders that were on this invoice will now be available for invoicing again. |
With the Export feature, you can send Invoices to Trading Partners that do not use an EDI system. The following sections describe how to export single or multiple Invoices on the Customer Invoices screen.
1. On the Customer Finance menu, click Invoices.
TIP Use the Filter panel to search for invoices.
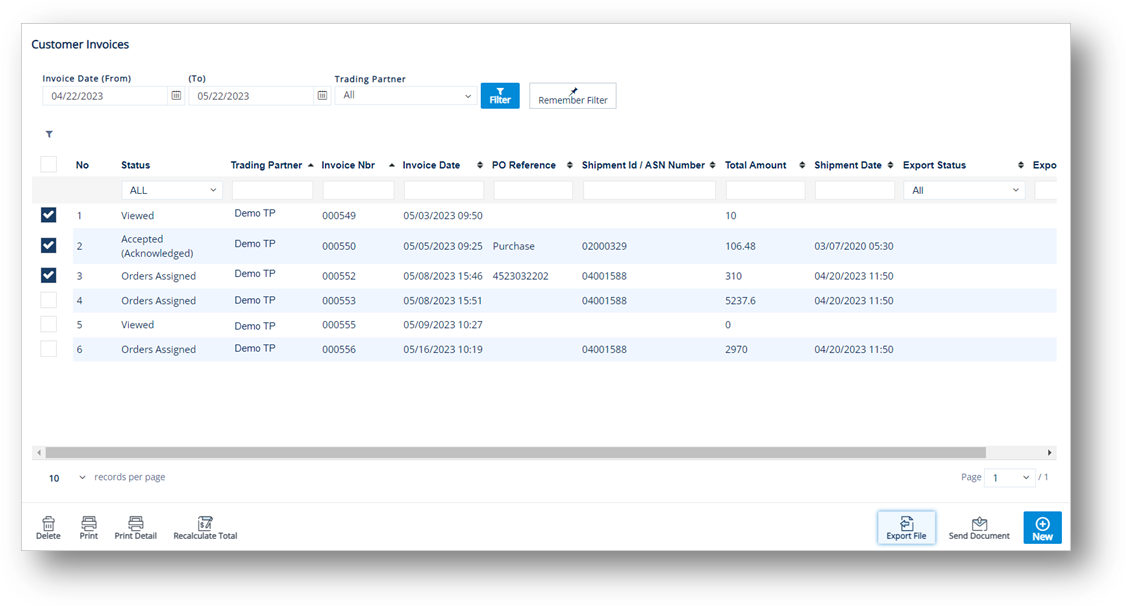
2. On the Customer Invoices screen, select the invoice that you want to export.
Note Refer to the Field Definitions at the end of this section.
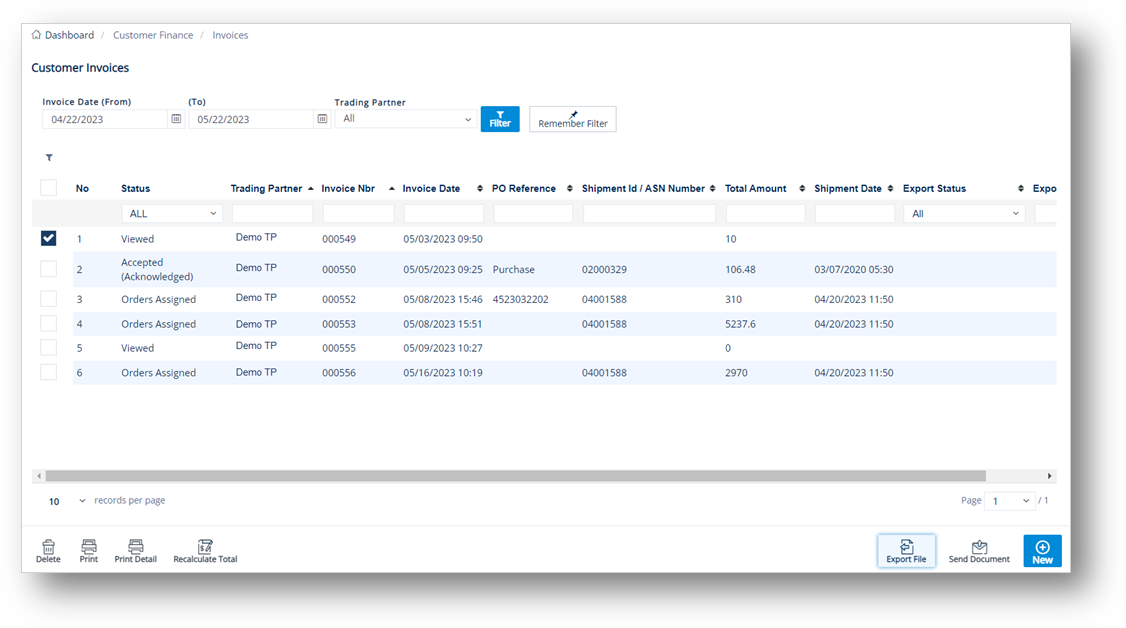
3. Next, click the Export File button.
TIP To export multiple invoices, select the invoices that you want to export and click the Export File button.
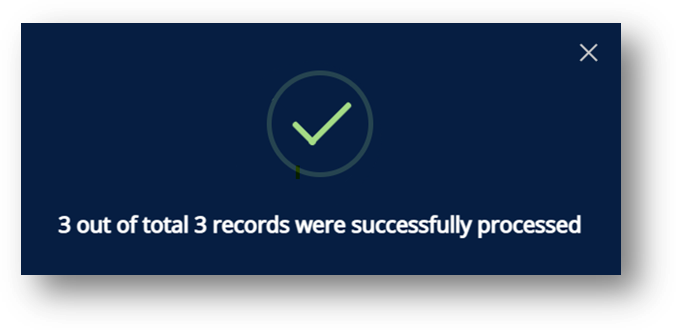
4. On the confirmation message, there are two options, do one of the following:
· Click Yes to export the selected record.
The notification window shows that the record has been processed successfully.
Note The notification pop-up window will show the number of records that have been processed successfully, out of those selected.
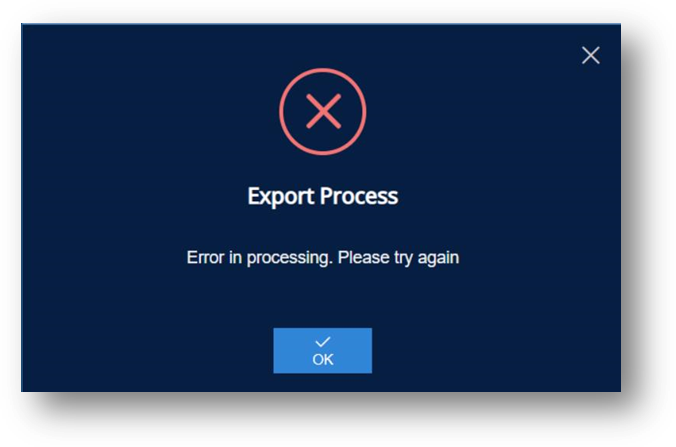
· Click No to cancel the export of the selected record.

The notification window will show if an exception occurred during the export process.
Field |
Definition |
Export Status |
The export status of an invoice. The status can be one of these values: Exporting, Exported Successfully, and Export Failed. - Exporting: The system confirms that the Exporting requests from the selected records have been received and are being verified for their readiness (validating the invoice information, etc.) for exporting. - Exported Successfully: The system confirms that the invoice has been successfully exported. - Export Failed: The export process failed. |
Export Date |
The date and time when the invoice was exported. NOTE This column is only displayed if the invoice is in the Exported Successfully status. |

