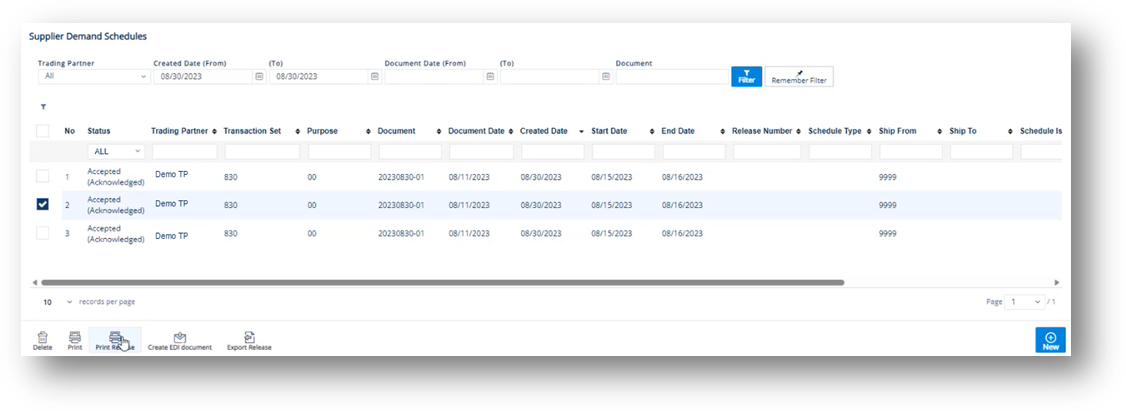
The Demand Schedules screen maintains order demands from suppliers. You can add either forecast or firm releases with part numbers, ship dates, and the like.
1. On the Supplier Demand Mgt menu, click Demand Schedules.
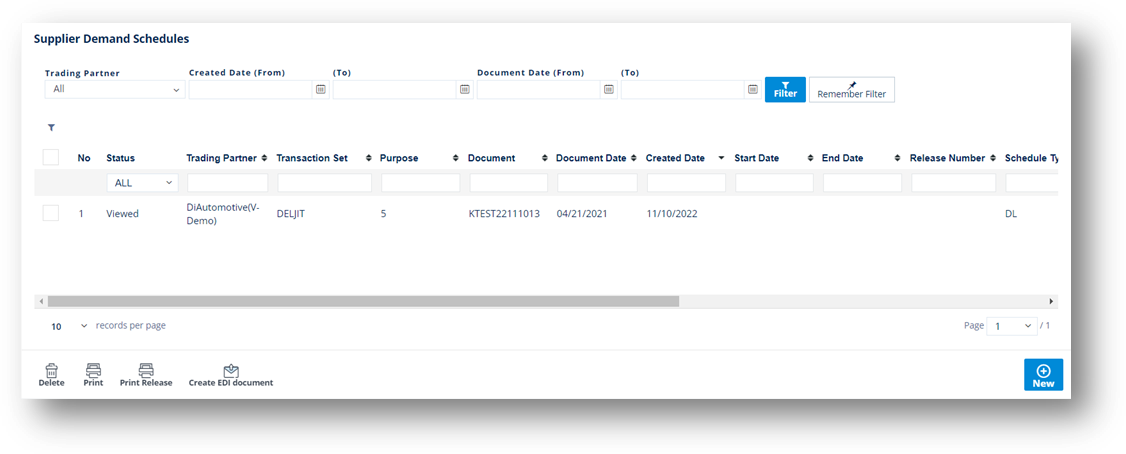
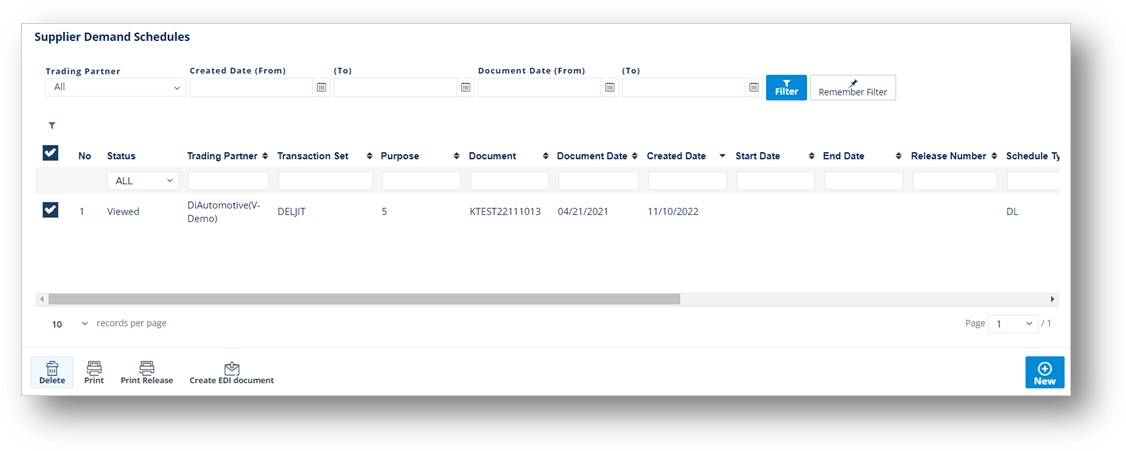
2. On the Supplier Demand Schedules screen, click the item that you want to view.
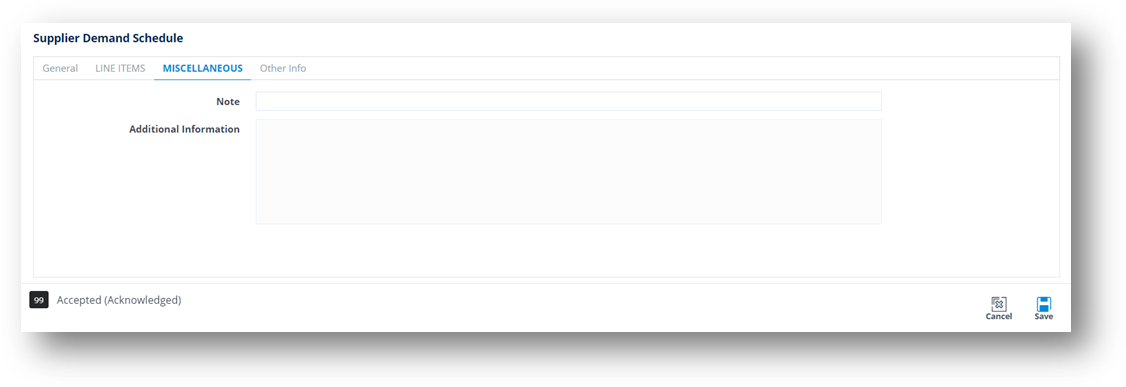
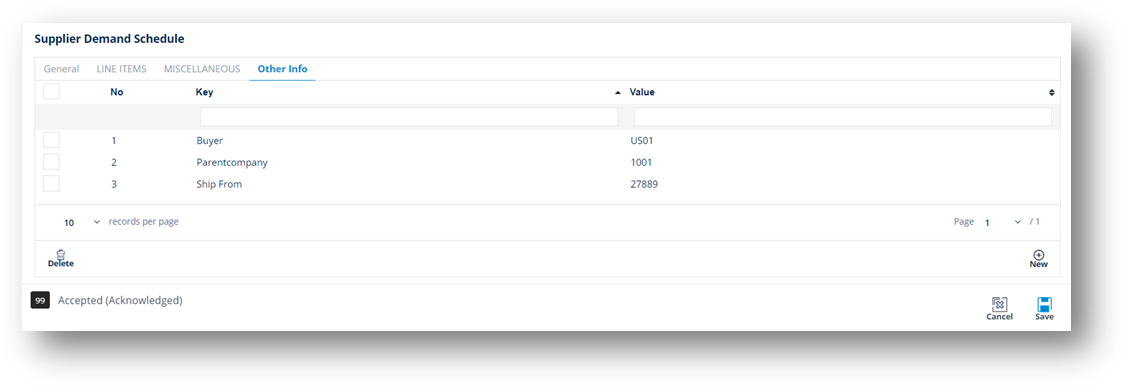
3. On the Supplier Demand Schedule screen, select the General, LINE ITEMS, MISCELLANEOUS, or Other Info tabs to view the corresponding details.
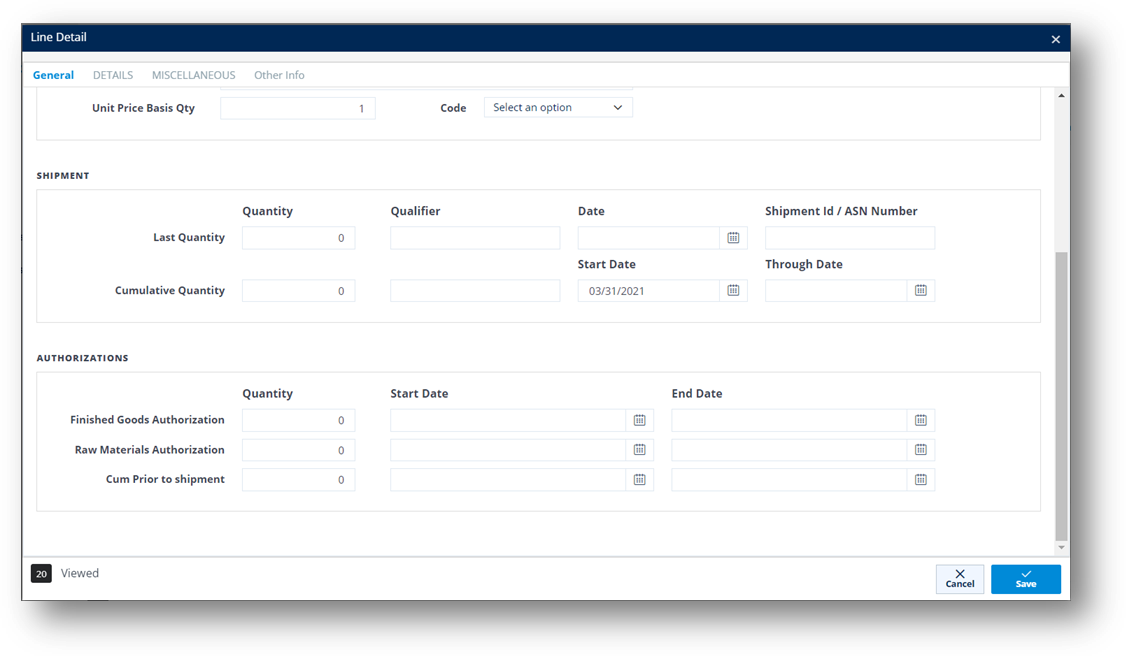
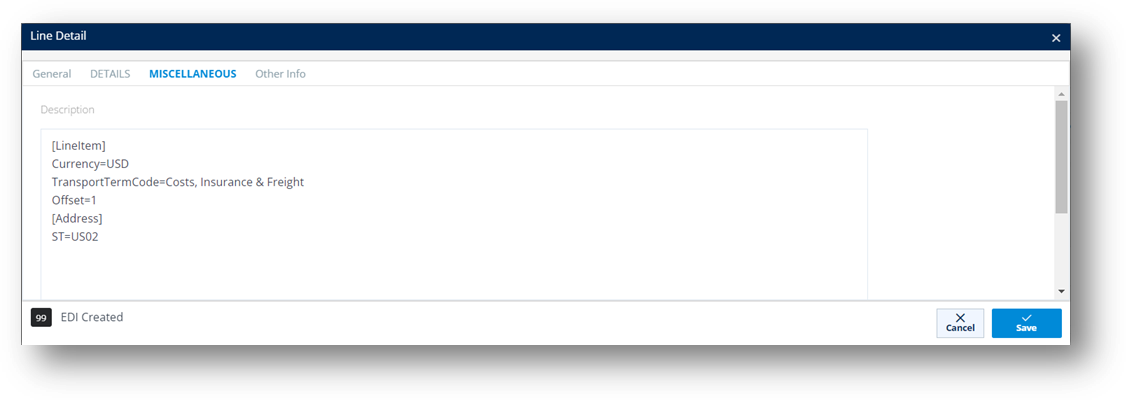
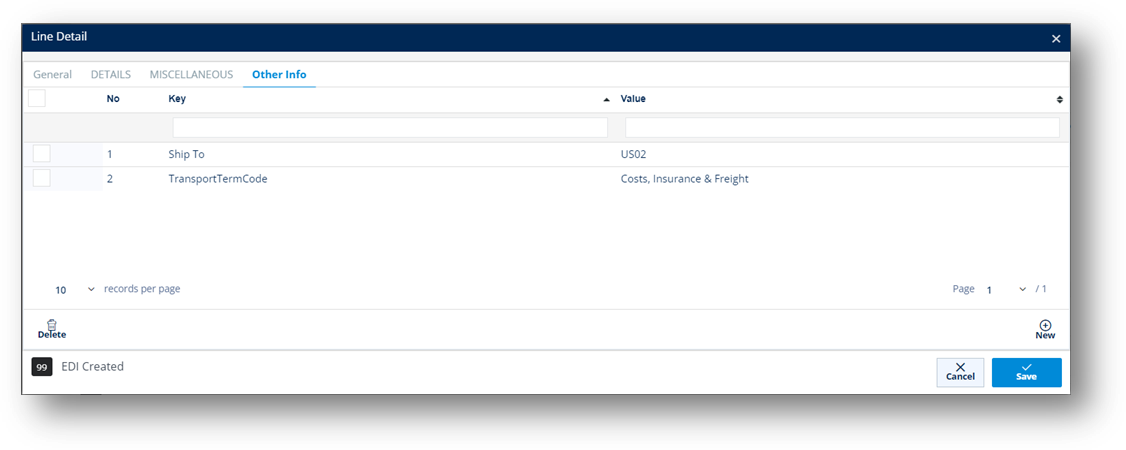
1. On the Line Items tab, click the line item whose details you want to view.
2. On the Line Detail window, switch to the GENERAL, DETAILS, MISCELLANEOUS, and Other Info tabs to view the corresponding data.
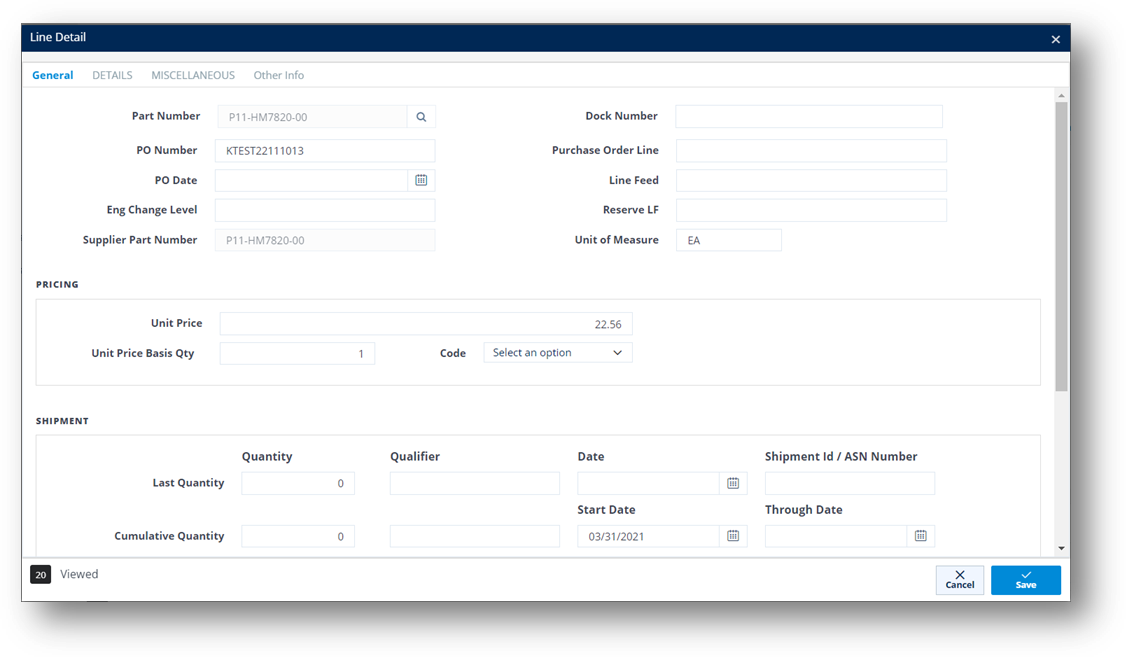
TIP You can scroll down to view more fields on the General tab.
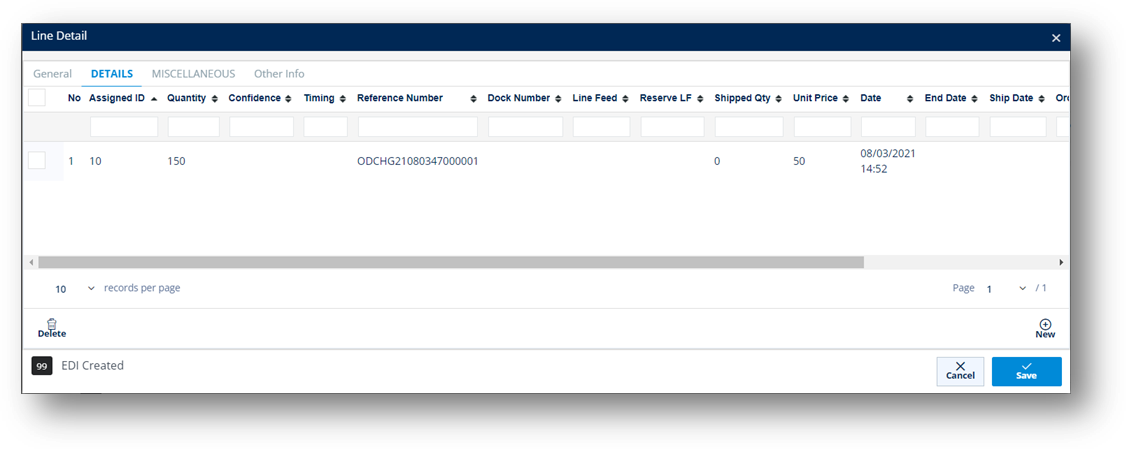
Field |
Definition |
Part Number |
The part number of this item. |
PO Number |
The PO reference number of this shipment, if applicable. |
Eng Change Level |
The engineering/design change code for the part ordered. |
Supplier Part Number |
The supplier’s part number. |
Dock Nbr |
Dock number this part will be sent to, if applicable. |
Line Feed |
Production Line Feed for this part. |
Reserve LF |
Reserve Line Feed for this part. |
Unit of Measure |
Unit of measure used. |
SHIPMENT |
- Last Quantity: Qualifier for the quantity in the following field – choose if the quantity was shipped or received from this Trading Partner. 011: Shipped 050: Received - Shipment Id: Shipment identifier or ASN number. - Qualifier: Type of shipment: C: Firm D: Planning - Cumulative Quantity: Qualifier for the cumulative quantity shipped/received from this Trading Partner. - Start Date: Start date of this cumulative quantity. - Thru Date: Cumulative quantity through this date. |
Timing |
Timing of the shipment: - D: Discrete - W: Weekly |
Quantity |
Quantity according to the last ASN. |
Date |
Date of the last ASN. |
Reference Number |
The release authorization number on the shipment. |
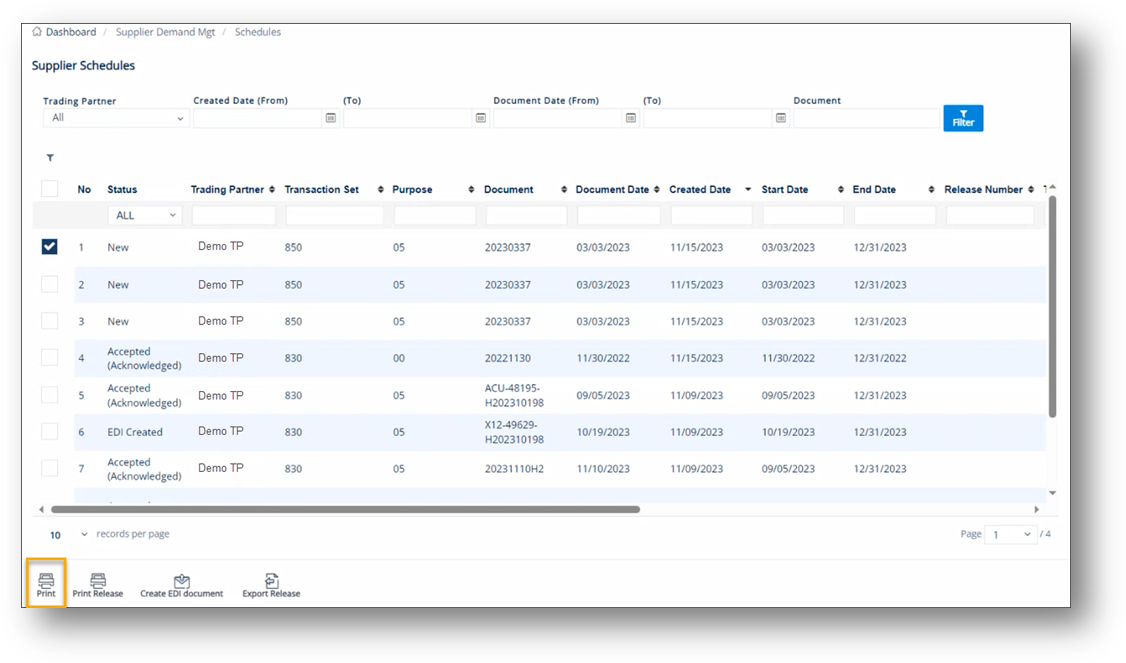
The Print button will print a report for the selected schedules.
1. On the Supplier Demand Mgt menu, click Demand Schedules.
2. On the Supplier Demand Schedules screen, click the Print button.

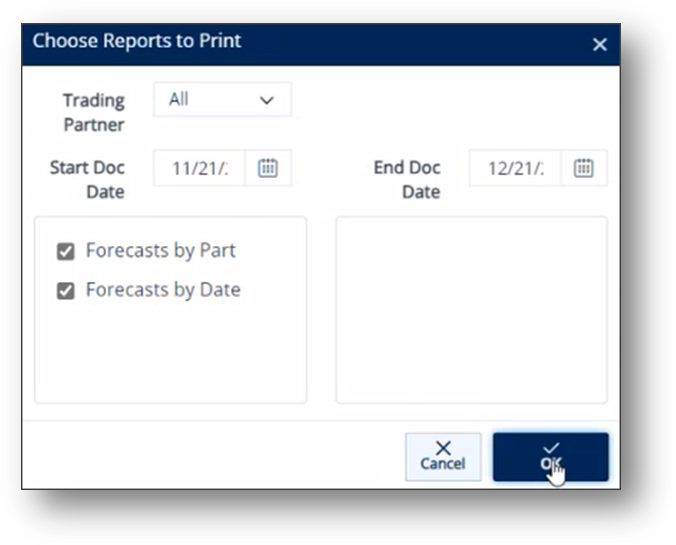
3. On the Choose Reports to Print window, do the following:
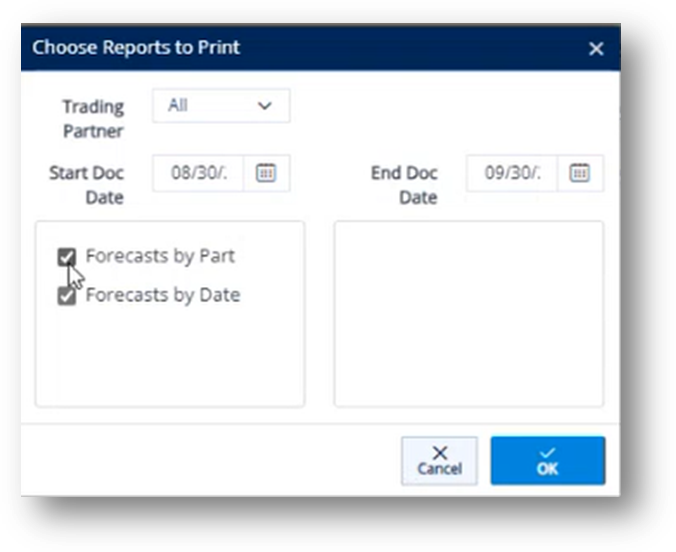
a. Select the date in the Start Doc Date dropdown list.
b. Select the date in the End Doc Date dropdown list.
c. Select one of the following options, and then click OK.
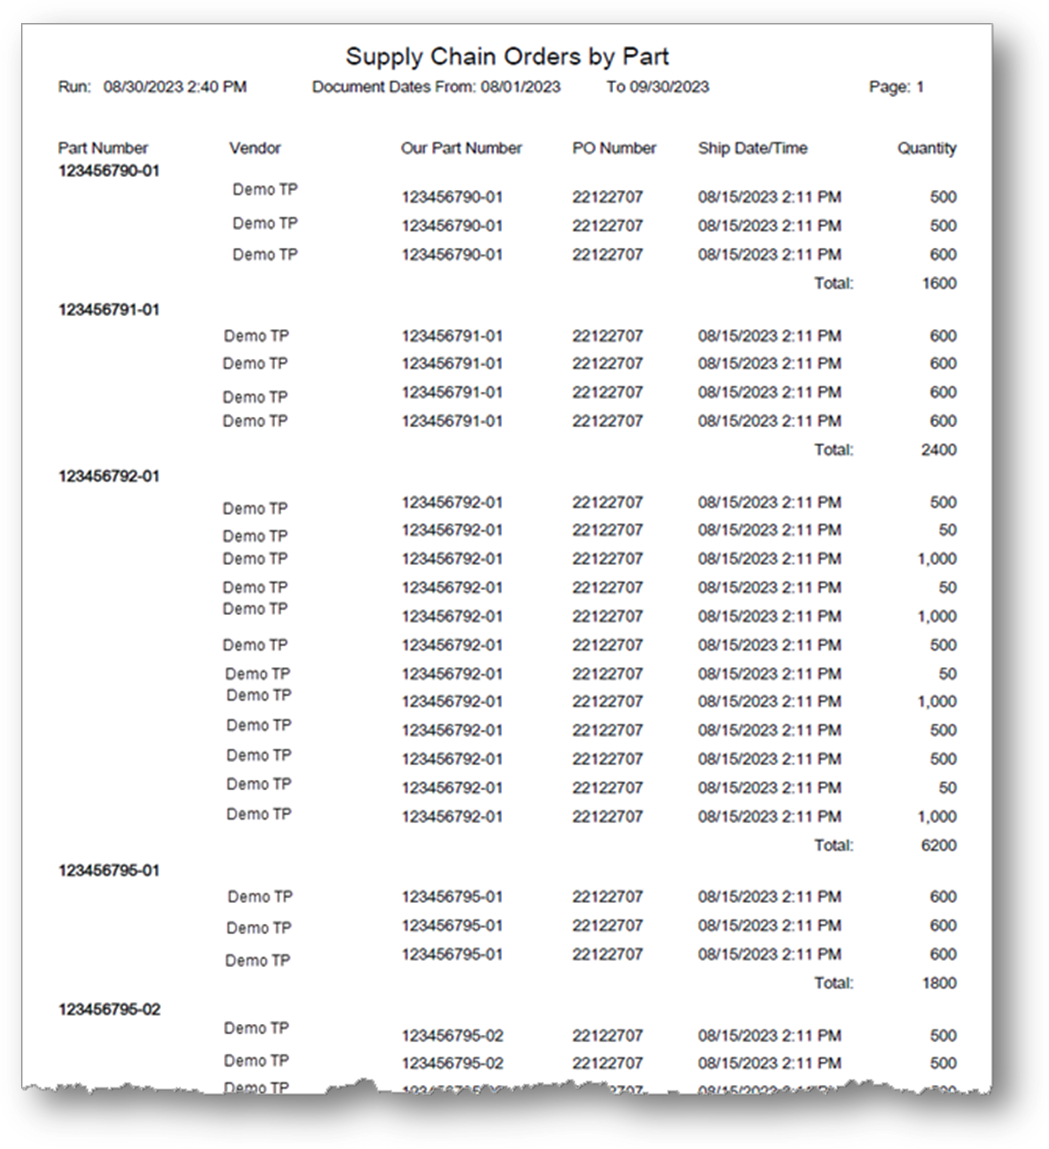
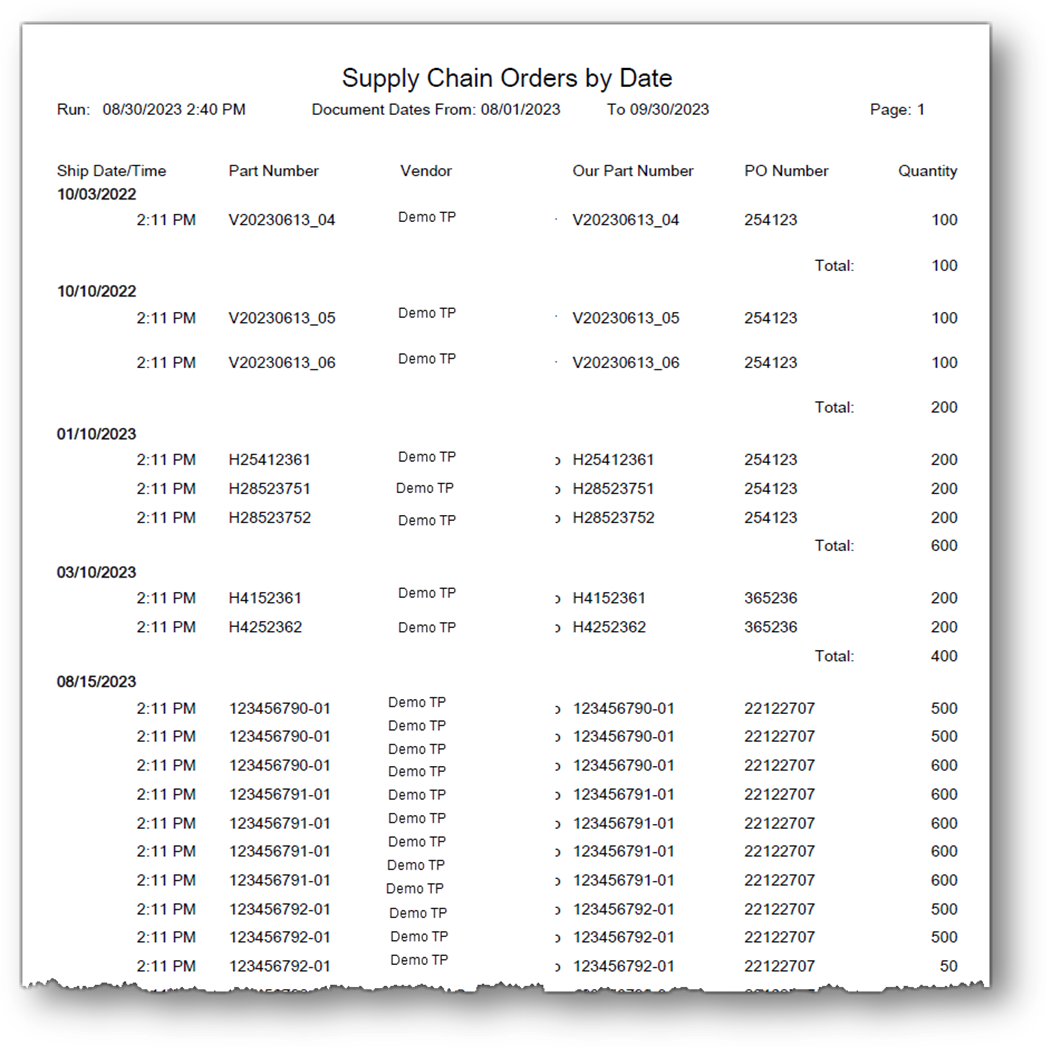
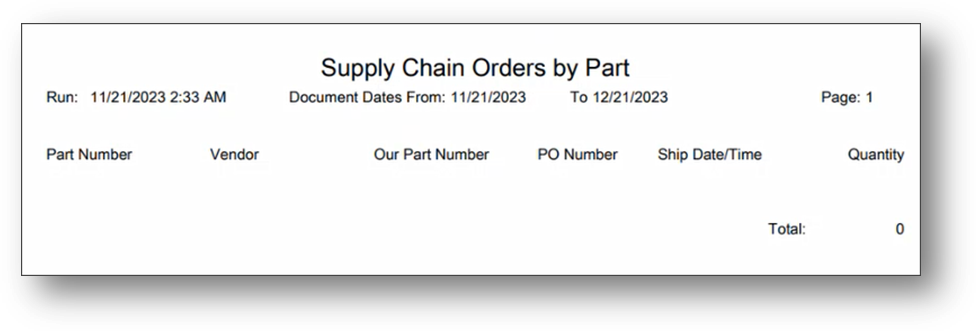
· Select the Forecasts by Part checkbox if you want to print the Forecast Report, grouped by Parts.
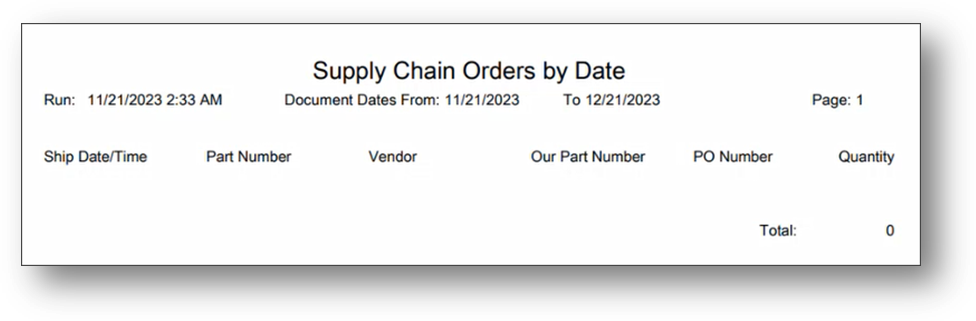
· Select the Forecasts by Date checkbox if you want to print the Forecast Report, grouped by Date.
4. On the confirmation message, click OK to review and print the report.
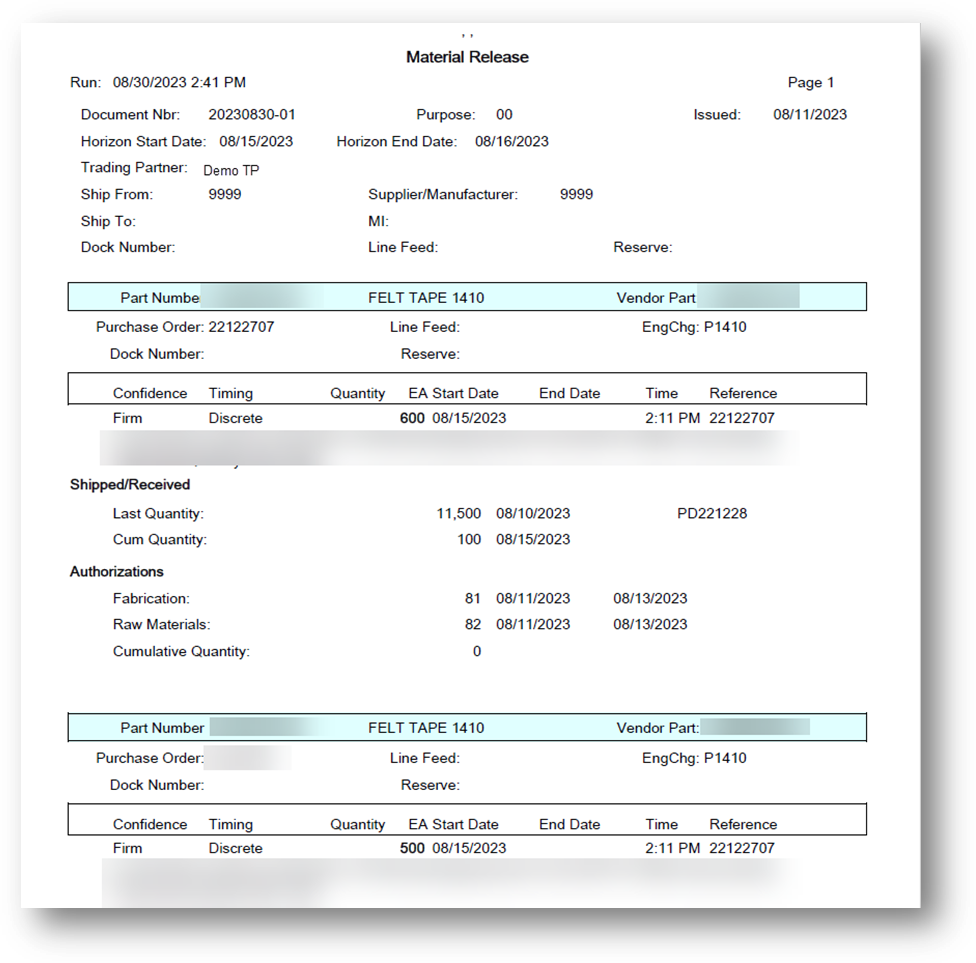
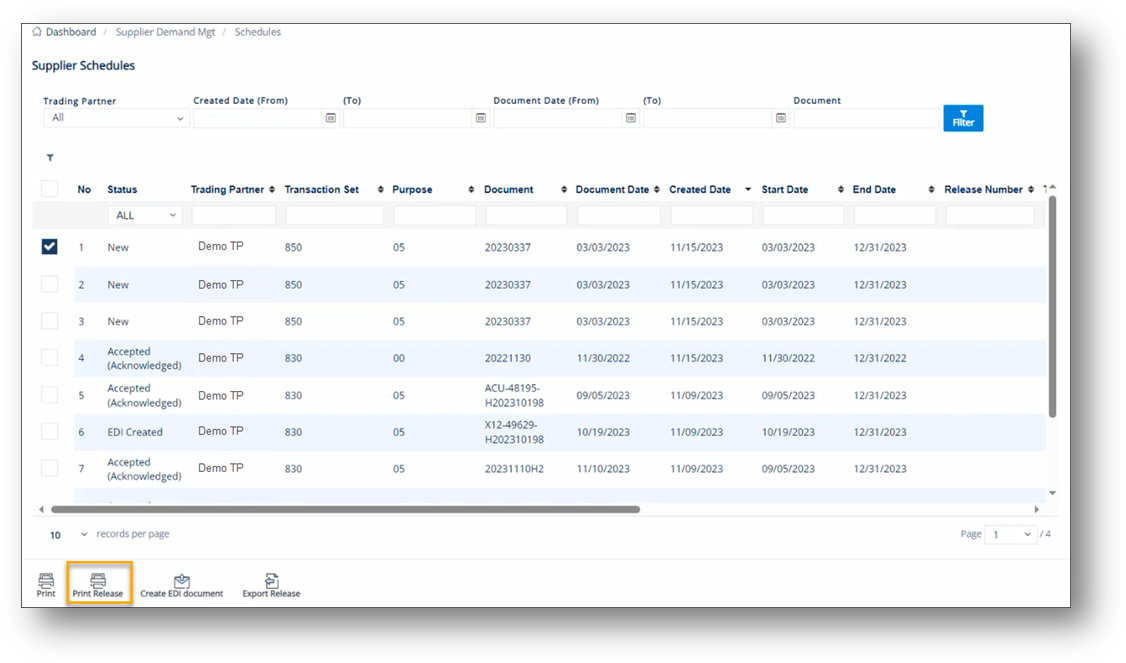
The Print Release button will print a report for the selected schedules.
1. On the Supplier Demand Mgt menu, click Demand Schedules.
2. On the Supplier Demand Schedules screen, select the release that you want to print.
3. Click the Print Release button.
4. On the confirmation message, click OK to review and print the report.
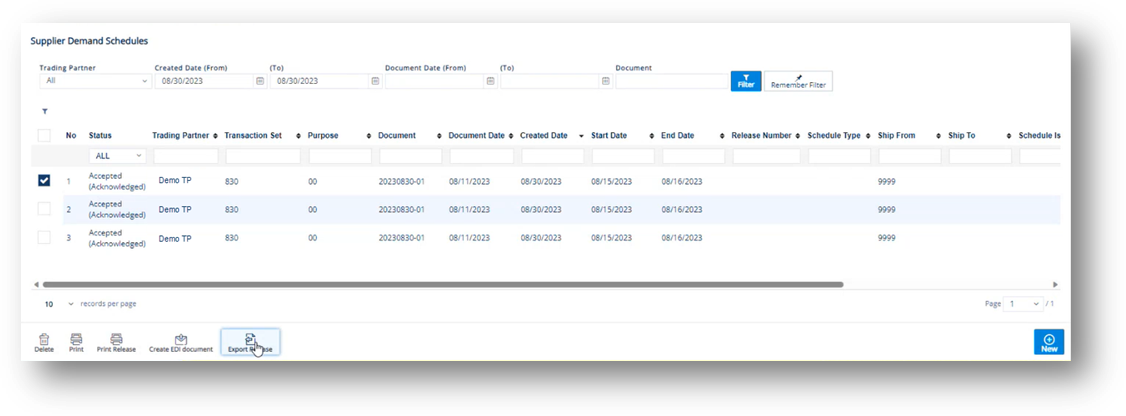
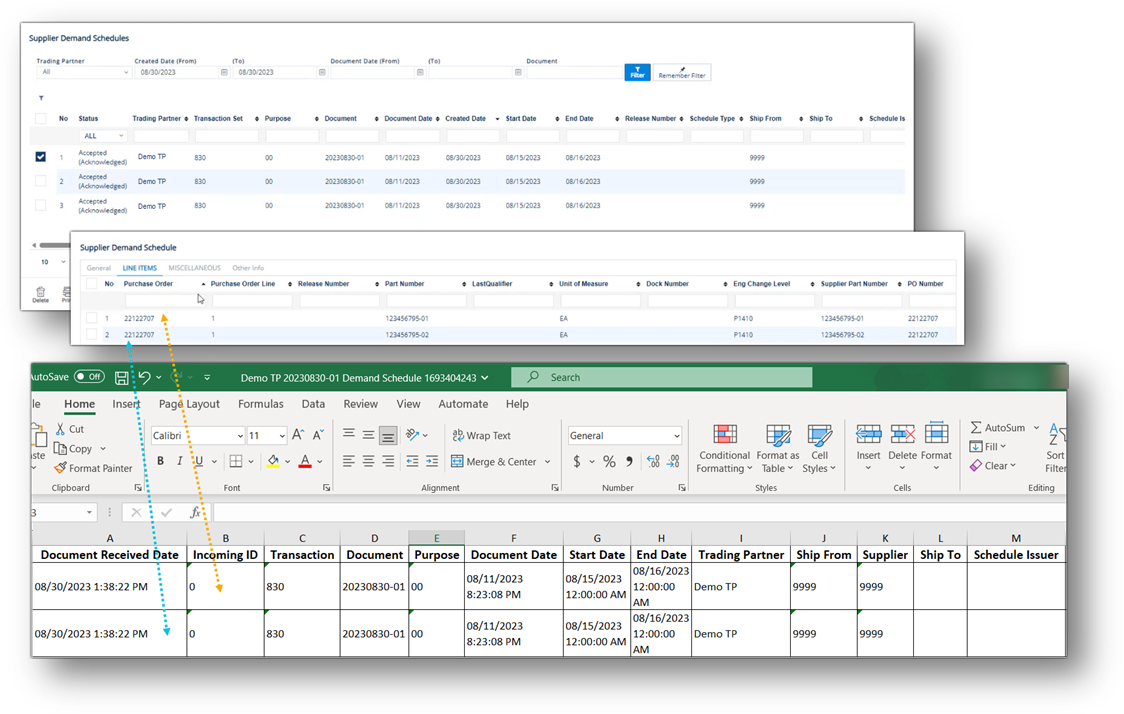
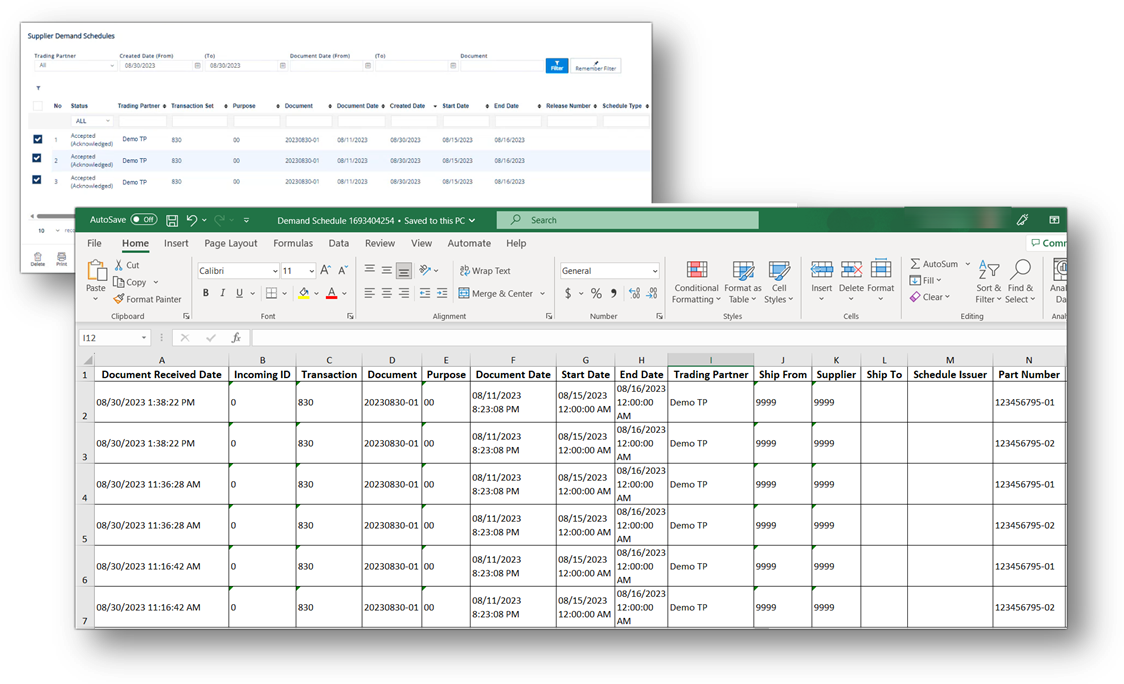
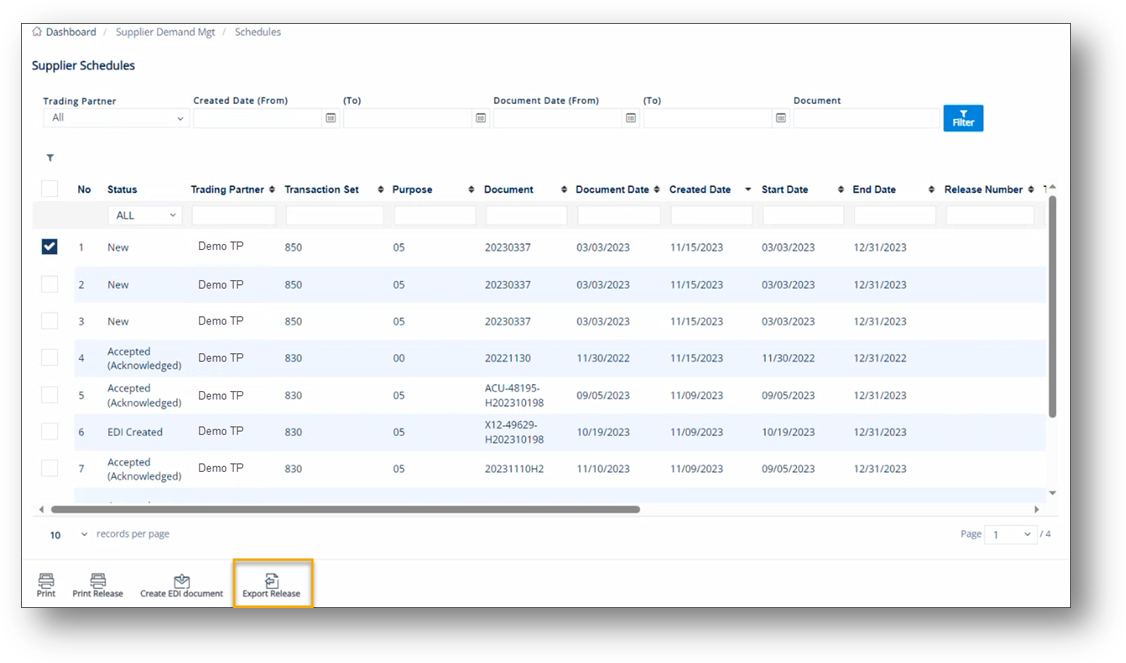
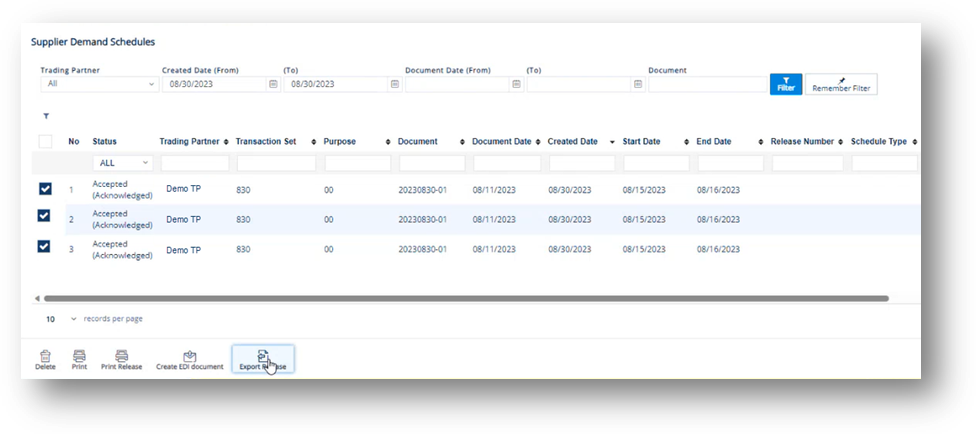
The Export Release button will export a report for one or multiple schedules to an Excel spreadsheet for external use.
1. On the Supplier Demand Mgt menu, click Demand Schedules.
2. On the Supplier Demand Schedules screen, select the release that you want to export.
3. Click the Export Release button.
|
NOTE To export multiple records, select the schedules that you want to export and click the Export Release button.
|
The Demand Schedule Excel file is downloaded.
· If you export one Schedule, the Excel file will contain only data from that Schedule. The file name of the Excel file is saved as Name of Trading Partner + Document Reference Number + Demand Schedule + Timestamp (Unix format).
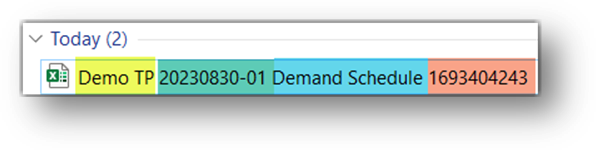
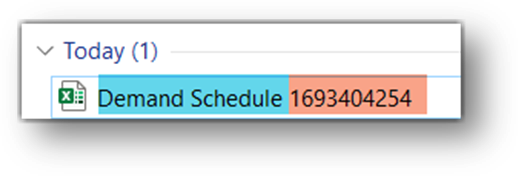
· If you export multiple Schedules, the Excel file will contain data of all selected Schedules. The file name of the Excel file is saved as Demand Schedule + Timestamp (Unix format).
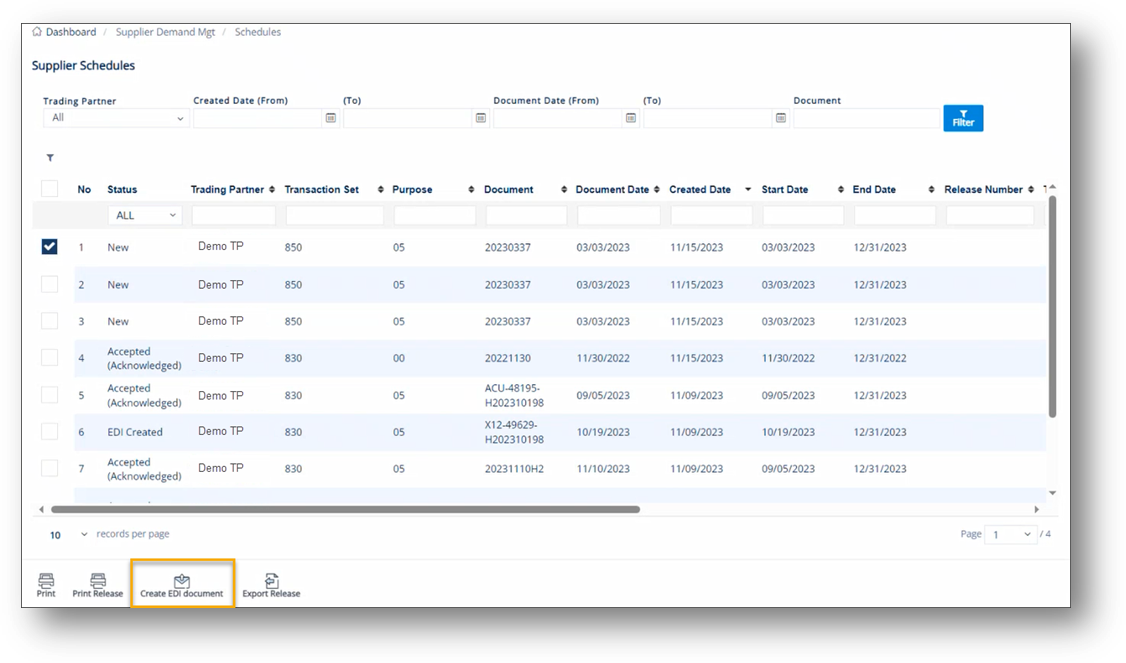
1. On the Supplier Demand Mgt menu, click Demand Schedules.
2. On the Supplier Demand Schedules screen, select the release.
3. Click the Create EDI Document button.
4. On the confirmation window, click OK.
1. On the Supplier Demand Mgt menu, click Demand Schedules.
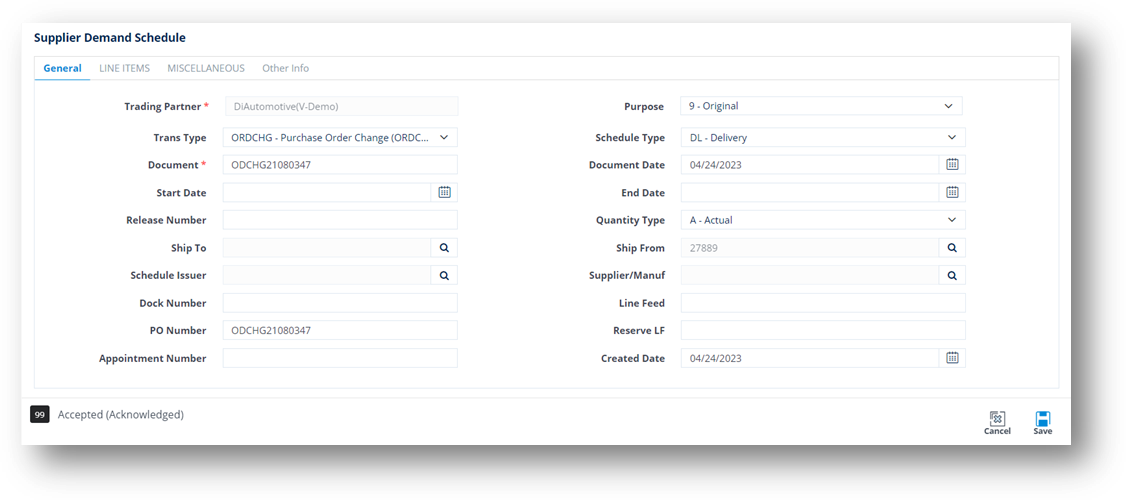
2. On the Supplier Demand Schedules screen, click New.
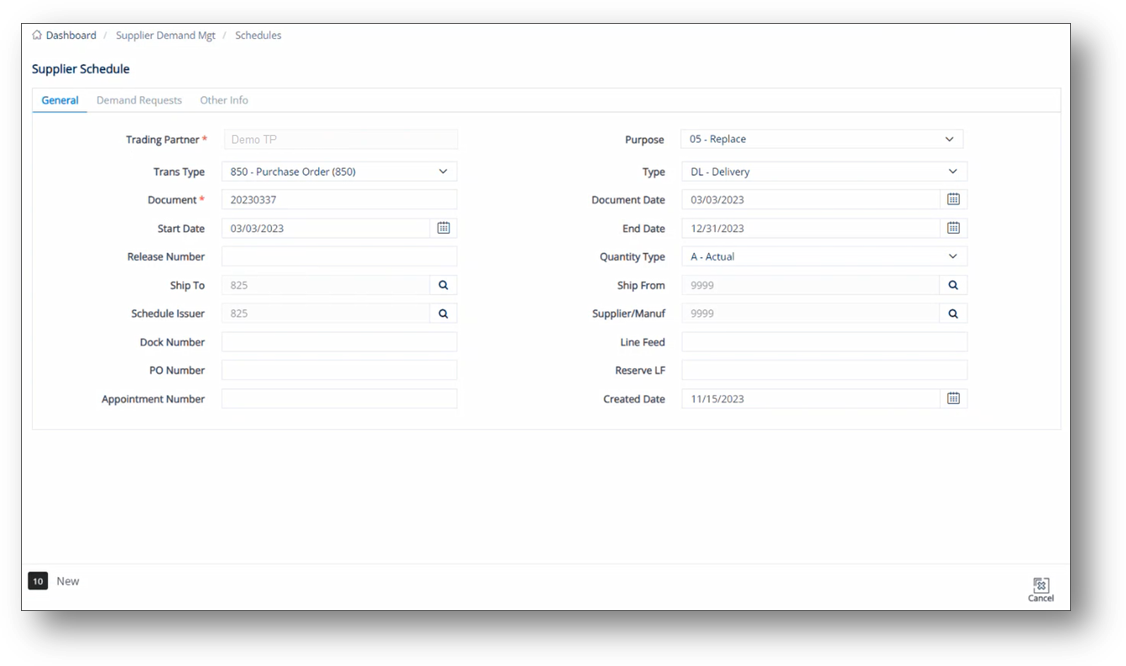
3. On the Supplier Demand Schedule screen, fill out the form. Use the following Field Definitions.
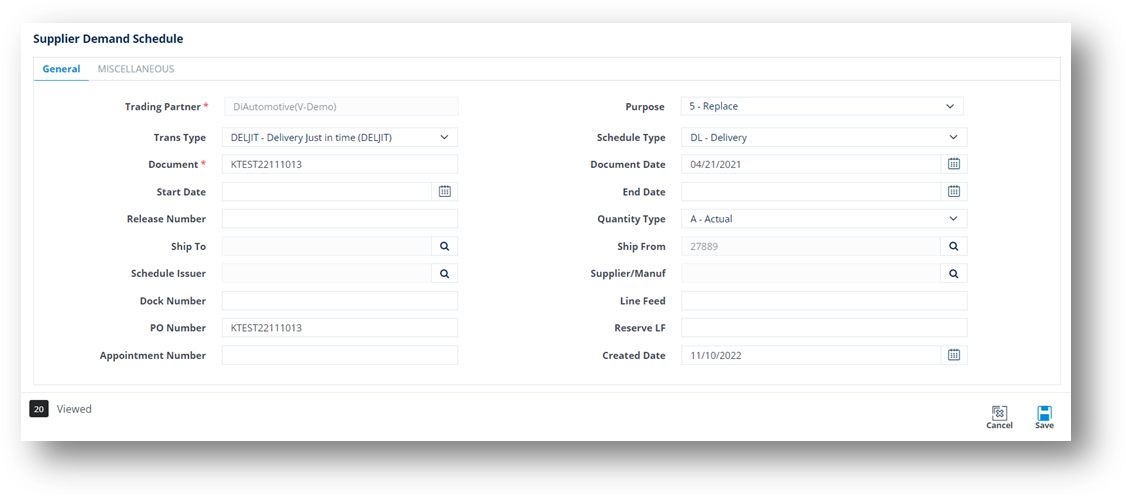
4. When you’re finished, click Save.
Field |
Definition |
Trading Partner |
The Trading Partner ID code. |
Purpose |
Indicates the release’s purpose code: - 00: Original - 01: Cancellation - 04: Change - 05: Replacement. Common item: Id=R; Code=SCHPU; Setting=value from above. |
Trans Type |
The type of transaction. 830 defines Material Release or Planning Schedule. |
Schedule Type |
Indicates the basis of dates in shipments: - DL: Delivery based dates - SH: Shipment based dates Common item: Id=R; Code=SCHTY; Setting=value from above. |
Document |
Release number to uniquely identify this schedule. The default is today’s date and time (YYMMDDHHMMSS). |
Document Date |
The date when the schedule was created. The default is today’s date. |
Start Date |
If applicable, the shipment release start date. The default is today’s date. |
End Date |
If applicable, the shipment release end date. The default is 7 days out. |
Release Nbr |
The number of the material release document. |
Quantity Type |
Indicates the basis of quantity values in shipments: - A: Actual quantity, no calculations required to determine how much product to send. - C: Cumulative quantity, calculations required to determine how much product to send. Common item: Id=R; Code=QTYQU; Setting=value from above. |
Ship To |
Location to which shipment was sent. Common item: Id=O; Code=ST; Setting=Ship To code. |
Ship From |
Location from which shipment will be sent. Common item: Id=O; Code=SF; Setting=Ship From code. |
Schedule Issuer |
The Material Release Schedule Issuer. |
Supplier/Manuf |
Supplier or Manufacturer of the product or part. Common item: Id=O;Code=SU; Setting=supplier’s code. |
Dock Nbr |
Dock number this part will be sent to, if applicable. |
Line Feed |
Production Line Feed for this part. |
PO Number |
Purchase Order reference number, if applicable. |
Life Cycle |
These codes provide the schedule status. Do not change this field. - 10: New Schedule, user has not verified content. - 20: Verification process has started on this schedule. - 90: Completed processing of schedule – Product activity records added; schedule’s EDI document created when Trading Partner is EDI-capable. - 99: EDI document sent; schedule has finished its life cycle. |
1. On the Supplier Demand Mgt menu, click Demand Schedules.
2. On the Supplier Demand Schedules screen, select the schedule that you want to remove, and then click the Delete icon.
3. On the confirmation window, click OK.
The Demand Schedules screen maintains order demands from suppliers.
1. On the Supplier Demand Mgt menu, click Schedules.
2. On the Supplier Schedules screen, click the item that you want to view.
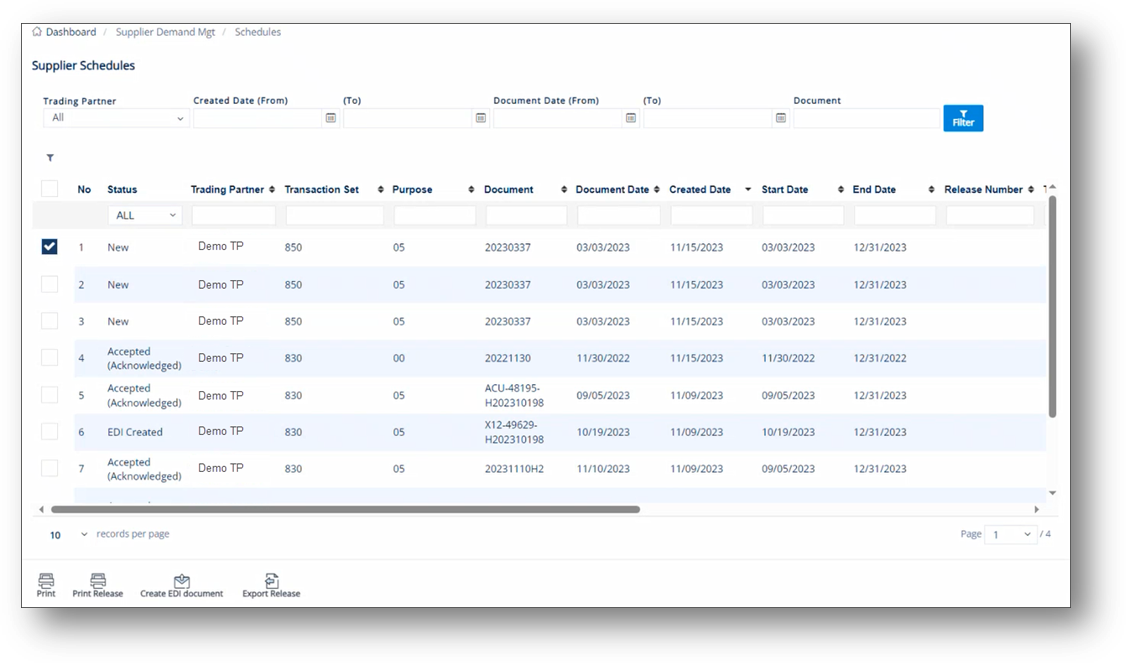
3. On the Supplier Schedule screen, select the General, Demand Requests, or Other Info tabs to view the corresponding details.
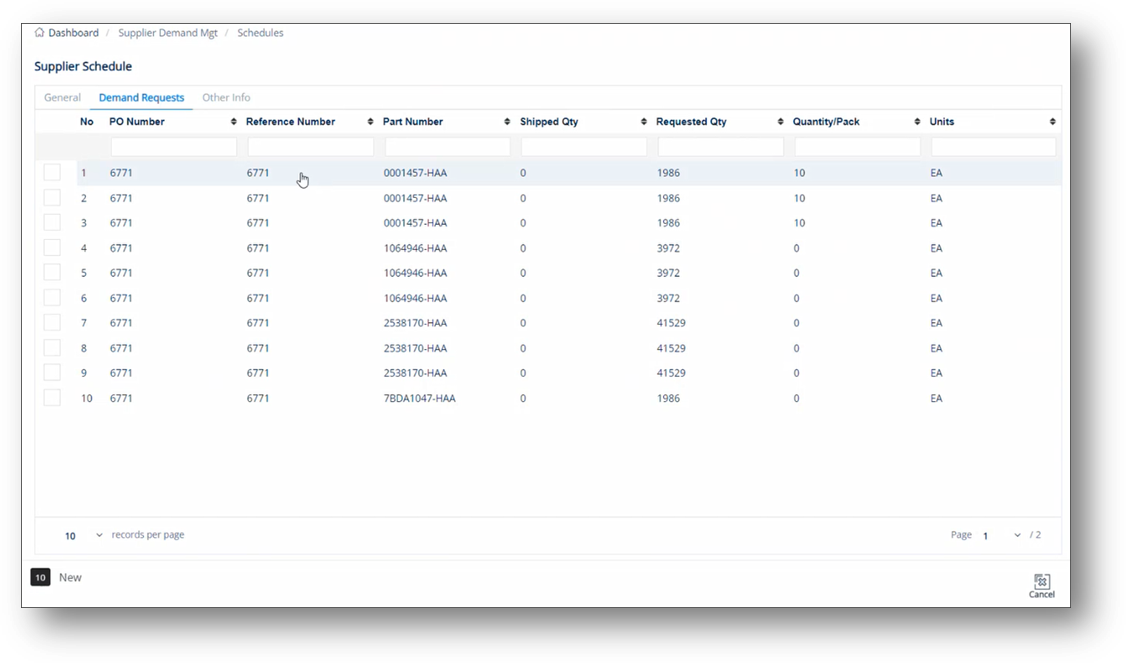
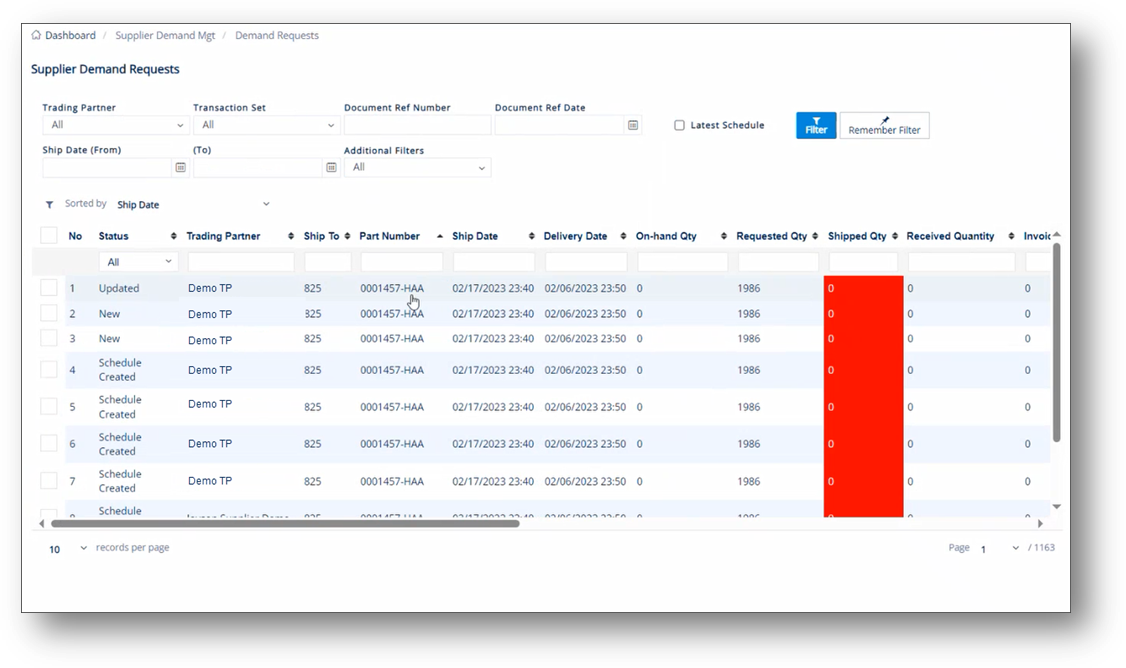
Use this tab to view all the requests sent to suppliers.
1. On the Demand Requests tab, click the record whose details you want to view.
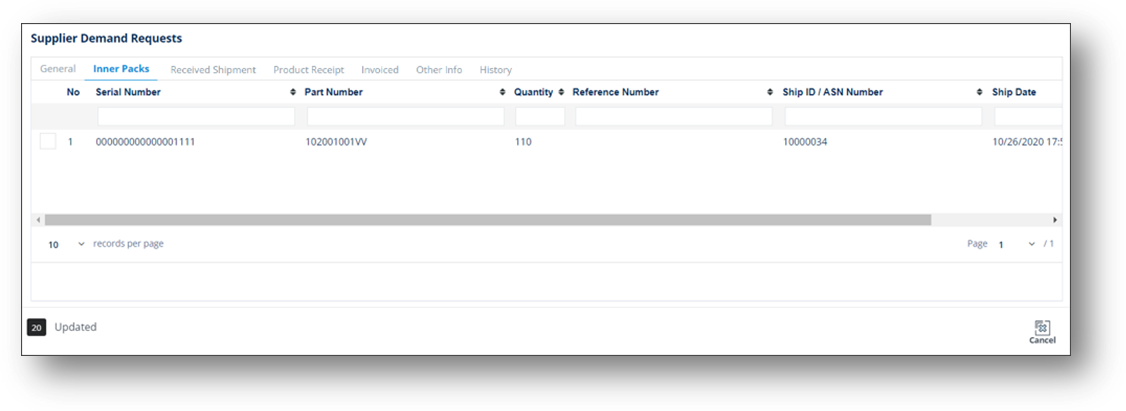
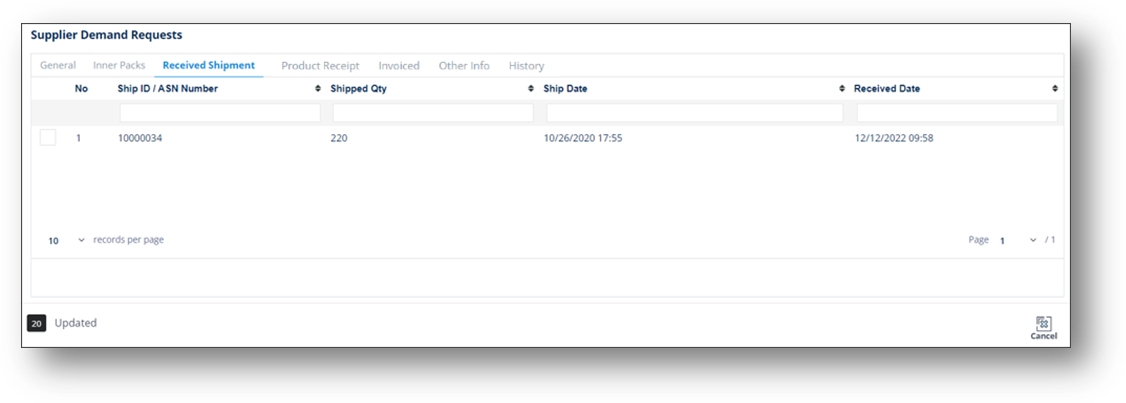
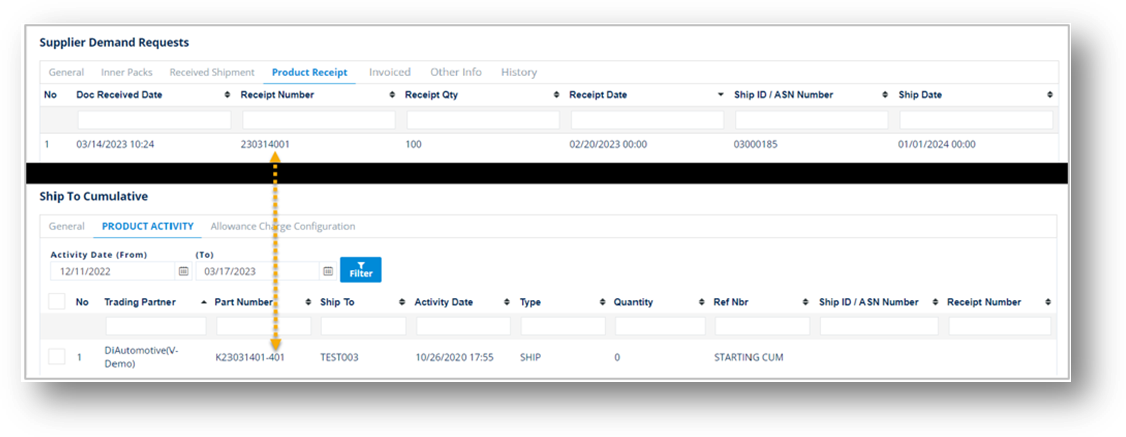
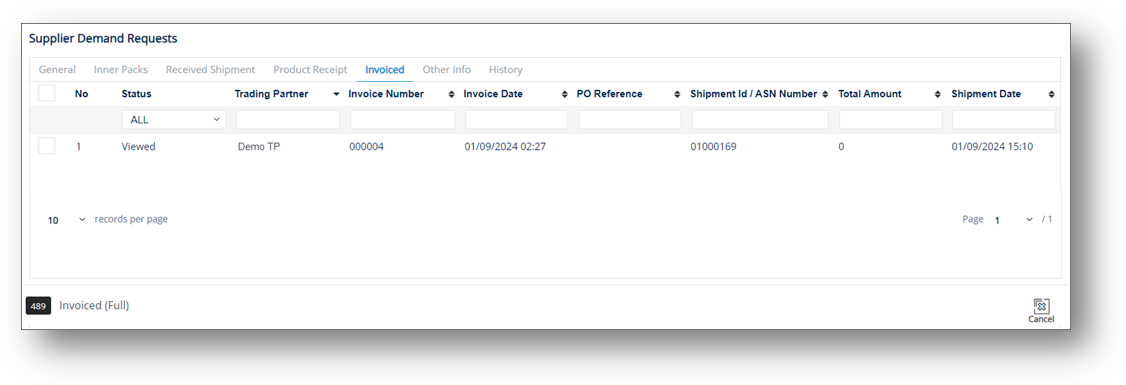
2. On the Supplier Demand Requests Detail window, select the General, Inner Packs, Received Shipment, Product Receipt, Other Info, or History tab to view the corresponding data.

|
NOTE The Supplier Demand Requests Detail window is the pop-up view of the Supplier Demand Requests screen.
|
The Print button will print a report for the selected schedules.
1. On the Supplier Demand Mgt menu, click Schedules.
2. On the Supplier Schedules screen, select the document that you want to print.
3. Click the Print button.
4. On the Choose Reports to Print window, do the following:
a. Select the date in the Start Doc Date dropdown calendar.
b. Select the date in the End Doc Date dropdown calendar.
c. Select one of the following options:
· Select the Forecasts by Part checkbox if you want to print the Forecast Report, grouped by Parts.
· Select the Forecasts by Date checkbox if you want to print the Forecast Report, grouped by Date.
d. Click OK.
5. On the message, click OK to review and print the report.
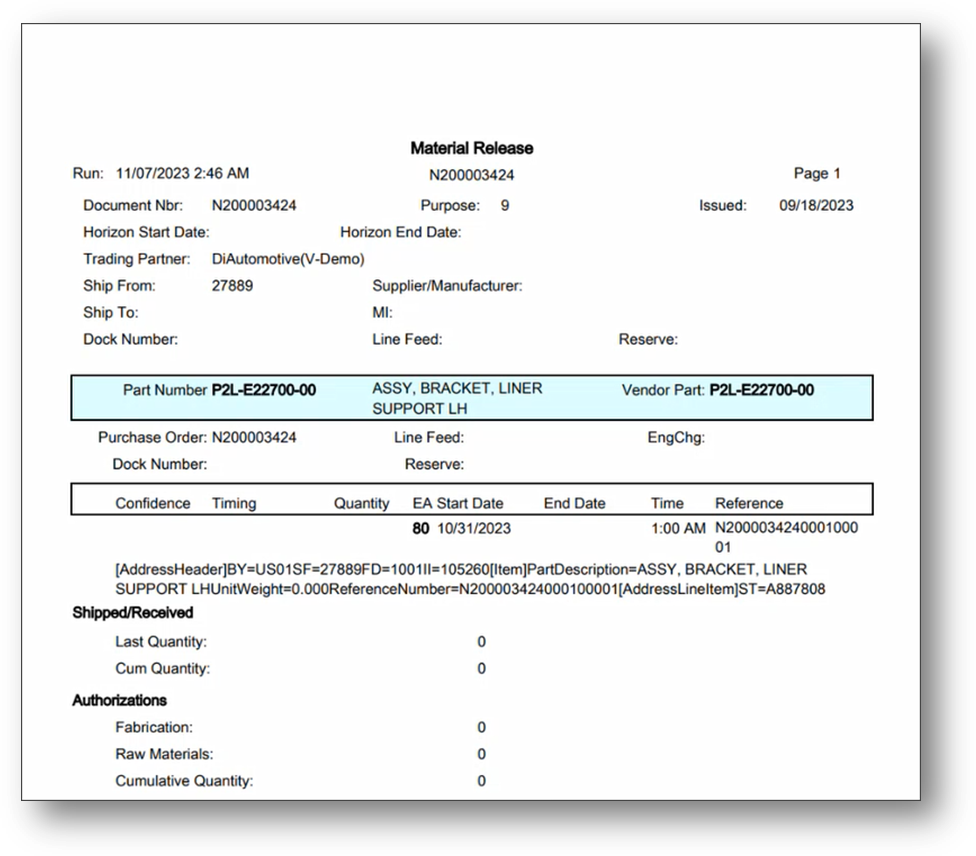
The Print Release button will print a Material Release report for the selected schedules.
1. On the Supplier Demand Mgt menu, click Schedules.
2. On the Supplier Schedules screen, select the document that you want to print.
3. Click the Print Release button.
4. On the confirmation message, click OK to review and print the report.
The Material Release report is displayed in a new window.
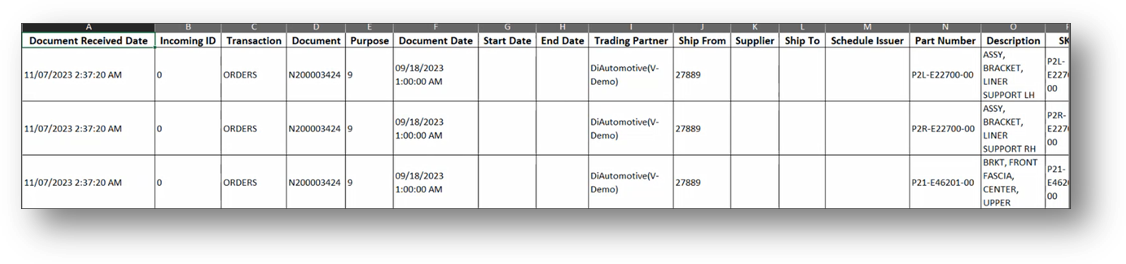
The Export Release button will export a report for one or multiple schedules to an Excel spreadsheet for external use.
1. On the Supplier Demand Mgt menu, click Schedules.
2. On the Supplier Schedules screen, select the document that you want to export.
3. Click the Export Release button.
The Material Release report is exported to an Excel file.
1. On the Supplier Demand Mgt menu, click Schedules.
2. On the Supplier Schedules screen, select the item that you want to send.
3. Click the Create EDI document button.
4. On the confirmation message, click Yes to send.
At this time, the Demand Requests feature only allows buyers to view the requests sent to suppliers. All information in the Demand Request is taken from incoming documents.
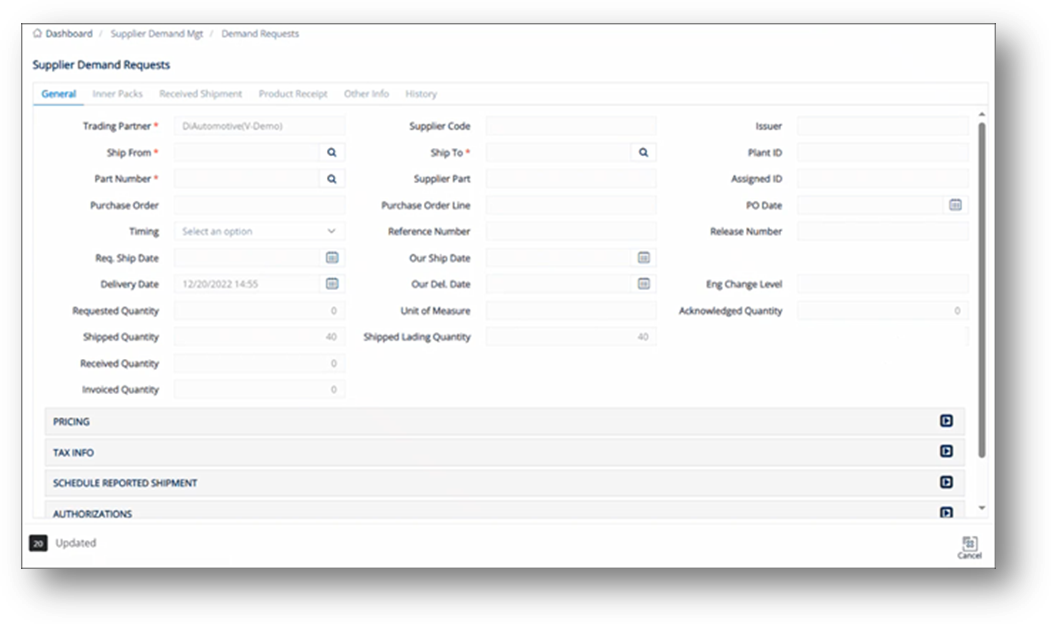
1. On the Supplier Demand Mgt menu, click Demand Requests.
2. On the Supplier Demand Requests screen, click the item that you want to view.
TIP Scroll to the right to view more fields on the screen.
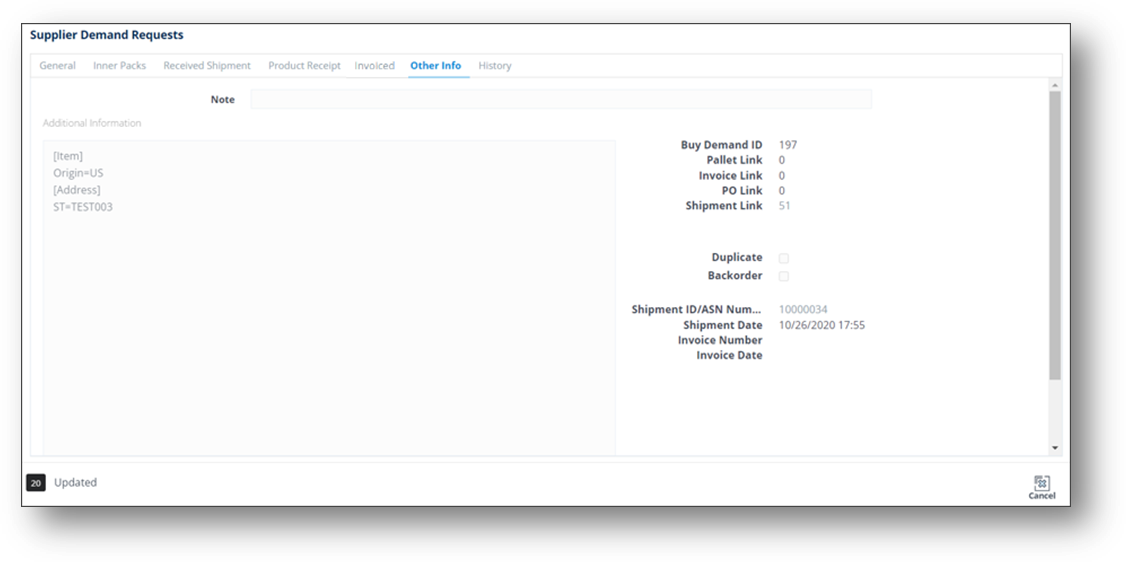
3. On the Supplier Demand Requests screen, select the General, Inner Packs, Received Shipment, Product Receipt, Other Info, and History tabs to view the corresponding details.
TIP You can scroll down to view more fields on the General tab. For a full description of each field, refer to the Field Definitions-General in the next section.
|
NOTE Information on the Received Shipment tab is also linked to the one in the Shipment Receiving feature of the Supplier Receiving module. For more information, see Shipment Receiving. |
|
NOTE The Receipt Number on the Product Receipt tab of the Supplier Demand Requests module is the Part Number on the PRODUCT ACTIVITY tab of the Ship To Cumulatives module. |
Field |
Definition |
Trading Partner |
The ID code of the Trading Partner. |
Ship From |
The address code of the supplier (your address). |
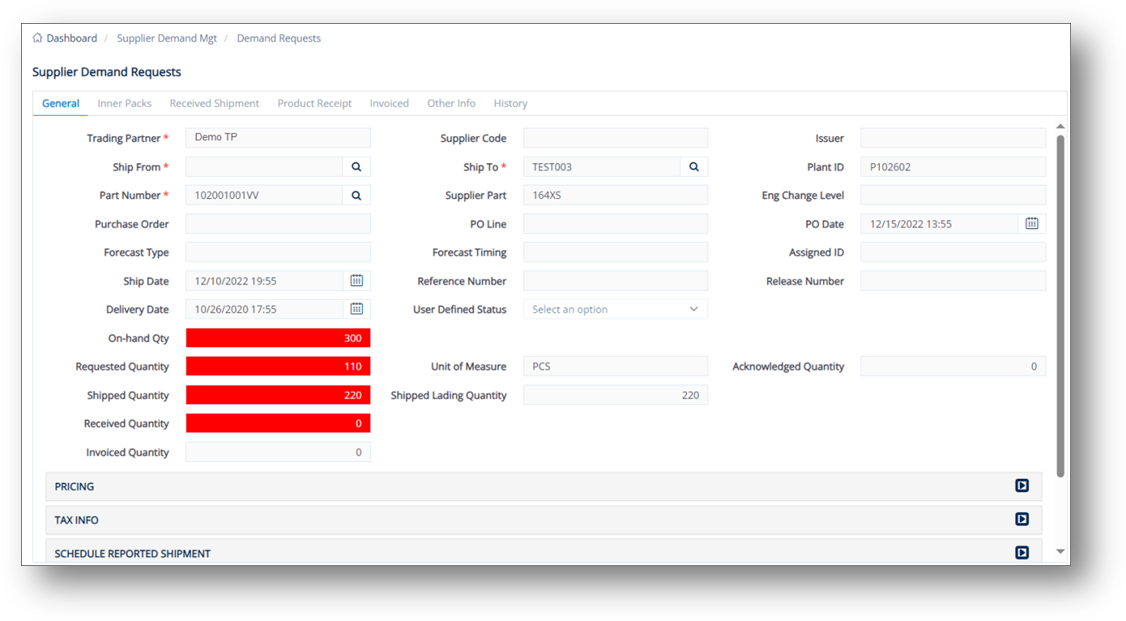
Part Number |
The Trading Partner's requested part number, found on the EDI release. |
Purchase Order |
The document reference number of the Purchase Order. |
Timing |
Timing of the shipment. |
Req. Ship Date |
The date when the Trading Partner wants the order to be shipped, found on the EDI release. |
Delivery Date |
The projected date when the parts will arrive at the Ship To location. |
User Defined Status |
Select a pre-configured status in the dropdown list. Contact the TrueAuto Support team to set up the statuses that you want to define. |
On-hand Qty |
The quantity of a specific item currently in the warehouse. |
Requested Quantity |
Ordered quantity from Buyer. |
Shipped Quantity |
The number of units shipped, or staged to ship on the Shipment (ASN) |
Received Quantity |
The actual quantity received/arrived at the Trading Partner's location. |
Invoiced Quantity |
The quantity entitled for payment claim in Invoice. |
Supplier Code |
Your Supplier Code assigned by the Trading Partner. |
Ship To |
The Ship To code representing the customer’s address. |
Supplier Part |
The supplier’s SKU or the internal part number used to cross-reference when you export to an ERP/MRP Inventory Control system. |
Purchase Order Line |
A data line/row of a purchase order. |
Reference Number |
The reference number from the original document if shown on the EDI release. This has multiple uses, such as identifying each line item of a PO. For example, Delivery Order Number. |
Our Ship Date |
Your date when the order is to be shipped. |
Our Del. Date |
Your date when the parts will arrive at the Ship To location. |
Unit of Measure |
The unit of measure used. |
Shipped Lading Quantity |
The quantity/number of Shipped Pallet or Stand-alone containers. |
Issuer |
Usually the issuer. |
Plant ID |
The identifier of the company. |
Assigned ID |
The Line Number or assigned ID for invoices and POs as shown on the EDI release. |
PO Date |
The date when the purchase order was created. |
Release Number |
The number of the material release document. |
Eng Change Level |
The engineering/design change code for the part ordered. |
Acknowledged Quantity |
The quantity that is known/accepted (in number) by the Trading Partner. |
Field |
Definition |
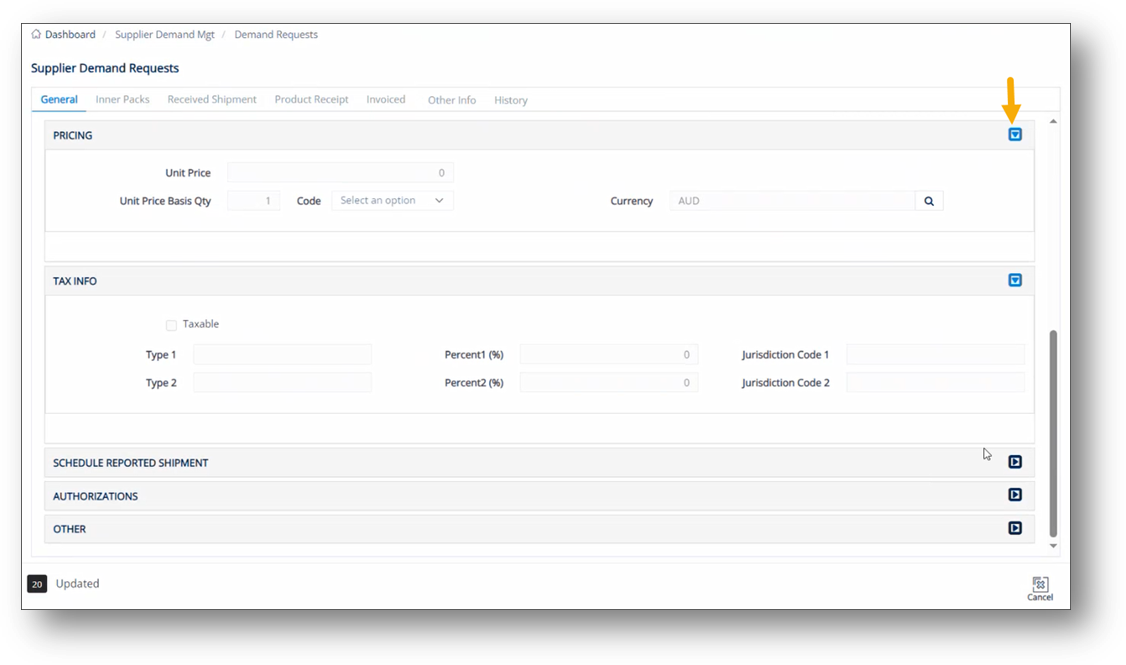
Unit Price |
Price of an individual piece. |
Unit Price Basis Qty |
The quantity used as a base for calculating Unit Price. For example: $1 for 10 pounds. |
Currency |
The currency code. |
Field |
Definition |
Type 1 |
First Tax type. |
Percent 1 (%) |
Percentage of first Tax type. |
Jurisdiction Code 1 |
Tax jurisdiction code 1. |
Type 2 |
Second Tax type. |
Percent 2 (%) |
Percentage of second Tax type. |
Jurisdiction Code 2 |
Tax jurisdiction code 2. |
Field |
Definition |
Quantity |
- Last Quantity: Qualifier for the quantity in the following field – choose if the quantity was shipped or received from this Trading Partner. o 011: Shipped o 050: Received |
Qualifier |
Type of shipment. - C: Firm - D: Planning |
Cumulative Quantity |
Qualifier for the cumulative quantity shipped/received from this Trading Partner. |
Date |
Date of the last ASN. |
Start Date |
Start date of this cumulative quantity. |
Through Date |
Cumulative quantity through this date. |
Shipment ID/ASN Number |
Shipment identifier or ASN number. |
Field |
Definition |
Quantity |
- Finished Goods Authorization: Authorize quantity parameters for finished goods. - Raw Materials Authorization: Authorize quantity parameters for raw materials. - Cum Prior to Shipment: Authorize cumulative quantity parameters before receiving the shipment. |
Start Date |
- Finished Goods Authorization: Start date of quantity parameters for finished goods. - Raw Materials Authorization: Start date of quantity parameters for raw materials. - Cum Prior to Shipment: Start date of cumulative quantity parameters before receiving the shipment. |
End Date |
- Finished Goods Authorization: End date of quantity parameters for finished goods. - Raw Materials Authorization: End date of quantity parameters for raw materials. - Cum Prior to Shipment: End date of cumulative quantity parameters before receiving the shipment. |
Field |
Definition |
Pickup Date |
The date when the part/product was picked up after the shipment arrived at the destination. |
Received Date |
The date when the part number was received. |
Part Type |
Unique identifying codes assigned to each part type if shown on the EDI release. |
Substitute Part |
The vendor replacement part or alternate part number. |
Product ID |
The Product Identifier. |
Job Sequence |
The order in which to load containers on a trailer or pack parts in a container. |
Line Feed |
The Line Feed location from the order as shown on the EDI release. |
Reserve LF |
The Reserve Line Feed, if any. |
Order Status |
The codes that TrueAuto uses to assign the Firm Order’s status. |
Shipped Part |
The parts shipped. |
Dock Number |
Larger plants may have one Ship To, but multiple receiving docks. If used, this number is found on the EDI release. |
Truck Route |
Some Trading Partners provide truck routing information. If used, this number is found on the EDI release and depending on the specifications, it may be added to the ASN’s Carrier field. |
Project Number |
The number of the involved project. |
Created Date |
The date when the order was created. |
Modified Date |
The date when the order record was changed. |
Invoiced Date |
The date of issuing bill/invoice. |
Amount Invoiced |
The total paid amount declared in Billing/Invoice. |
Transaction Type |
The type of any business transaction, e.g., in X12, Purchase Order transaction known as 850, in EDIFACT as an ORDER. |
Purpose |
The order’s purpose code. |
Document |
The Document Reference Number in EDI. For example, the Document Ref. No. of the EDI 862 document is BSS02. |
Order Received |
The date when the order was received. |
Appointment Number |
Shipment booking number assigned by Logistics. |
Quantity Type |
Indicates the basis of quantity values in shipments. A: Actual quantity, no calculations required to determine how much product to send. C: Cumulative quantity, calculations required to determine how much product to send. Common item: Id=R; Code=QTYQU; Setting=value from above. |
Quantity/Pack |
The number of units of a part in each shipping container. |
Created By |
The person who created the order. |
Modified By |
The user ID of the last person who saved a change to the Order. |
Ship Delivery Calendar Pattern |
Calendar pattern to define Ship Delivery date. |
Ship Delivery Time Pattern |
Time pattern to define Ship Delivery timing. |
Reference Qualifier |
A qualifier in EDI to define a reference note. |
Order Weight |
The total weight of all units in this order. |
Originator |
Generating source. |
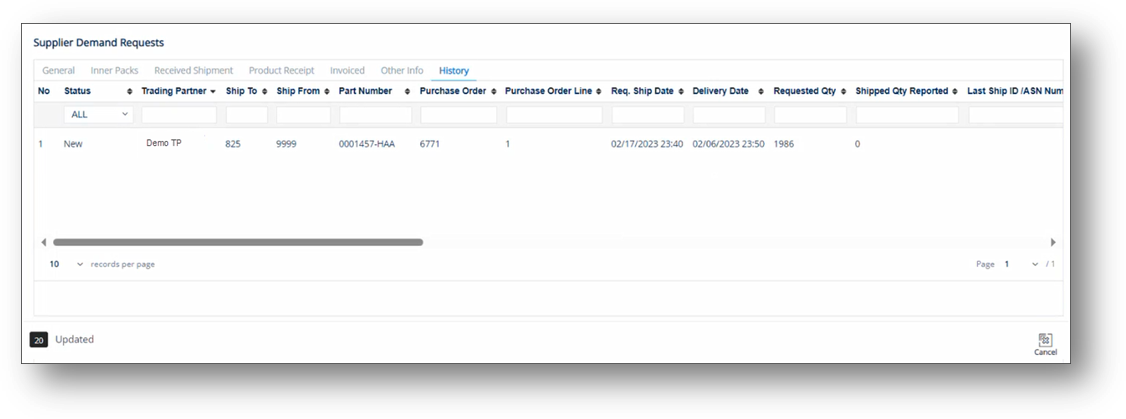
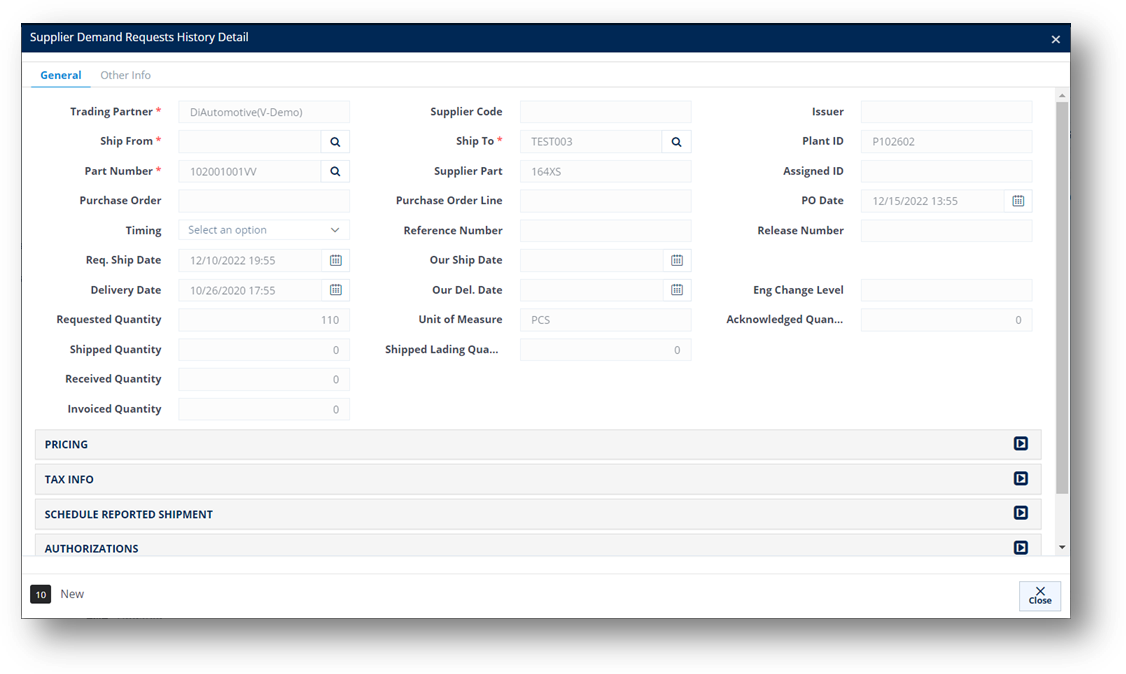
This feature displays all the processing that has occurred to a demand request. After you save the changes made to a request, the previous one will be stored on the History tab.
1. On the Supplier Demand Requests screen, switch to the History tab.
2. On the History tab, click the request whose history records you want to view.

The Supplier Demand Requests History Detail window is displayed.
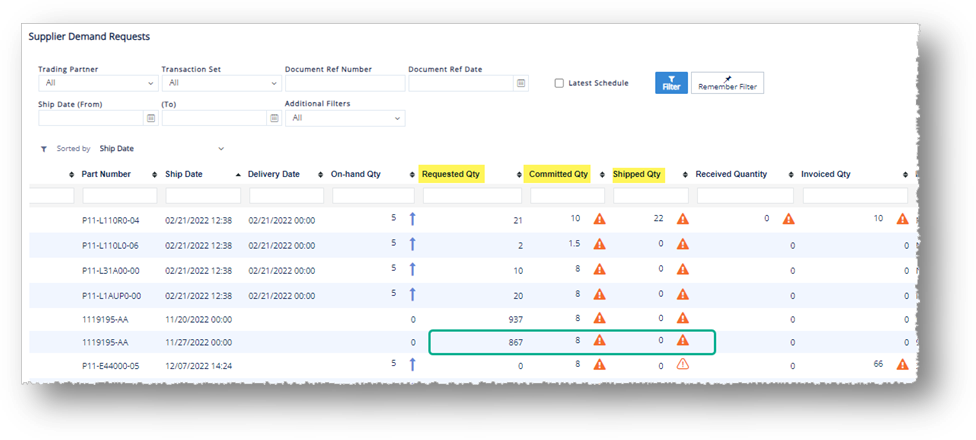
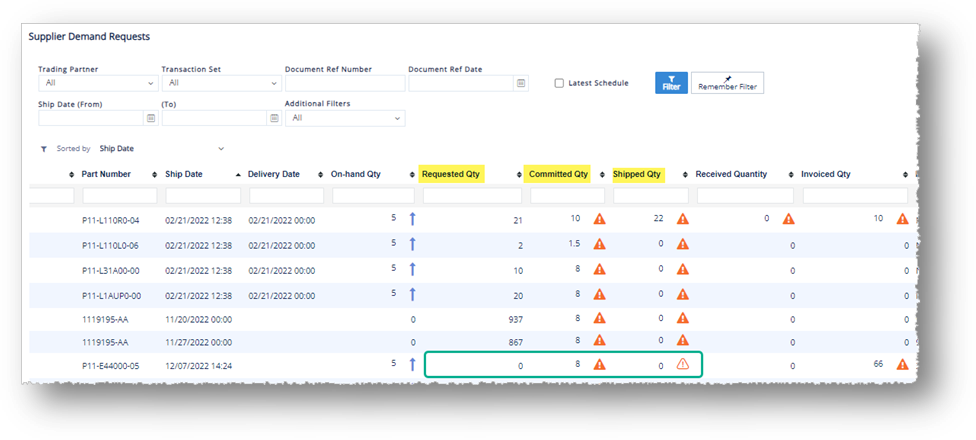
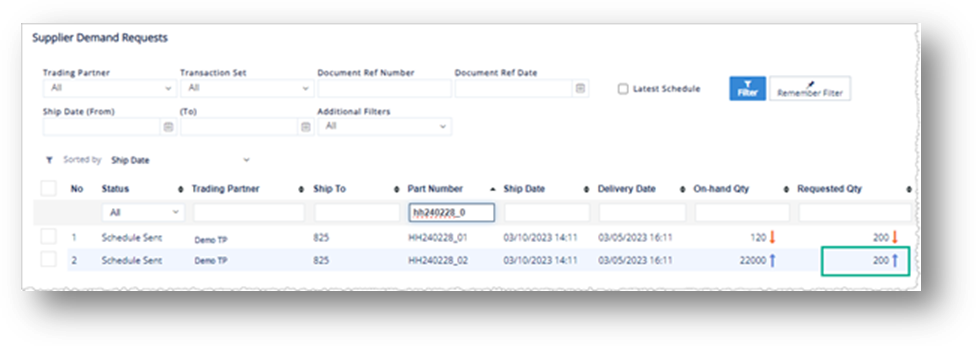
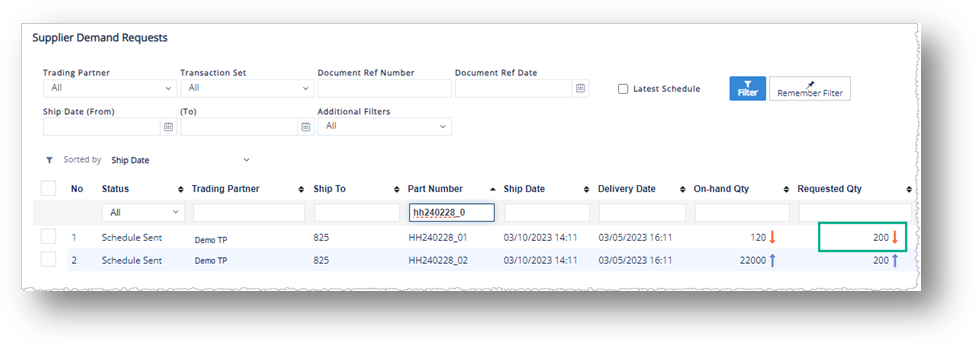
TrueAuto uses alert icons as a visual way for you to quickly identify any quantity deviations on the Supplier Demand Requests screen. Refer to the following cases:
Case |
Alert Icon Example |
If On-hand Qty
is above Qty on Hand Max, a blue up-arrow icon |
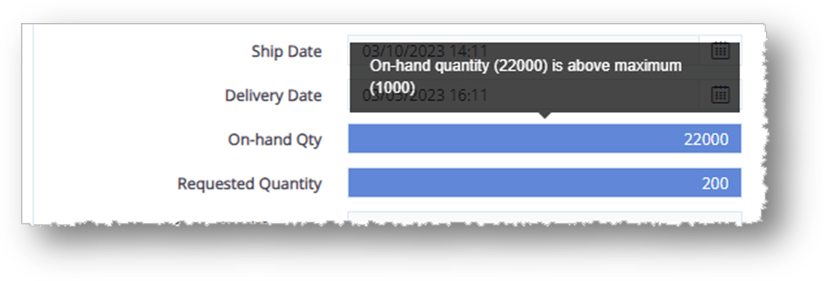
On-hand Qty = 22000 but Qty on Hand Max = 20000
|
If On-hand Qty
is below Qty on Hand Min, a red down-arrow icon |
On-hand Qty = 120 but Qty on Hand Min = 150
|
If Requested Qty
is above Order Qty Max, a blue up-arrow icon |
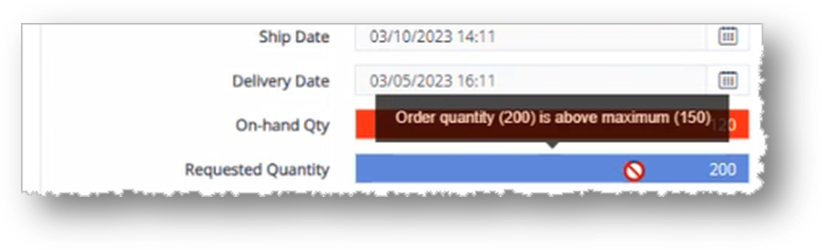
Requested Qty = 200 but Order Qty Max = 150
|
If Requested Qty
is below Order Qty Min, a red down-arrow icon |
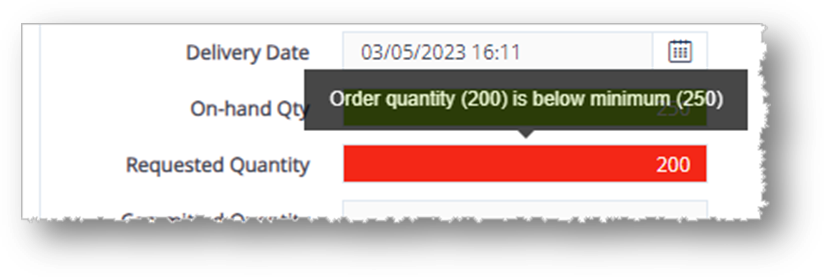
Requested Qty = 200 but Order Qty Min = 250
|
If Invoiced Qty
differs from Received Qty, a dark orange triangle |
Invoiced Qty = 10 but Received Qty = 0
|
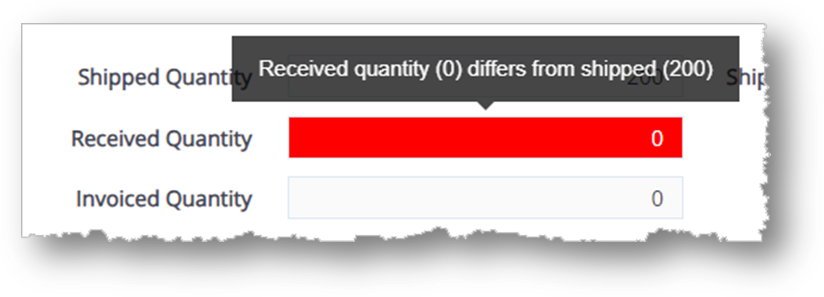
If Received Qty
differs from Shipped Qty, a dark orange triangle |
Received Qty = 0 but Shipped Qty = 22
|
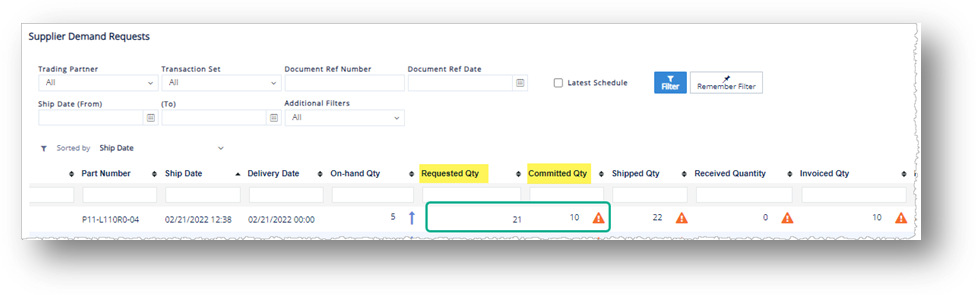
If Committed Qty
differs from Requested Qty, a dark orange triangle |
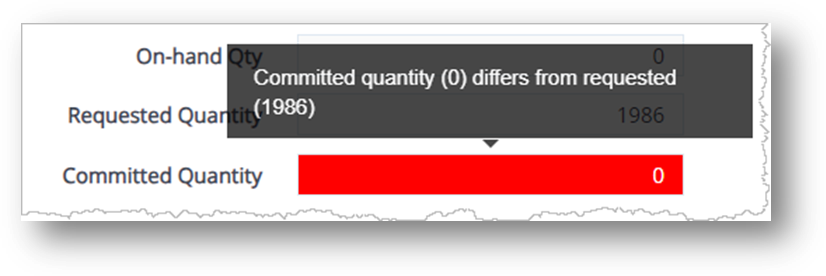
Committed Qty = 10 but Requested Qty = 21
|
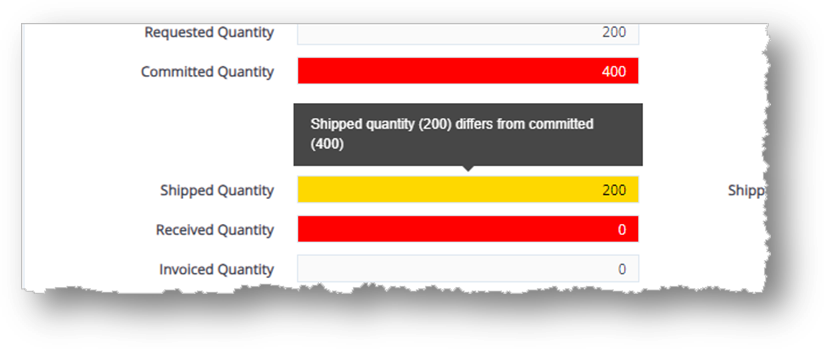
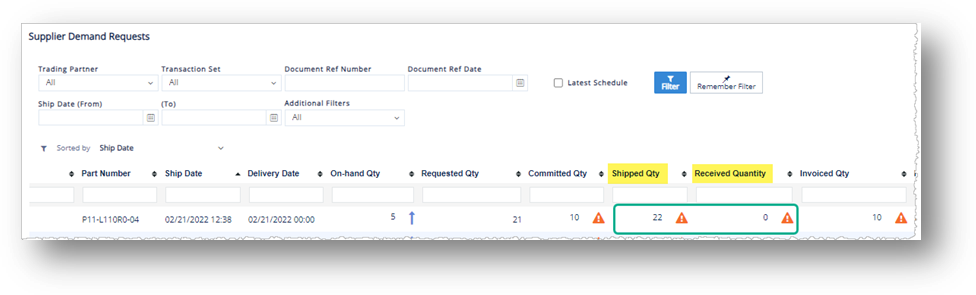
The following comparison priority is made for Ship Qty: 1) Shipped Qty versus Requested Qty 2) Shipped Qty versus Committed Qty So, to indicate the quantity discrepancy: · If Shipped Qty
differs from both Requested Qty and Committed Qty,
a dark orange triangle · If Shipped Qty
equals Requested Qty but differs from Committed Qty,
a light orange triangle |
Shipped Qty = 0, Requested Qty = 867, and Committed Qty = 8
Shipped Qty = 0, Requested Qty = 0, and Committed Qty = 8
|
TrueAuto uses alert colors and tooltips on the Supplier Demand Requests > General tab, as visual ways for you to quickly identify a discrepancy between quantities.
Case |
Alert Color |
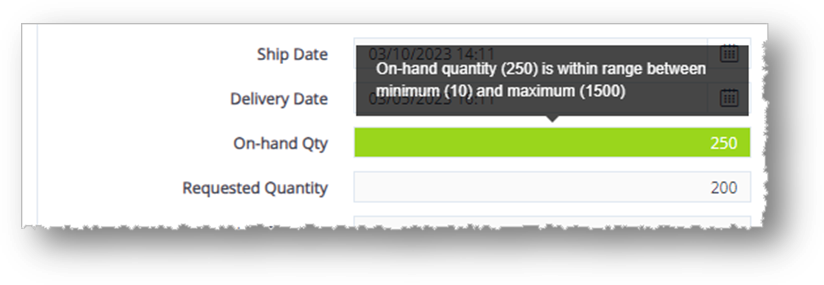
On-hand Qty is within the range between Qty on Hand Min and Qty on Hand Max. |
Green |
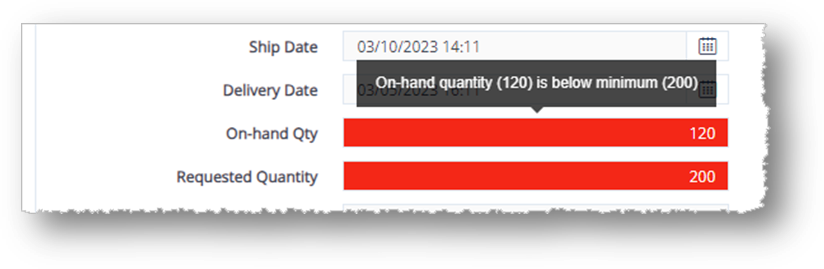
On-hand Qty is below Qty on Hand Min. |
Red |
On-hand Qty is above Qty on Hand Max. |
Blue |
Requested Qty is within the range between Order Qty Min and Order Qty Min. |
No color |
Requested Qty is below Order Qty Min. |
Red |
Requested Qty is above Order Qty Max. |
Blue |
A tooltip is a visual description of exception details that is displayed when you put the cursor over the On-hand Qty and Requested Quantity fields, which are shown in different colors. Refer to the following cases:
Case |
Tooltip Example |
On-hand Qty is within the range between Qty on Hand Min and Qty on Hand Max. |
|
On-hand Qty is below Qty on Hand Min. |
|
On-hand Qty is above Qty on Hand Max.
|
|
Requested Quantity is below Order Qty Min.
|
|
Requested Quantity is above Order Qty Max.
|
|
Committed Quantity differs from Requested Quantity. |
|
Shipped Quantity differs from Requested Quantity. |
|
Shipped Quantity differs from Committed Quantity. |
|
Received Quantity differs from Shipped Quantity. |
|
Invoiced Quantity differs from Received Quantity. |
|
IMPORTANT Note Inventory Advices on the Customer Demand Mgt screen and the ones on the Supplier Demand Mgt screen have similar functions. The main difference between them are the purpose of use and types of users.
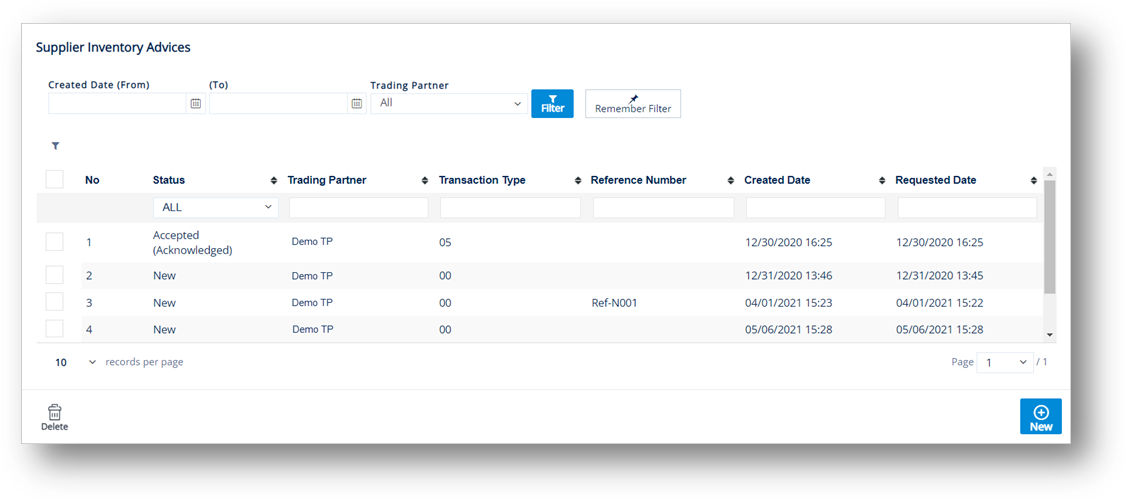
1. On the Supplier Demand Mgt menu, click Inventory Advices.
2. On the Supplier Inventory Advices screen, click the New button.
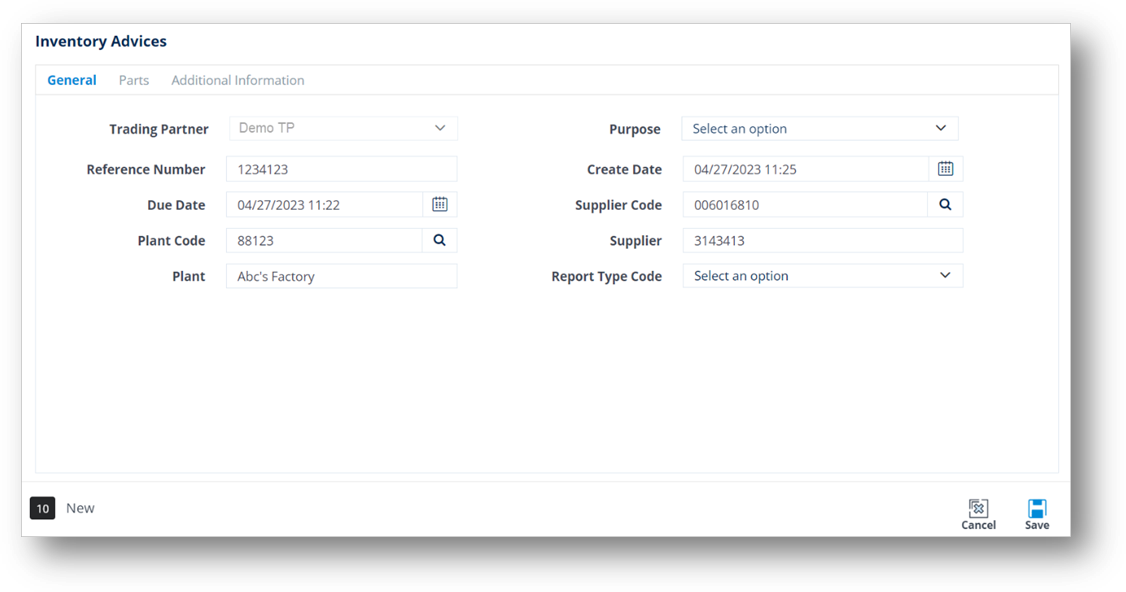
3. On the General tab, fill out the details of the Inventory Advice, as follows.
Note For a full description of each field, refer to the Field Definitions-General in the next section.
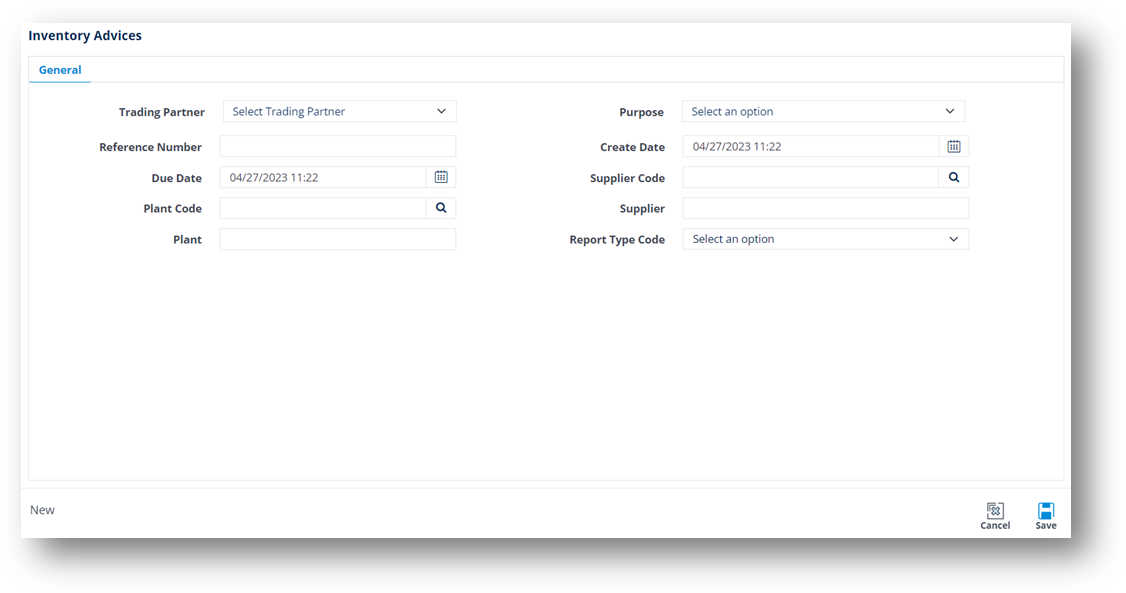
a. Select the Trading Partner in the dropdown list.
b. Select the purpose code in the Purpose dropdown list.
c. Enter the Reference Number in the text box.
d. Set the Created Date and Due Date in the calendars.
e. For Supplier Code, click the Search icon. On the Browse Supplier Code window, choose an option, and then click Select.
Note The supplier codes are loaded from the Addresses module of the trading partner.
f. For Plant Code, click the Search icon. On the Browse Address Code window, choose an option, and then click Select.
g. Type the Supplier Name in the text box.
h. Type the Plant Name in the text box.
4. When you’re finished, click Save.
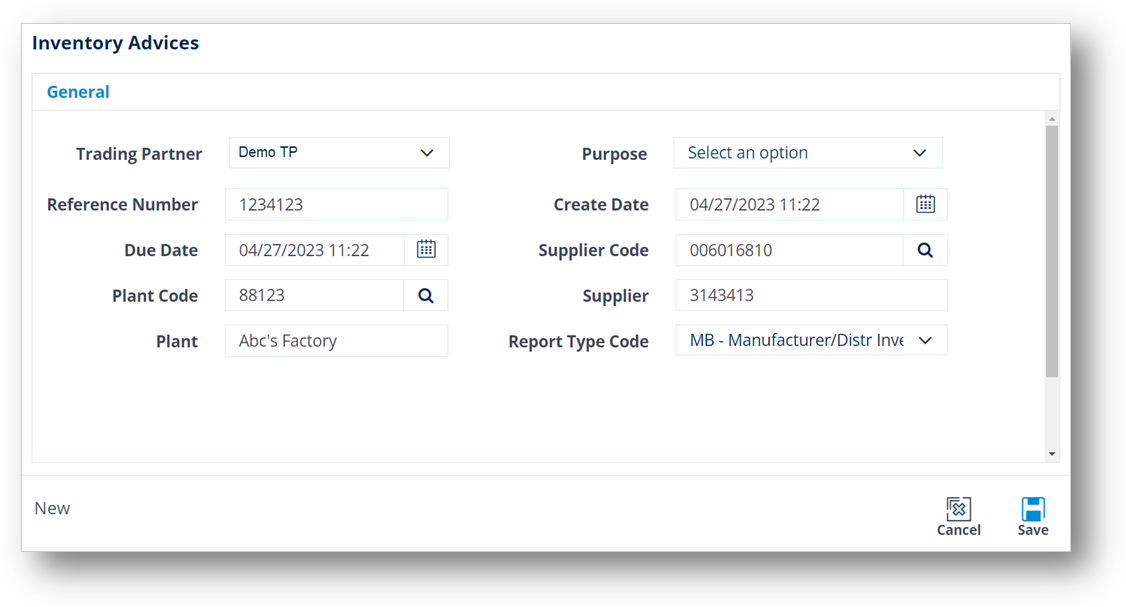
After you save the information on the General tab, the Parts tab is displayed.
5. Switch to the Parts tab.
6. On the Parts tab, click the New icon to create a new part number.
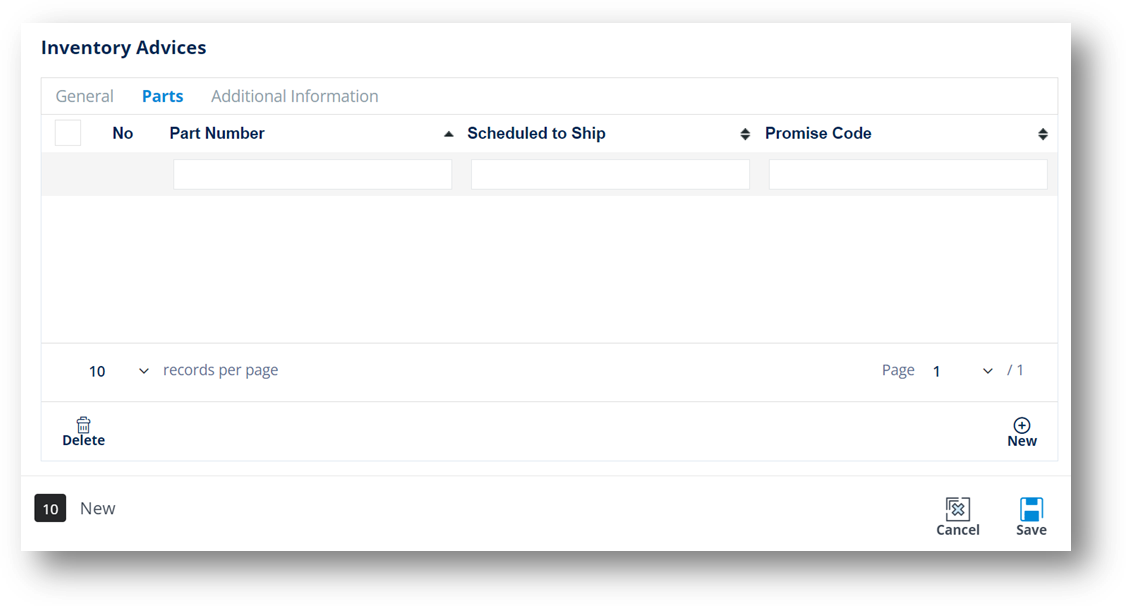
7. On the Inventory Advices Detail window, fill out the details of the part, as follows.
Note For a full description of each field, refer to the Field Definitions - Parts in the next section.
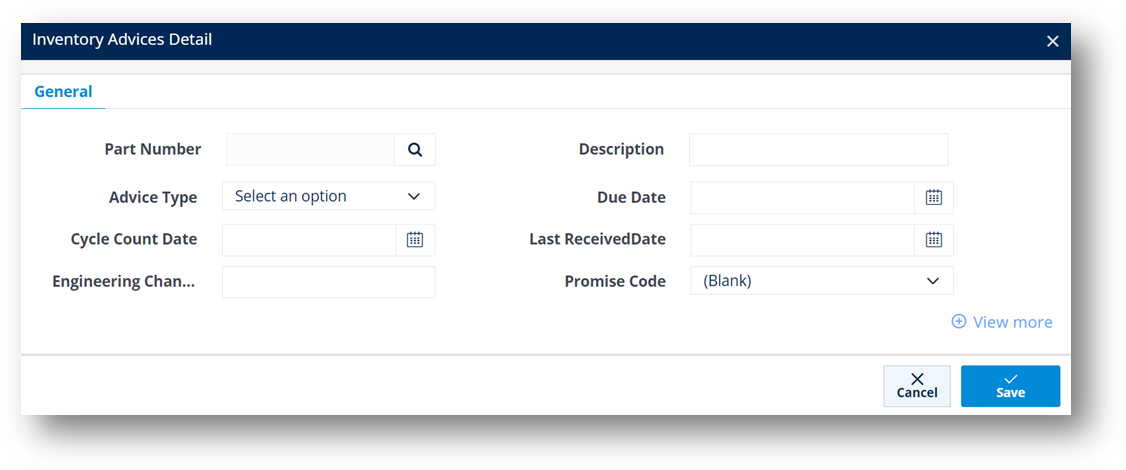
a. For Part Number, click the Search icon. On the Browse Parts window, choose an option, and then click Select.

b. Type the Description in the text box.
c. Select the Advice Type in the dropdown list.
d. Set the Due Date, Cycle Count Date, and Last Received Date in the calendars.
e. Enter the Engineering Change Level in the text box.
f. Type in the Promise Code in the text box.
g. Next, click the View more link to expand the details.
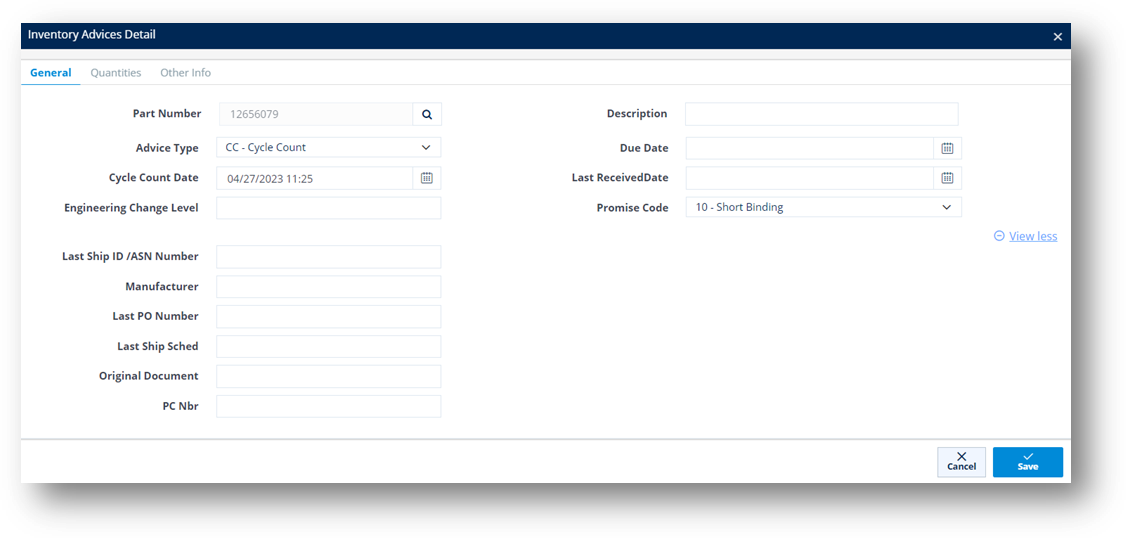
h. Fill out the Last Ship ID, Manufacturer, Last PO Number, Last Ship Scheduled, Original Document, and PC Number in the text boxes.
8. When you’re finished, click Save.
The part is created.
9. On the Inventory Advices window, click to open the part that you created.
TIP You can use the Delete icon to remove a record.
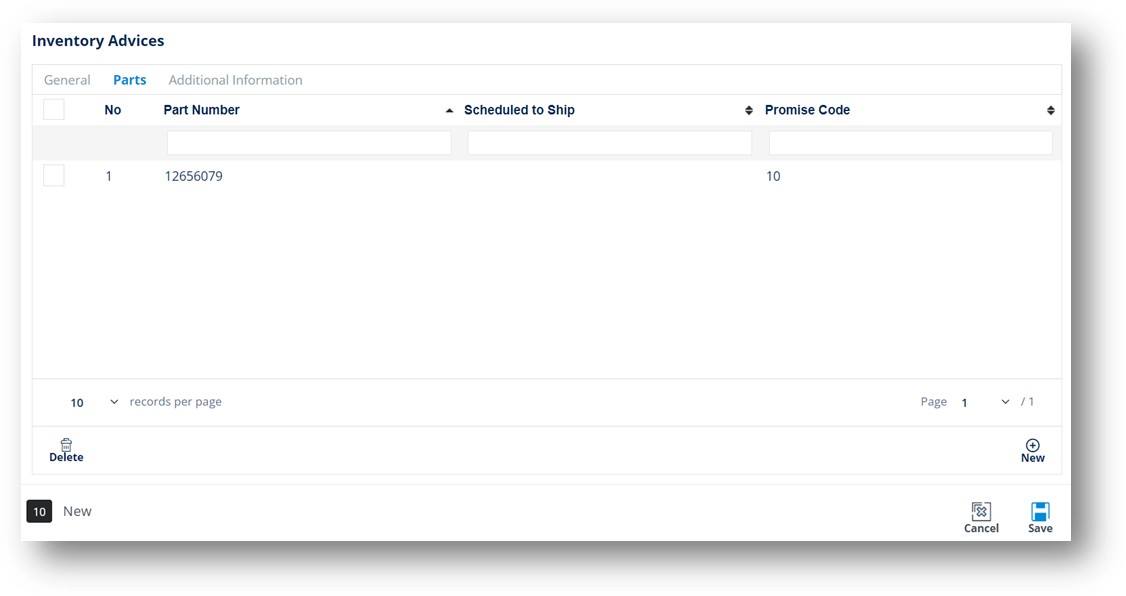
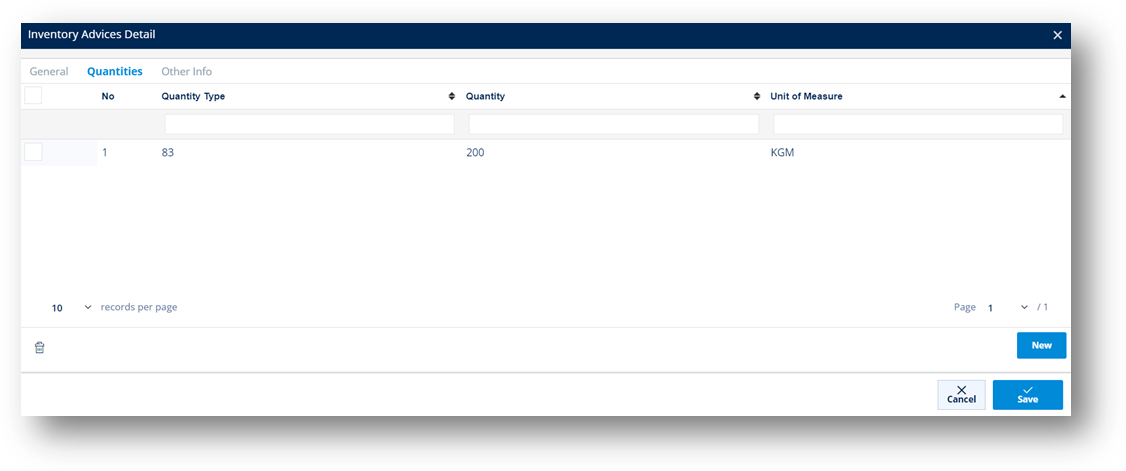
On the Inventory Advices Detail window, the Quantities and Other Info tabs are displayed.
10. Switch to the Quantities tab, and then add the quantity information about the part by doing the following:
a. Click the New button.
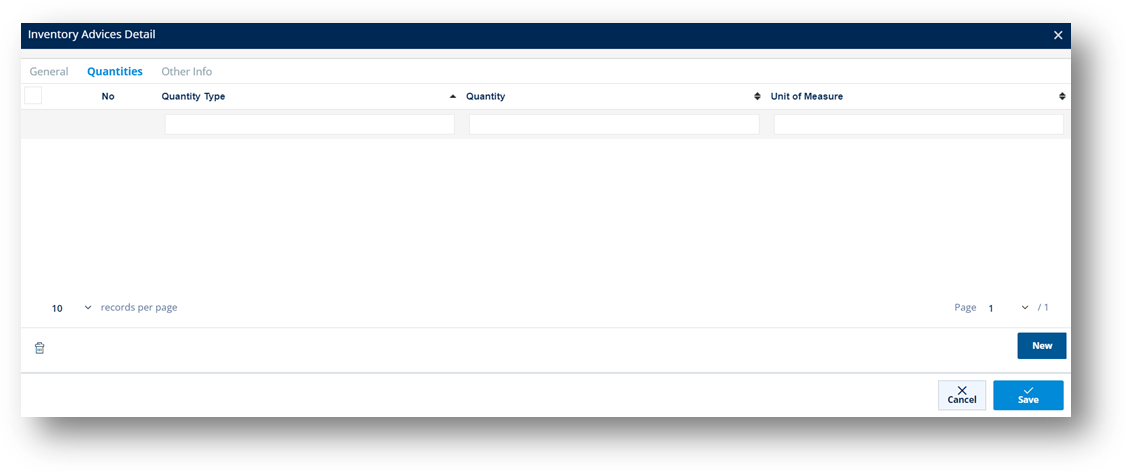
b. On the Inventory Advices Detail Quantity window, fill out the form.

c. Click Save.
The part quantity is added.
11. Switch to the Other Info tab, and then add the other information about the part.
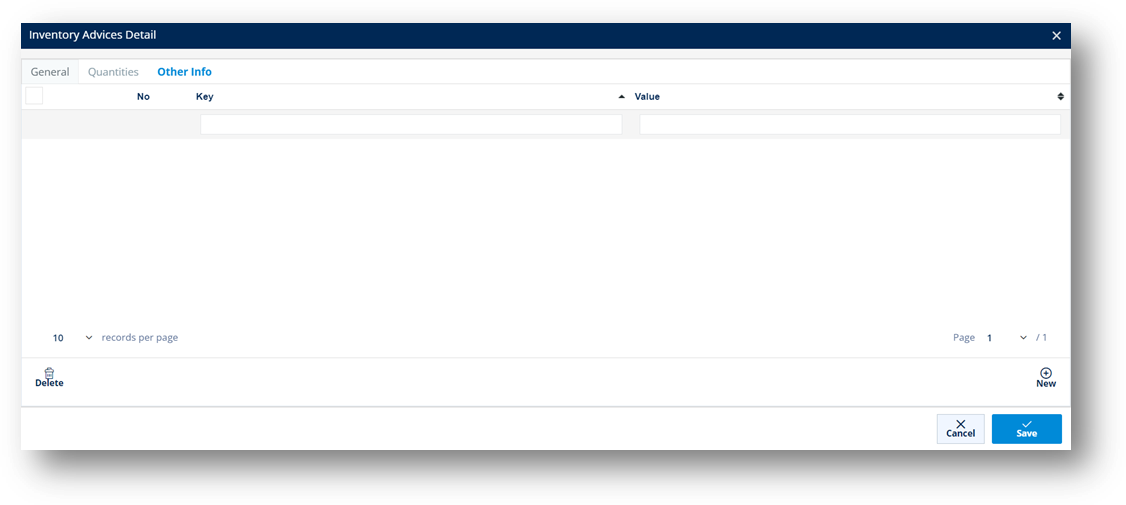
12. When you’re finished, click Save.
Field |
Definition |
Trading Partner |
The ID code of the Trading Partner. |
Purpose |
The Inventory Advice’s purpose code. |
Reference Number |
The reference number from the original document for this inventory advice. |
Created Date |
The date when the inventory advice was created. |
Due Date |
The date when the inventory advice is due. |
Supplier Code |
The ID code of the Supplier. |
Supplier Name |
The name of the Supplier. |
Plant Code |
The branch company of the Supplier Code. |
Plant Name |
The name of the branch company, which belongs to the Supplier. |
Field |
Definition |
Part Number |
The part number for the Inventory Advice. |
Description |
A brief description about the part ordered. |
Advice Type |
The type of Inventory Advice. Examples: - IA: Inventory Adjustment - RA: Receipt Adjustment |
Due Date |
The end date of storage life cycle of the product. It could be shipped date/delivery date. |
Cycle Count Date |
The start date of periodic counting of individual items throughout the course of the year to ensure the accuracy of inventory quantities and values. |
Last Received Date |
The last date when the part number was received. |
Engineering Change Level |
The engineering/design change code for the part ordered. |
Promise Code |
The number of the involved project. |
Last Ship ID |
The last Shipment ID (ASN Number). |
Manufacturer |
Supplier or manufacturer of the product or part. |
Last PO Number |
The last Purchase Order reference number. |
Last Ship Sched |
The last date when this part is scheduled to ship. |
Original Document |
The reference number of the original document for this part. |
Quantity Type |
The quantity type of the part. For example, 17 means Quantity on hand. |
Quantity |
The quantity of the part ordered. |
Unit of Measure |
The Unit of Measure for the part. |
1. On the Supplier Demand Mgt menu, click Inventory Advices.
2. On the Supplier Inventory Advices screen, click the record that you want to change.
3. On the Inventory Advices window, make the changes on the General and the Parts tabs as needed.
Note For a full description of each field, refer to the Field Definitions in the previous section.
4. When you are finished, click Save.
1. On the Supplier Demand Mgt menu, click Inventory Advices.
2. On the Supplier Inventory Advices screen, select the inventory advice that you want to remove, and then click the Delete icon.
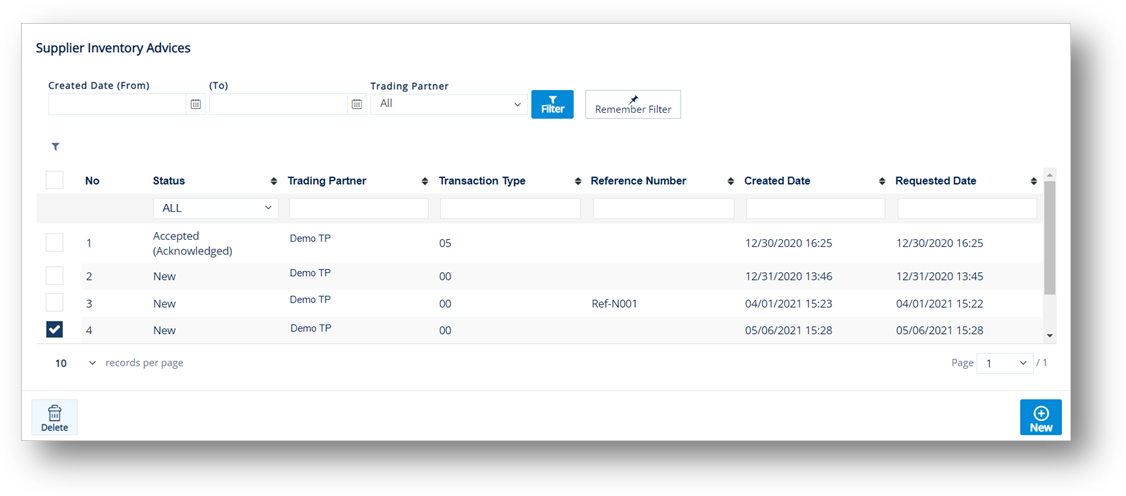
3. On the confirmation window, click OK.


 is used
to indicate the excess.
is used
to indicate the excess.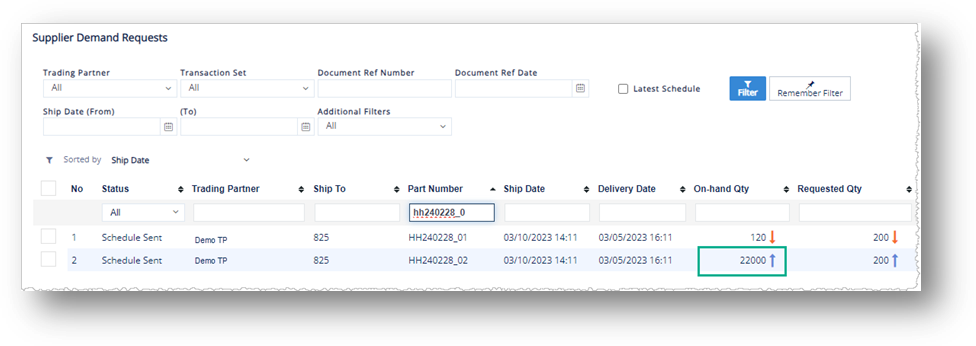
 is
used to indicate the deficiency.
is
used to indicate the deficiency.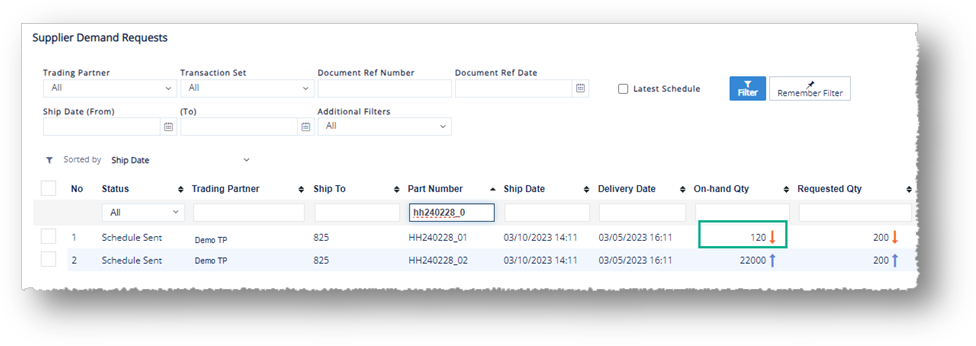
 is used to indicate the quantity
discrepancy.
is used to indicate the quantity
discrepancy.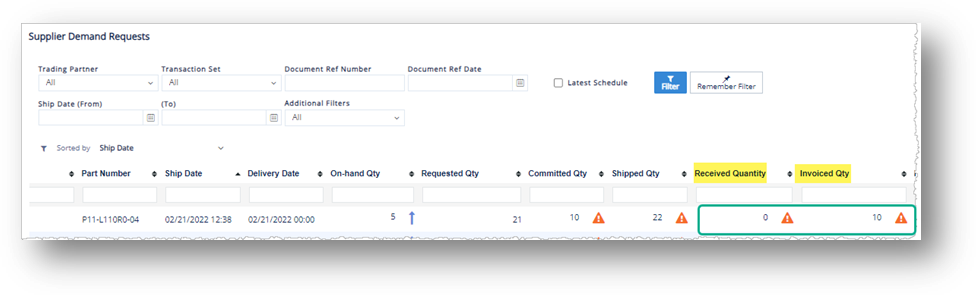
 is used. This
icon represents a less severe warning.
is used. This
icon represents a less severe warning.