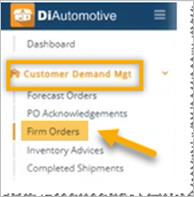
Customer Demand Management
The intended use for the Customer Demand Management (Planning) system is to handle all Forecast information sent in through EDI from customers. This forecast information can be used for material and/or production planning. You can use information found in the DiAutomotive Planning file by printing reports, creating exports, or if needed, preparing ASNs. When Trading Partners send forecast data via EDI, DiAutomotive generally separates orders into Forecasted Orders and Firm Orders.
As releases from Trading Partners are processed, forecasted orders are transferred to the Planning file, and firm orders are transferred to the Firm Orders file. In general, you cannot ship against forecasted orders, however, Firm Orders must be shipped. Each Trading Partner has a preset way of handling orders: whether they are routed to the Planning file or routed to the Firm Orders file. You can choose to make modifications to this routing based on your needs. Contact the DiAutomotive Support team if you are interested in changing the way that data is routed.
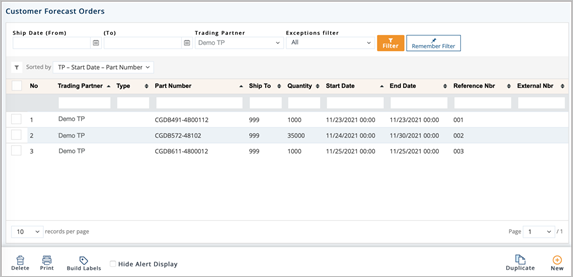
1. On the Customer Demand Mgt menu, click Forecast Orders.
tip Use the Filter panel to search for forecast orders.
2. On the Customer Forecast Orders screen, click the forecast that you want to view.
3. Select the General, SHIP/DELV DATE REVIEW, MISCELLANEOUS, or History tabs to view the corresponding details.
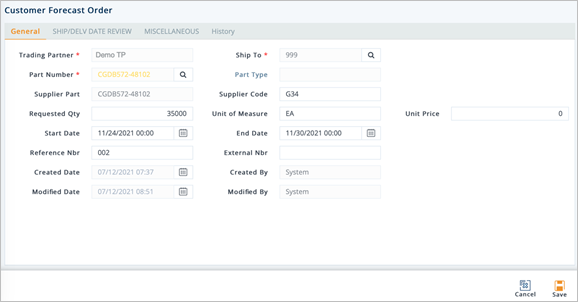
GENERAL tab
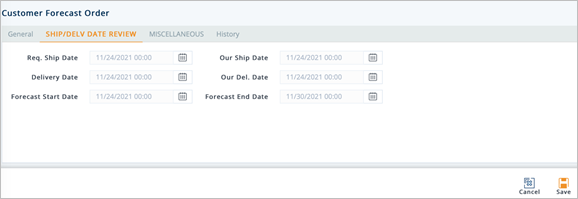
SHIP/DELV DATE REVIEW tab
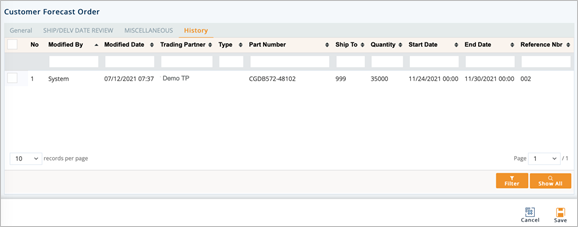
HISTORY tab
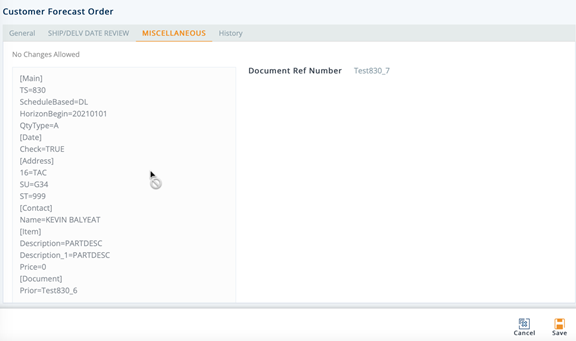
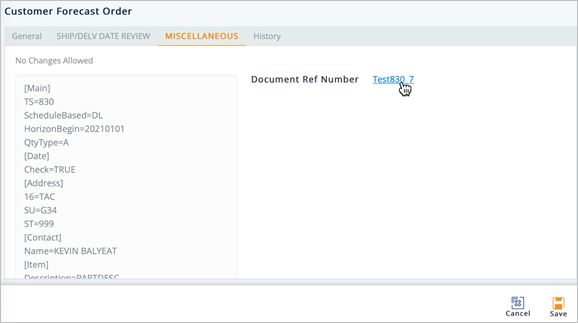
Work with MISCELLANEOUS
To view and print an incoming EDI document
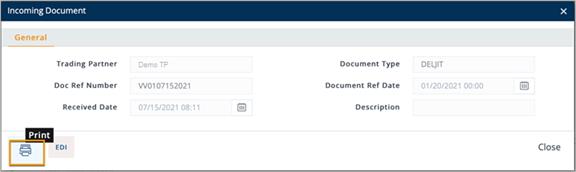
1. Click the Document Ref Number link.
2. On the Incoming Document window, click the EDI button.
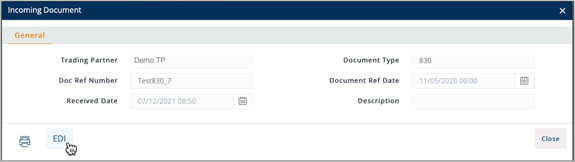
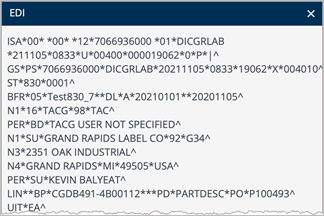
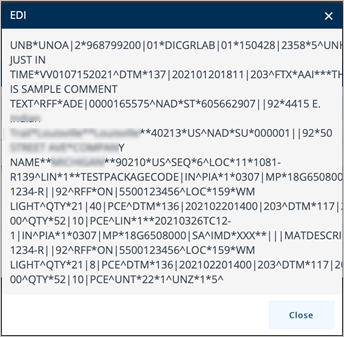
The EDI window displays the raw EDI for the selected incoming document.
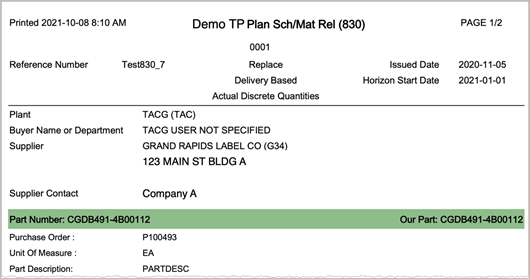
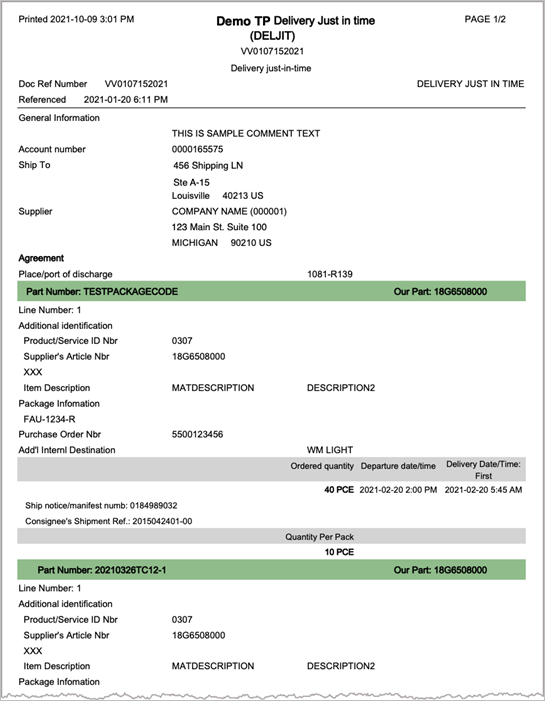
3. On the Incoming Document window, click the Print icon.
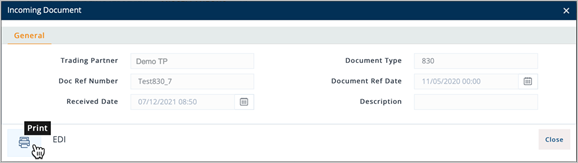
The Incoming Document is displayed in a new window.
tip To learn more about Incoming Documents, refer to Incoming Documents.
Work with History
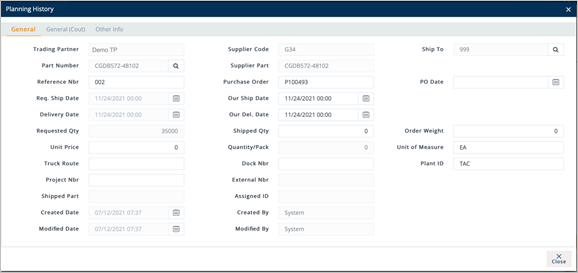
To view Planning History
This feature displays all the processing that has occurred to a forecast order. After you save the changes made to a forecast order, the previous forecast order will be stored on the History tab.
1. On the History tab, click the order whose history records you want to view.

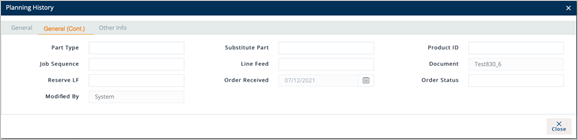
2. On the Planning History window, select the General, General (Cont.), or Other Info tabs to view the corresponding details.
General tab
General (Cont.) tab
Other Info tab
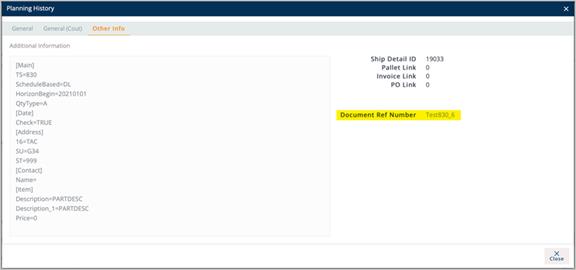
tip You can view and print an incoming EDI document on the Other Info tab by referring to steps on the MISCELLANEOUStab.
Build Labels for a Forecast
1. On the Customer Forecast Orders screen, select the forecast for which you want to build labels.
2. Click the Build Labels button.
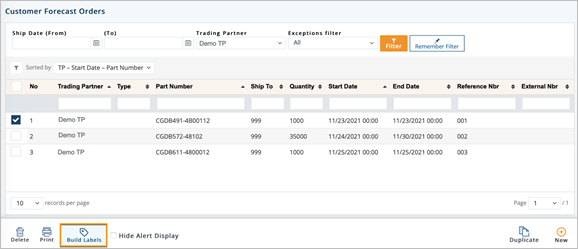
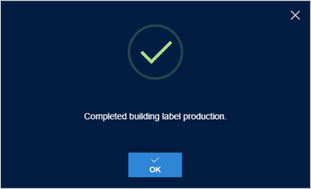
3. On the completed labels message, click OK.
You can manipulate the views of forecast data into multiple formats. You can also export forecast reports to a file or an Excel spreadsheet for external use.
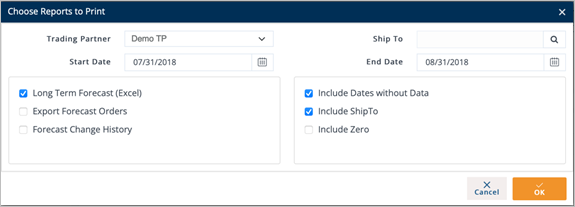
Print a Report
1. On the Customer Forecast Orders screen, click Print.
2. On the Choose Reports to Print window, do the following:
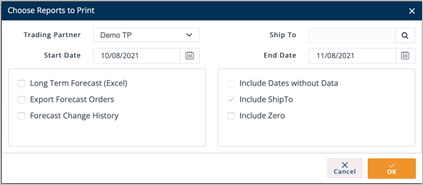
a. Select the Trading Partner and Ship To in the drop-down list.
b. Select the Start Date and End Date from the calendars.
c. In the left pane, select the report that you want to print. Use the following Field Definitions.
d. In the right pane, select one or more options, and then click OK to preview the report.
Field Definitions
§ Trading Partner: Narrow view of the Trading Partner’s name. Use * for all Trading Partners.
§ Ship To: Narrow view of the Trading Partner's Ship To locations. Use * for all Ship Tos.
§ Start Date: Narrow view of forecast periods starting on or after this date.
§ End Date: Narrow view of forecast periods ending on or before this date.
§ Long Term Forecast (Excel): Opens Excel and uploads the selected search parameters.
§ Export Forecast Orders: Exports files to a .csv file.
§ Forecast Change History: Prints a history report with changes made to forecasts.
§ Include Dates without Data: Includes all dates in the date range, even if they do not have data associated with them.
§ Include Ship To: Includes the Ship To column in the report.
§ Include Zeros: Includes values of zero (0) in the report.
Export a Report
Two of the check boxes in the Choose Reports to Print window are used to export data to either an Excel spreadsheet or a comma-separated plain text file (.csv).
Once the files are exported, you can bring meaning to the data using the functions in Excel or other external program. If the data does not appear to have exported correctly, contact the DiAutomotive Support team. If you are having trouble manipulating the data after it has been successfully exported to Excel or .csv file, contact your IT Dept. for help.
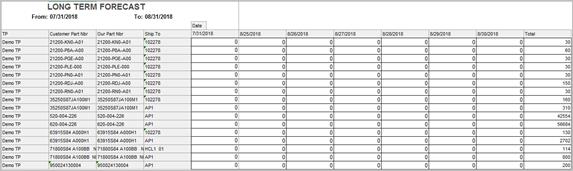
Export a Planning Report to an Excel Spreadsheet
With the Long Term Forecast (Excel) check box selected, DiAutomotive opens a new Excel spreadsheet and begins to populate a worksheet with the parameters that were entered in the Forecast Reports window.
The export process omits all dates without forecast data. Select the Include Dates without Data check box to override the omission and show one column for all dates in the range that was specified.
Create a Forecast
Unless you are working with a non-EDI Trading Partner or are replacing an order that was accidentally removed, there should be little to no reason to manually add a new record.
1. On the Customer Demand Mgt menu, click Forecast Orders.
2. On the Customer Forecast Orders screen, click New.
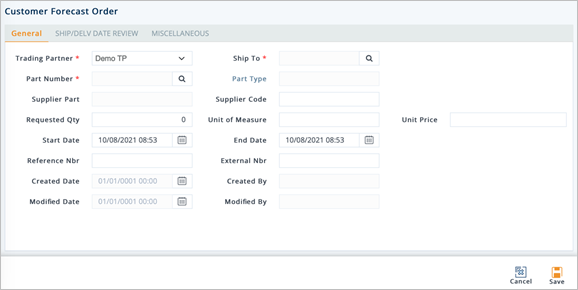
3. On the next screen, fill out the details of the new plan on the General, SHIP/DELV DATE REVIEW, or MISCELLANEOUS tabs. Use the following Field Definitions.
4. When you’re finished, click Save.
Field Definitions-General
Trading Partner: The name of the requesting party.
Ship To: The forecasted Ship To location.
Part Number: The Trading Partner’s part number.
Part Type: Unique codes assigned to each type of item.
Supplier Part: The internal part number or SKU (Stock Keeping Unit).
Requested Qty: The order quantity.
Unit of Measure: The unit of measure used.
Start Date: The start date of the forecast.
End Date: The end date of the forecast.
Forecast Type: Defines the type of order. Some Trading Partners ask their suppliers to ship against forecast documents. Common codes: C=Firm, D=Planning.
Forecast Timing: The timing designation of the Forecast. Common codes: D=Discrete, I=Immediate, W=Weekly, M=Monthly.
Supplier Code: Your Supplier Code assigned by the Trading Partner.
Field Definitions-SHIP/DELV DATE REVIEW
§ Req. Ship Date:The date when the Trading Partner wants the order to be shipped, found on the EDI release.
§ Our Ship Date:Your date when the order is to be shipped.
§ Delivery Date: The projected date when the parts will arrive at the Ship To location.
§ Our Del. Date: Your date when the parts will arrive at the Ship To location.
§ Forecast Start Date: The start date of the forecast.
§ Forecast End Date:The end date of the forecast.
1. On the Customer Demand Mgt menu, click Forecast Orders.
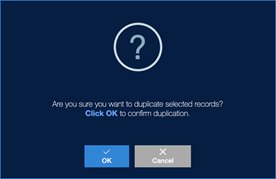
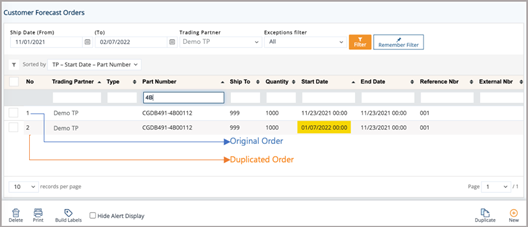
2. On the Customer Forecast Orders screen, select the order that you want to duplicate.
3. Click the Duplicate button.
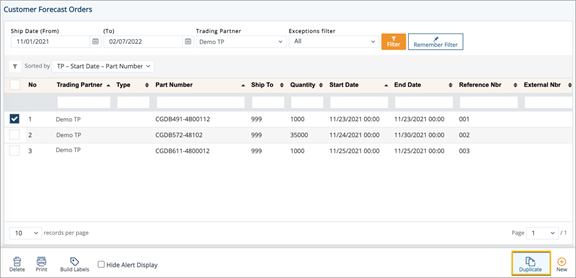
4. On the confirmation message, click OK.
5. On the Customer Forecast Order window, make changes as needed for the duplicated order.

Notes
- The only change made is that the Start Date, Ship Date, and Delivery Date are set to today’s date.
- You are only able to modify editable fields, such as Requested Qty, Unit of Measure, Unit Price, Reference Nbr, etc.
- The default fields cannot be changed (e.g., Trading Partner, Supplier Part, Ship To, etc.).
6. When you’re finished, click Save.
The Forecast Order is duplicated.
Delete a Forecast
1. On the Customer Demand Mgt menu, click Forecast Orders.
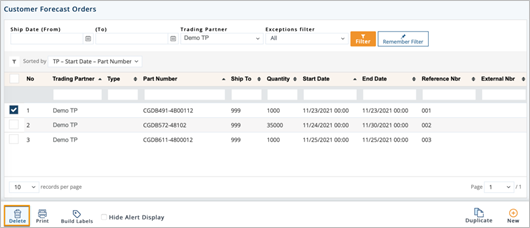
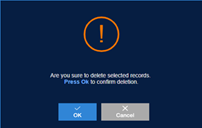
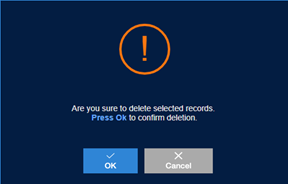
2. On the Customer Forecast Orders screen, select the forecast file that you want to remove, and then click the Delete icon.
3. On the confirmation message, click OK.
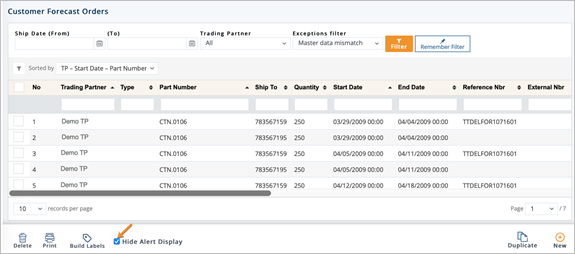
1. On the Customer Demand Mgt menu, click Forecast Orders.
2. On the Customer Forecast Orders screen, select the Hide Alert Display check box.
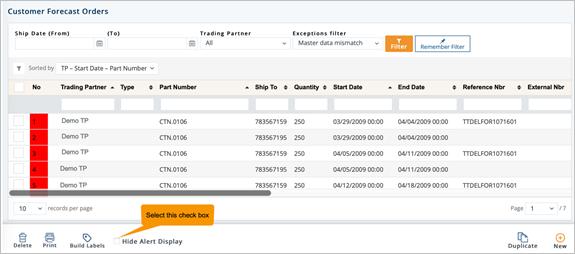
The color status (Red) will be hidden.
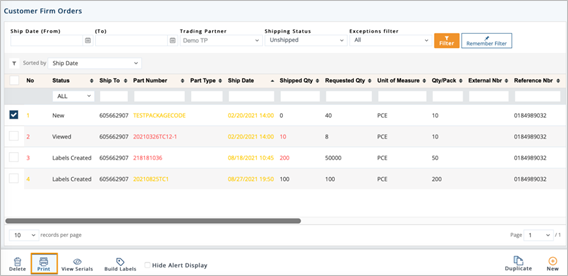
The Firm Orders file contains all “firmed” shipment requests from the Trading Partner based on incoming EDI data. Each Firm Order is defined by the Trading Partner specifications as some combination of part number, ship date, ship to, and reference number from the incoming document. Although the definition of Firm Order may differ between Trading Partners, each of their specifications are preloaded into DiAutomotive. Firm Orders are always displayed as unique records in the Firm Orders file. When they are ready to ship, Firm Orders are then attached to user-created shipments called ASNs through a process called assignment.
1. On the Customer Demand Mgt menu, click Firm Orders.
tip Use the Filter panel to search for firm orders.
2. On the Customer Firm Orders screen, click the order that you want to view.
tip For a full description of each field, refer to the Field Definitions in the next section.
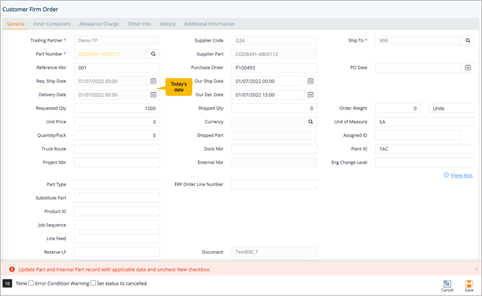
3. On the Firm Order Detail screen, select the General, Inner Containers, Allowance Charge, Other Info, and History tabs to view the corresponding details.
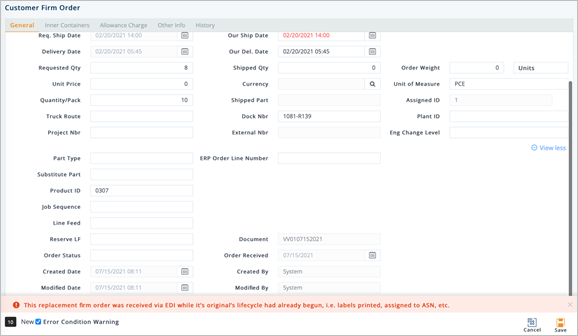
General tab
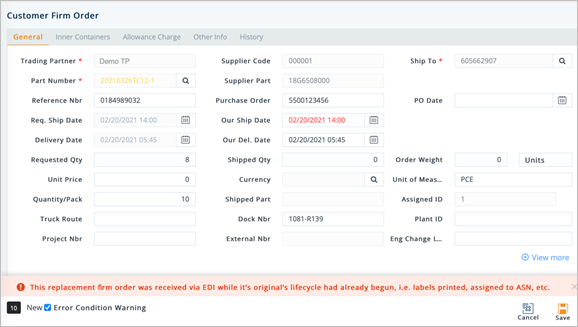
tip Click the  View more link to expand the details.
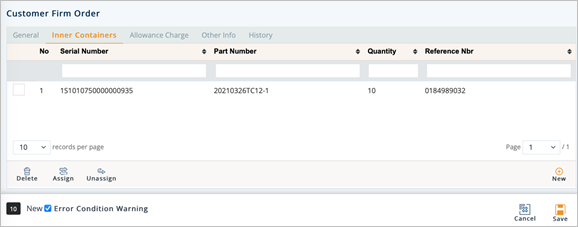
Inner Containers tab
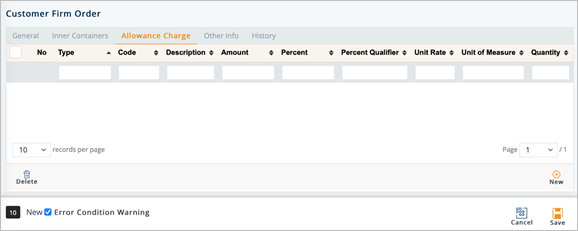
Allowance Charge tab
Other Info tab

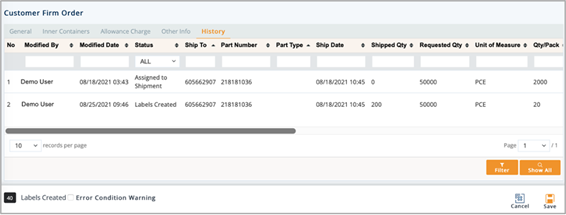
History tab
Field Definitions
§ Status: The Firm Order’s status. Each Firm Order listed on the Customer Firm Orders screen has a value in the Status column. These statuses indicate the latest actions completed on the order. Below are the codes and definitions of every Firm Order status:
- New: Record is untouched by any user.
- Viewed: Record has been opened and saved by a user.
- Assigned to Shipment: Record has been assigned to ASN.
- Labels Created: Labels have been generated.
- Labels Scanned: Labels have been printed.
- Documents Printed: Documentation has been printed.
- Staged: Allows the user to generate Product Activity records without generating EDI.
- Shipment EDI Created: ASN has been generated.
- Shipment EDI Sent: ASN has been transmitted.
- Cancelled: Record has been cancelled by a user.
- Assigned to Invoice: Record has been assigned to Invoice.
- Invoice EDI Created: Invoice has been generated.
- Invoice EDI Sent: Invoice has been transmitted.
§ Ship To: The Ship To code representing the customer’s address.
§ Part Number: The Trading Partner's requested part number, found on the EDI release.
§ Part Type: Unique identifying codes assigned to each part type if shown on the EDI release.
§ Ship Date: The projected date when units will be shipped.
§ Shipped Qty: The number of units shipped, or staged to ship on an ASN.
§ Requested Qty: The number of units ordered by the Trading Partner.
§ Unit of Measure: The unit of measure used.
§ Qty/Pack: The number of units of a part in each shipping container.
§ External Nbr: The number connecting DiAutomotive firm orders with an order from an external system. This number is automatically assigned when DiAutomotive exports a release.
§ Reference Nbr: The reference number from the original document if shown on the EDI release. This has multiple uses, such as identifying each line item of a PO. For example, Delivery Order Number.
§ Supplier Part: The supplier’s SKU or the internal part number used to cross-reference when you export to an ERP/MRP Inventory Control system.
§ Purchase Order: The document reference number of the Purchase Order.
§ Product ID: The Product Identifier.
§ Assigned ID: The Line Number or assigned ID for invoices and POs as shown on the EDI release.
§ Trading Partner: The ID code of the Trading Partner.
§ Original ID: The Firm Order ID may change. The original Firm Order ID is stored here.
Work with Inner Containers
To view the inner container details
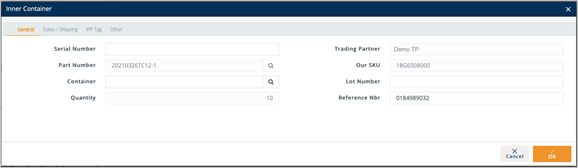
1. On the Inner Containers tab, click the container that you want to view.
2. On the Inner Container window, select the General, Dates/Shipping, IPP Tag,or Other tabs to view the corresponding details.
To add an inner container to a firm order
1. On the Inner Containers tab, click New.
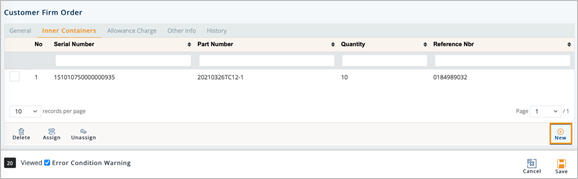
2. On the Inner Container window, fillout the details of the new serial on the General, Dates/Shipping, IPP Tag or Other tabs.
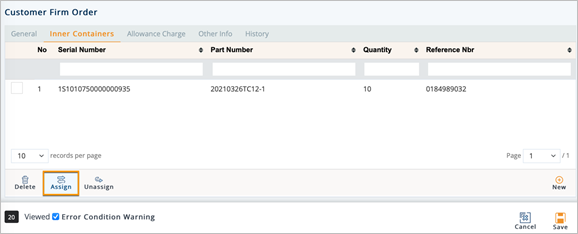
To assign an inner container to a firm order
1. On the Inner Containers tab, click the Assign icon.
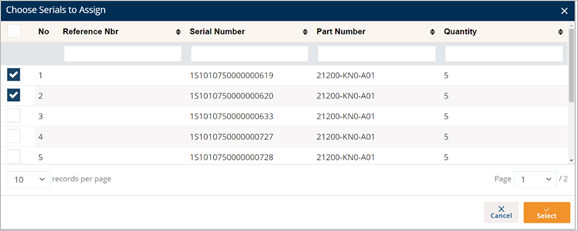
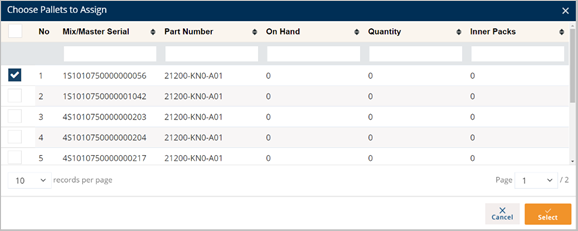
2. On the Choose How to Assign window, select one of the following options and click OK:
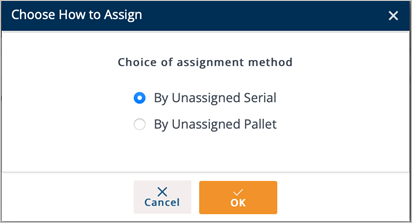
· By Unassigned Serial: Shows all available serials from inventory for that part.
· By Unassigned Pallet: Shows mixed master serials from inventory for that part.
3. If you select the By Unassigned Serial option, choose the serials that you want to assign on the Choose Serials to Assign window.
4. If you select the By Unassigned Pallets option, choose the pallets that you want to assign on the Choose Pallets to Assign window.
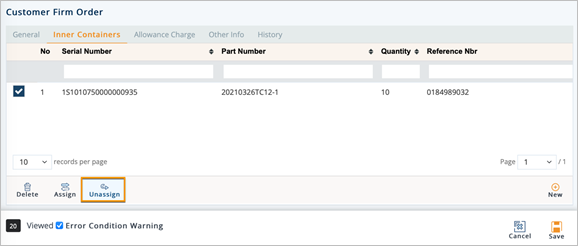
To unassign an inner container from a firm order
ð On the Inner Containers tab, select the container that you want to unassign, and then click the Unassign icon.
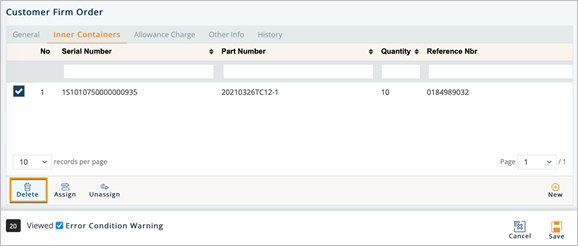
To delete an inner container from a firm order
ð On the Inner Containers tab, select the container that you want to remove, and then click the Delete icon.
Work with Allowance Charge
To add a new allowance or charge to a firm order
1. On Customer Firm Order screen, switch to the Allowance Charge tab.
2. Click New.
3. On the Adding Allowance Charge Line Items window, do as follows:
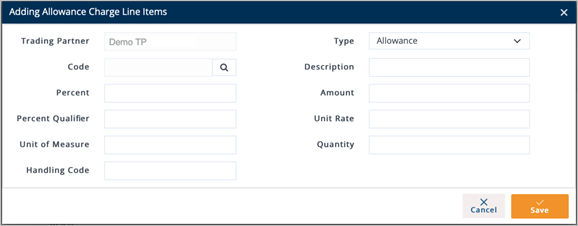
a. Select a Code.
i. Click the Search icon in the Code field.
ii. On the Select Allowance Code window, select the Allowance or Charge Code.
iii. Click Select.
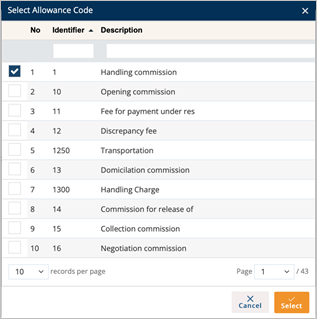
The selected Allowance or Charge Code is displayed in the Code field. The Description is loaded according to the Allowance or Charge Code.

tip You can add more allowance or charge options to the Code drop-down list by referring to steps in Cross Reference Library.
b. Select Allowance or Charge in the Type drop-down list.
c. Enter the Percent, Percent Qualifier, Amount, Unit Rate, Unit of Measure, Quantity, and Handling Code in the boxes.
4. Click Save.
A new Allowance or Charge is added to a Firm Order.
To view and print an incoming EDI document
1. On Customer Firm Order screen, switch to the Other Info tab.
2. On the Other Info screen, click the Document Ref Number link.
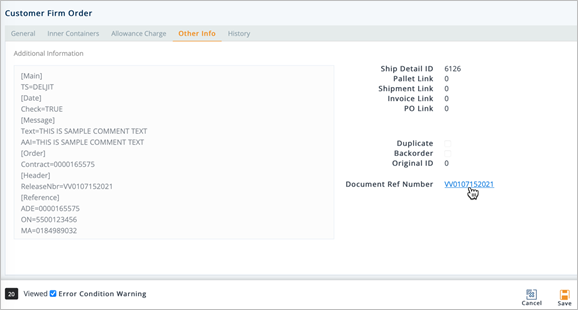
3. On the Incoming Document window, click the EDI button.
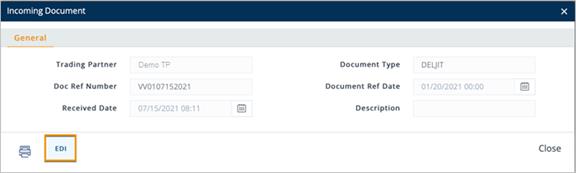
The EDI window displays the raw EDI for the selected incoming document.
4. On the Incoming Document window, click the Print icon.
The Incoming Document is displayed in a new window.
tip To learn more about Incoming Documents, refer to Incoming Documents
Work with History
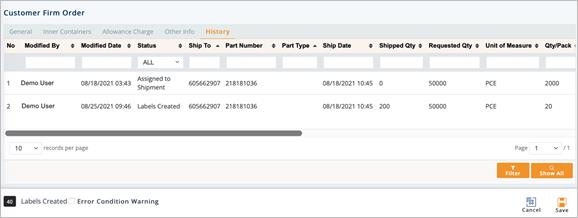
To view Firm Order Detail History
This feature displays all the processing that has occurred to a firm order. After you save the changes made to a firm order, the previous firm order will be stored on the History tab.
For instance, if you save the deletion of a ship serial from a firm order on the Firm Order Detail page, you can then view the previous Shipped Quantity for this firm order in the history.
1. On Customer Firm Order screen, switch to the History tab.
2. On the History tab, click the order whose history records you want to view.
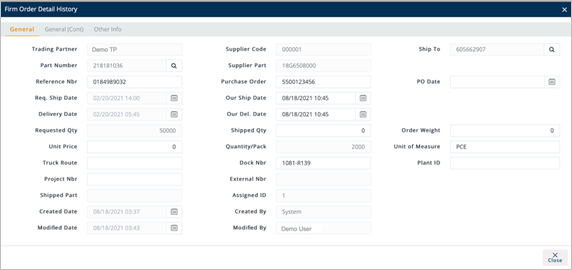
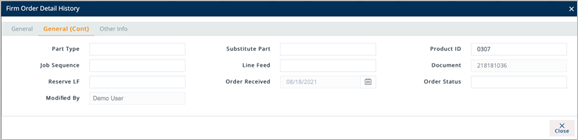
3. On the Firm Order Detail History window, select the General, General (Cont.), or Other Info tabs to view the corresponding details.
General tab
General (Cont.) tab
Other Info tab
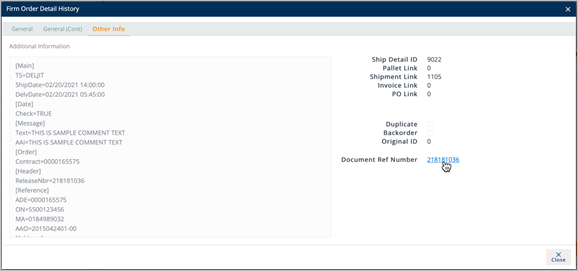
tip You can view and print an incoming EDI document on the Other Info tab by referring to the steps in working with the Other Info tab.
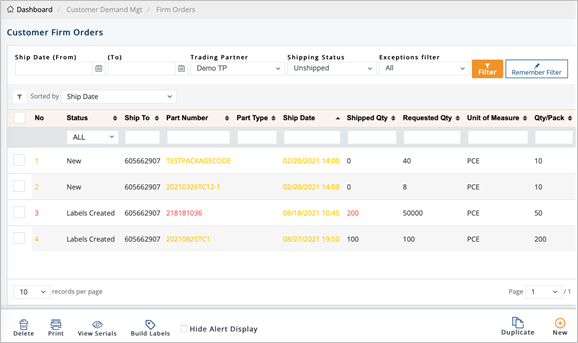
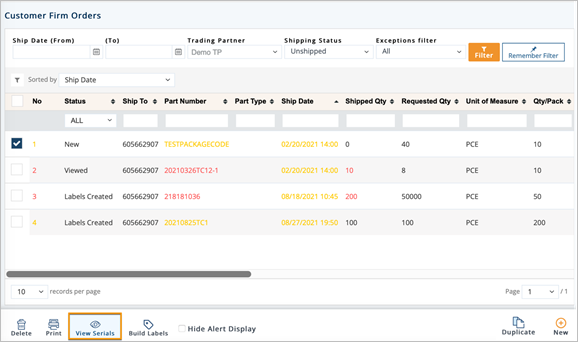
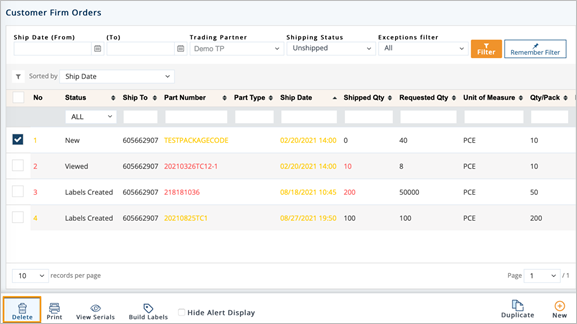
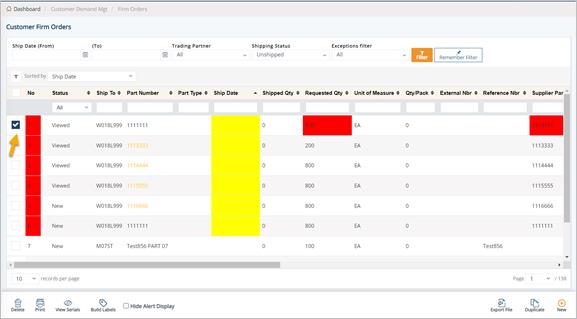
Customer Firm Orders File: Use of Colors
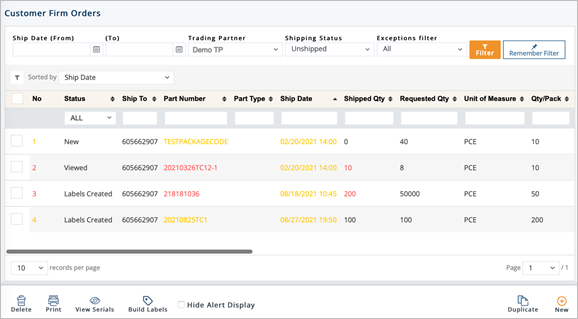
DiAutomotive makes the use of the colors to show you something that may need attention. The following shows how they are used in the Customer Firm Orders file.
§ Red Ship Date Text:
The firm order is overdue and unshipped. Requires attention. Decide if it is still a valid firm order, and then postpone the ship date, ship the order, or delete it.
§ Red Ship Date Highlighted:
There is no TP requested ship date or our ship date. Because this order’s ship date is unknown, attention from the user is required to add it, or contact DiAutomotive Support if there are problems with the EDI transfer process.
§ Red Shipped Quantity and Part Number:
The shipped quantity is higher than 0 and does not match the requested quantity.
§ Yellow Highlight over Part Number:
A warning flag has been turned on. You cannot ship this order until the flag is removed. The most common cause for a yellow firm order is: During processing, DiAutomotive found that the firm order is a replacement for another order that has already been assigned to an ASN. In terms of replacement logic, DiAutomotive considers any order assigned to an ASN as shipped, and therefore unchangeable. Hence, the original firm order remains unchanged and the new firm order is added to the Firm Order file in yellow, and cannot be shipped against. This behavior can be altered.
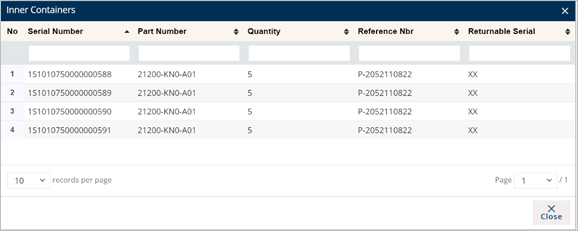
The View Serials icon will display a pop-up window showing all the Serial Numbers that have been assigned to the highlighted Order. If labels have not been printed or serials have not been assigned, this window will be blank. You can use this window to either verify accuracy, adjust serial record information, or reprint labels as needed. An example would be to change returnable types or lot numbers. Be careful not to make changes here that will create inconsistencies between DiAutomotive records and the printed labels. It is possible to create serial records here when troubleshooting special cases of missing serials.
1. On the Customer Demand Mgt menu, click Firm Orders.
2. On the Customer Firm Orders screen, select the order that you want to view.
3. Click the View Serials icon.
4. On the Inner Containers window, click the serial that you want to view.
5. On the Inner Container window, select the General, Dates/Shipping, IPP Tag or Other tabs to view the corresponding details.
Field Definitions-General
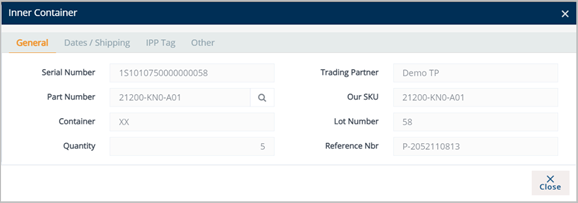
§ SerialNumber: The barcode serial number.
§ Part Number: Part Number for this Part.
§ Our SKU: Your Company’s Part Number (or Stock Keeping Unit).
§ Returnable Serial: Record identifying the Container Management of the serial.
§ Lot Number: Lot Number for this serial.
§ Quantity: Quantity in this container.
§ Reference Nbr: The reference number from the original document for this order. DiAutomotive will add this number when printing labels from the Orders screen or ASN screen.
Field Definitions-Dates/Shipping
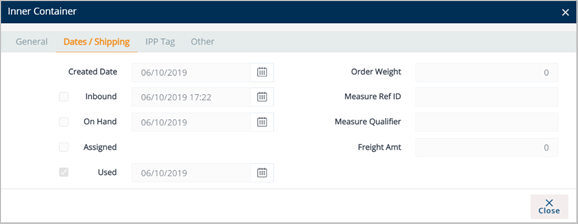
§ Created Date: The date when this label was printed or the serial was created.
§ Order Weight: The weight of this box serial.
§ Inbound: The date when this serial arrived from another location, usually when it was scanned in.
§ Measure Ref ID: Type of measurement.
§ On Hand: Scanned as usable for shipping into DiAutomotive.
§ Measure Qualifier: Measurement qualifier (N=Net, G=Gross).
§ Assigned: The date when this serial was assigned to an ASN or order.
§ Used: The date when it was used/shipped out.
§ Freight Amt: The freight cost.
IPP tags help you track parts throughout the entire transportation process. You can issue IPP tags for initial prototype parts or to trace where problems may occur during shipping.
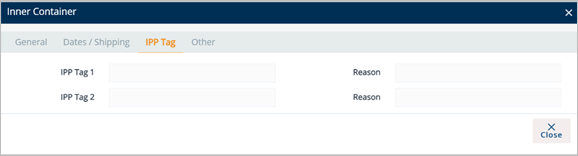
Field Definitions-Other
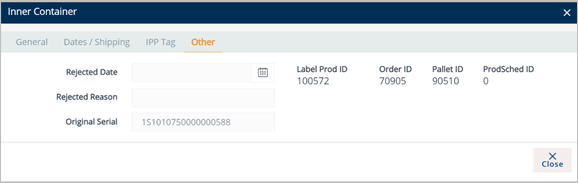
§ Rejected Date: The date when the 861 (Receiving Advice) rejected the part.
§ Rejected Reason: The reason from the 861 for rejection.
§ Original Serial: The serial number may change. The original serial is stored here.
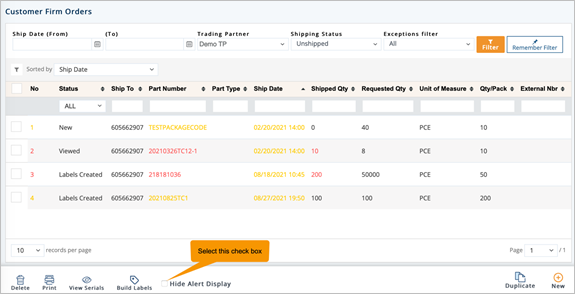
Though it is seldom used, it is possible to print labels from the Firm Order file before the orders have been assigned to ASNs. By clicking the Build Labels button, DiAutomotive prepares the labels for printing.
1. On the Customer Demand Mgt menu, click Firm Orders.
2. On the Customer Firm Orders screen, select the order for which you want to build labels.
3. Click the Build Labels button.
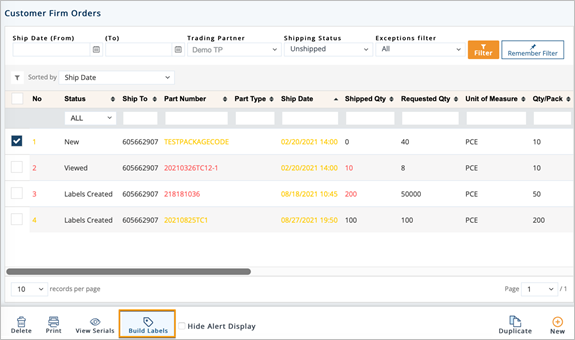
4. On the completed labels message, click OK.

Note If the Firm Order already has labels for printing, the Review Labels message will appear. Then, select one of the options:
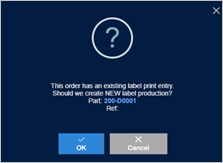
o Create: Creates new serials for the selected part.
o Reprint: Reprint the existing serials.
o Cancel: Cancels this printing.
The Firm Orders file shows you a list of shipment requests from your Trading Partners. It is the file that contains information for parts orders, quantities, and the date when they are requested. You can analyze Firm Orders at a higher level by manipulating the data into different views through DiAutomotive reports. To print a report or export data from the Firm Order file, click the Print icon.
1. On the Customer Demand Mgt menu, click Firm Orders.
2. On the Customer Firm Orders screen, select the order that you want to print.
3. Click the Print icon.
4. On the Choose Reports to Print window, do the following:
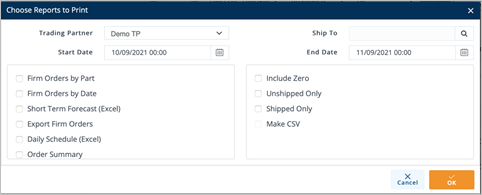
a. Select the Trading Partner in the drop-down list.
b. Select the Ship To.
i. Click the Search icon in the Ship To field.
ii. On the Browse Ship To window, choose the Ship To and click Select.
The selected Ship To is loaded.
c. Select the Start Date and End Date from the calendars.
d. In the left pane, select the reports that you want to print.
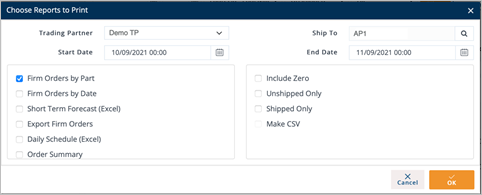
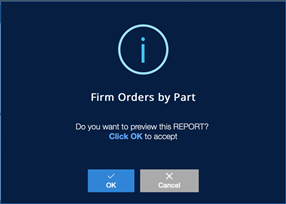
§ Firm Orders by Part: Creates a report with the part numbers grouped together.
§ Firm Orders by Date: Creates a report with the orders grouped by date.
§ Short Term Forecast (Excel): Creates Excel-based Firm Orders.
§ Export Firm Orders: Creates a .csv file with date, time, part, reference, quantity, ship to, description, and unit price.
§ Daily Schedule (Excel): Exports data to Excel and includes all parts for the Trading Partner, the LineSide work center (if appropriate), and the details of each order for the date range.
§ Order Summary: Prints a list of shippers with orders showing either the balance remaining, or all orders if you select the Include Zero option.
§ Order Change History: Prints a report with the historical changes made to the order.
e. In the right pane, select one or more of the following options:
§ Include Zero: Includes zero-quantity orders.
§ Unshipped Only: Includes only unshipped orders.
§ Shipped Only: Displays shipped Orders.
§ Make CSV:Creates a Comma-Separated Value file for this report.
f. Click OK to print or review the report.
g. On the Print Preview message, click OK to continue.
The report is displayed accordingly.
Firm Orders are added automatically as data is received from Trading Partners. For Trading Partners that send and receive EDI, manually creating a Firm Order runs the risk of being rejected due to missing system-specific information which you may not have. If the Trading Partner sends EDI and you suspect a Firm Order should be manually added, contact the DiAutomotive Support team to evaluate if inserting a Firm Order can be avoided, or if it is possible to duplicate an existing Firm Order instead.
For non-EDI Trading Partners, it may be a common occurrence to manually create Firm Orders. DiAutomotive suggests that you create a master list of Firm Orders: one per part number, Ship To number, and order number.
1. On the Customer Demand Mgt menu, click Firm Orders.
2. On the Customer Firm Orders screen, click New.
3. On the Firm Order Details screen, select the Trading Partner in the drop-down list.
4. Fill out the details of the new Firm Order on the General tab. Use the following Field Definitions.
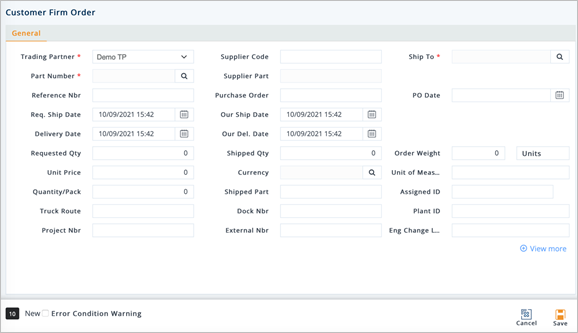
5. When you’re finished, click Save.
Field Definitions
§ Trading Partner: The Trading Partner ID code.
§ Supplier Code: Your Supplier Code assigned by the Trading Partner.
§ Ship To: The Ship To code for the truck’s destination, found on the EDI release.
§ Part Number: The Trading Partner's requested part number, found on the EDI release.
§ Supplier Part: The supplier’s SKU or the internal part number used to cross-reference when you export to an ERP/MRP Inventory Control system.
§ Reference Nbr: The reference number from the original document if shown on the EDI release. This has multiple uses, such as identifying each line item of a PO (for example, Delivery Order Number or Ran Number).
§ Purchase Order: The document reference number for the Purchase Order.
§ PO Date: The date when the purchase order was created.
§ Req. Ship Date: The date when the Trading Partner wants the order to be shipped, found on the EDI release.
§ Our Ship Date: Your date when the order is to be shipped.
§ Delivery Date: The projected date when the parts will arrive at the Ship To location.
§ Our Del. Date: Your date when the parts will arrive at the Ship To location.
§ Requested Qty: The number of units ordered by the Trading Partner, found on the EDI release (may be in the form of Cumulative quantities).
§ Shipped Qty: The number of units shipped, or staged to ship on the Shipment (ASN).
§ Order Weight: The total weight of all units in this order.
§ Unit Price: Price of an individual piece.
§ Quantity/Pack: The number of units of a part in each shipping container.
§ Unit of Measure: The unit of measure used.
§ Truck Route: Some Trading Partners provide truck routing information. If used, this number is found on the EDI release and depending on the specifications, it may be added to the ASN’s Carrier field.
§ Dock Nbr: Larger plants may have one Ship To, but multiple receiving docks. If used, this number is found on the EDI release.
§ Plant ID: The identifier of the company.
§ Eng Change Level: The engineering/design change code for the part ordered.
§ Project Nbr: The number of the involved project.
§ External Nbr: The number connecting DiAutomotive firm orders with an order from an external system. This number is automatically assigned when DiAutomotive exports a release.
§ Shipped Part: The parts shipped.
§ Assigned ID: The Line Number or assigned ID for invoices and POs as shown on the EDI release.
§ Part Type: Unique identifying codes assigned to each part type if shown on the EDI release.
§ Substitute Part: The vendor replacement part or alternate part number.
§ Product ID: The Product Identifier.
§ Job Sequence: The order in which to load containers on a trailer or pack parts in a container.
§ Line Feed: The Line Feed location from the order as shown on the EDI release.
§ Document: The Document Reference Number in EDI. For example, the Document Ref. No. of the EDI 862 document is BSS02.
§ Reserve LF: The Reserve Line Feed, if any.
§ Order Received: The date when the order was received.
§ OrderStatus: The codes that DiAutomotive uses to assign the Firm Order’s status. Please refer to Firm Order Status Codes.
§ Modified By: The user ID of the last person who saved a change to the Firm Order.
To select a Part
1. On the General tab of the Firm Order Details screen, click the Search icon in the Part Number field.
2. On the Browse Parts window, choose the Part file and click Select.
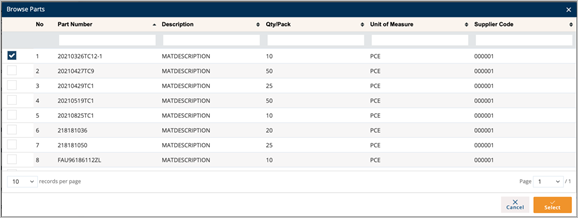
The selected part is loaded in the Part Number field.

To select a Ship To
1. Click the Search icon in the Ship To field.
2. On the Browse Ship To window, choose the Ship To and click Select.
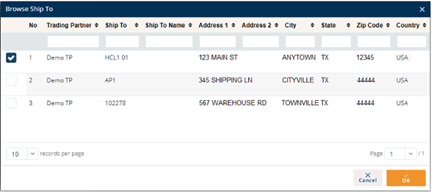
The selected Ship To is loaded in the Ship To field.

To select a Currency
1. Click the Search icon in the Currency field.
2. On the Select Currency Code window, choose the Currency and click Select.
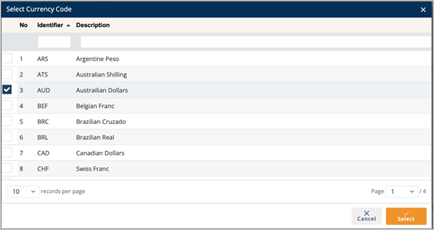
The selected Currency is loaded in the Currency field.

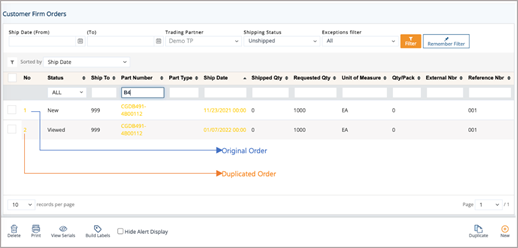
1. On the Customer Demand Mgt menu, click Firm Orders.
2. On the Customer Firm Orders screen, do one of the following:
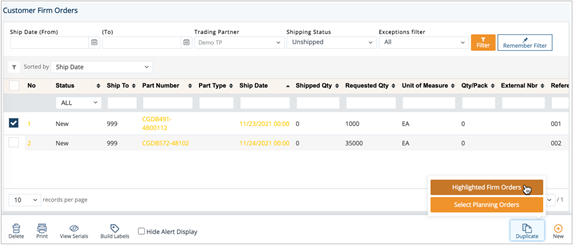
Note You can also use information from the Planning file (Customer Demand Management > Forecast) as a source for this duplication. Sometimes a Trading Partner will want you to ship against a planned or forecasted order, even though it was not sent as a Firm Order using EDI.
· To duplicate a Firm Order: Select the order that you want to duplicate, click the Duplicate button, and thenchoose the Highlighted Firm Orders option.
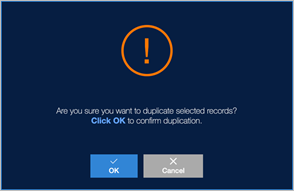
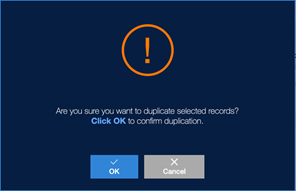
a. On the confirmation message, click OK.
b. On the Customer Firm Order window, make changes as needed for the duplicated order.
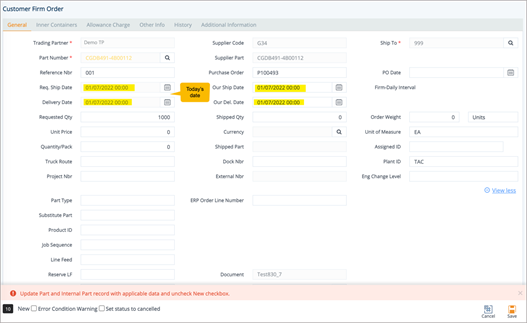
Notes
- The only change made is that the Ship Dates and Delivery Dates are set to today’s date.
- You are only able to modify editable fields, such as Reference Number, Purchase Order, Requested Qty, Shipped Qty, Order Weight, etc.
- The default fields cannot be changed.
c. When you’re finished, click Save.
The Firm Order is duplicated.
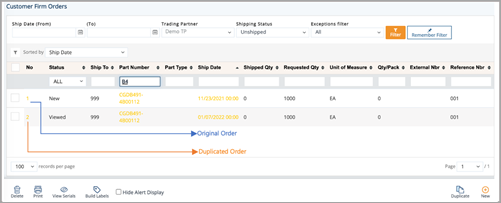
· To duplicate a Planning Order: Click the Duplicatebutton, and then choose the Select Planning Orders option.
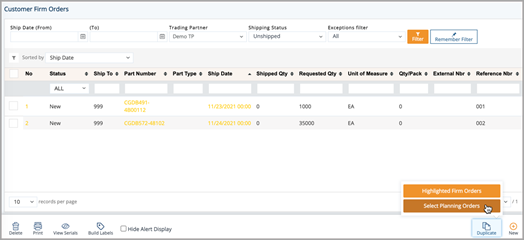
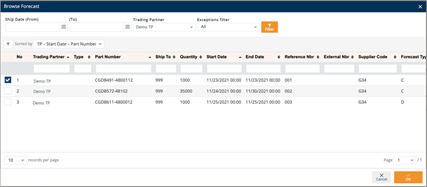
a. On the Browse Forecast window, choose the planned orders for this Trading Partner.
b. Click OK.
c. On the confirmation message, click OK.
d. On the Customer Firm Order window, make changes as needed for the planned order.
Notes
§ The only change made is that the Ship Dates and Delivery Dates are set to today’s date.
§ You are only able to modify editable fields, such as Requested Qty, Shipped Qty, Order Weight, Quantity/Pack, etc.
§ The default fields cannot be changed.
§ The time period between the Our Ship Date and Our Delivery Date will be copied from the original order to the duplicated order. In the example screenshot above, the time period is 15 hours.
e. When you’re finished, click Save.
The Firm Order is duplicated.
Only delete Firm Orders that are definitely no longer scheduled to ship. Deleting live orders will result in missed shipments.
1. On the Customer Demand Mgt menu, click Firm Orders.
2. On the Customer Firm Orders screen, select the order that you want to remove, and then click the Delete icon.
3. On the confirmation message, click OK.
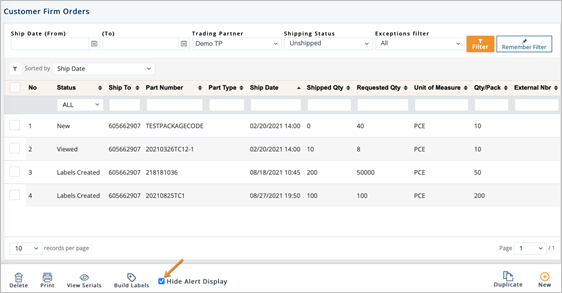
1. On the Customer Demand Mgt menu, click Firm Orders.
2. On the Customer Firm Orders screen, select the Hide Alert Display check box.
The color statuses (Red & Yellow) will be hidden.
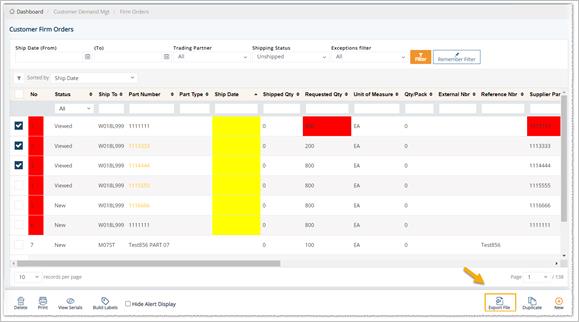
With the Export feature, you can send Firm Order documents to Trading Partners that do not use an EDI system. The following sections describe how to export single or multiple Firm Orders on the Customer Demand Mgt screen.
1. On the Customer Demand Mgt menu, click Firm Orders.
tip Use the Filter panel to search for firm orders.
2. On the Customer Firm Orders screen, select the order that you want to export.
tip Refer to the Field Definitions at the end of this section.
3. Next, click the Export File button.
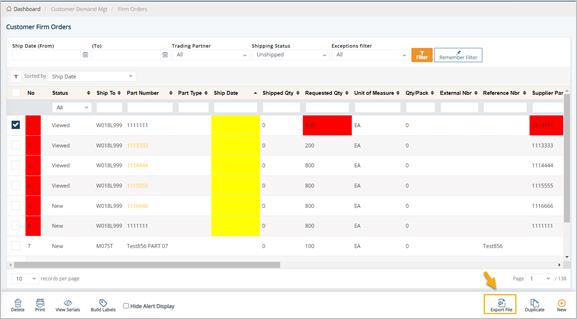
NOtE To export multiple orders, select the orders that you want to export and click the Export File button.
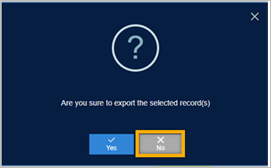
4. On the confirmation message, there are two options, do as follows:
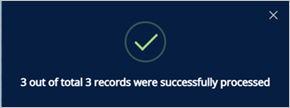
(1) Click Yes to export the selected record.
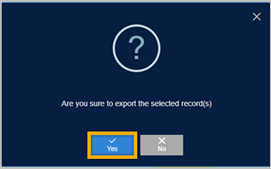
The notification window shows that the record has been processed successfully.
NOTE The notification pop-up will show the number of records that have been processed successfully, out of those selected.
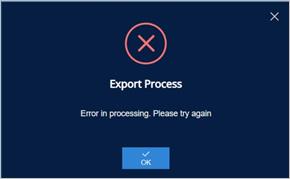
(2) Click No to cancel the export of the selected record.
The notification window will show if an exception occurred during the export process.
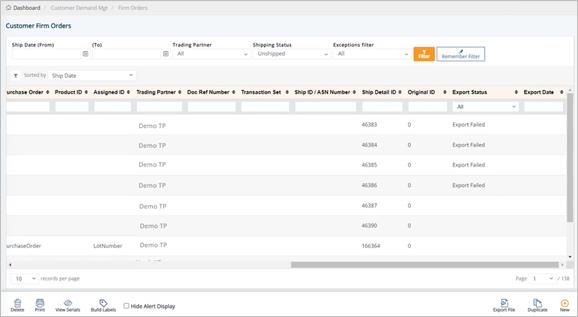
§ Export Status: The export status of the order. The status can be one of these values: Exporting, Exported Successfully, and Export Failed.
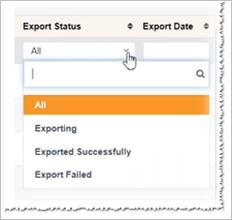
- Exporting: The system confirms that the Exporting requests from the selected records have been received and are being verified for their readiness (validating the order information, etc.) for exporting.
- Exported Successfully: The system confirms that the order has been successfully exported.
- Export Failed: The export process failed.
§ Export Date: The date and time when the order was exported.
NOTE This column is only displayed if the order is in the Exported Successfully status.
The Purchase Order Acknowledgement (PO ACK), known in X12 as an 855 and in EDIFACT as an ORDRSP, is sent after a Purchase Order is received to confirm the goods are available to be sold. It can be used to tell the buyers who sent you a Purchase Order (PO) that you will be either filling the PO as requested or will not be able to fill the order for some reason. With this feature, you can edit and send PO Acknowledgements to your trading partners.
1. On the Customer Demand Mgt menu, click PO Acknowledgements.
2. On the Customer PO Acknowledgements screen, click the record that you want to change.
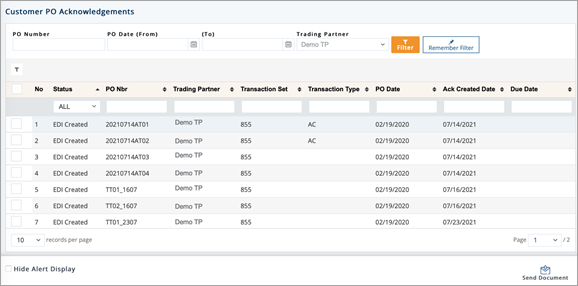
3. On the General tab, view the general information and make the changes as needed.
Notes
§ For a full description of each field, refer to the Field Definitions in the next section.
§ The dimmed fields cannot be edited because they were cloned from the EDI information on the Firm Order.
§ We recommend that you NOT change the PO Date.
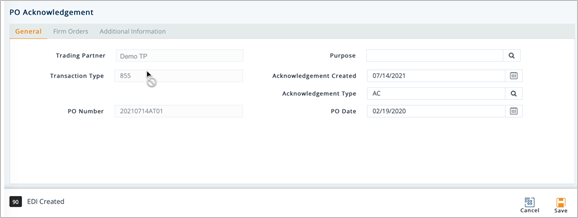
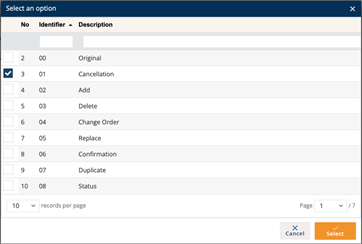
a. To change the Purpose Code, do the following:
i. Click the Search icon.
ii. On the next screen, choose an option, and then click Select.
b. To change the date when the Acknowledgement was created, enter the new date in the Acknowledgement Created field.
Note By default, the Acknowledgement Created Date takes the current date.
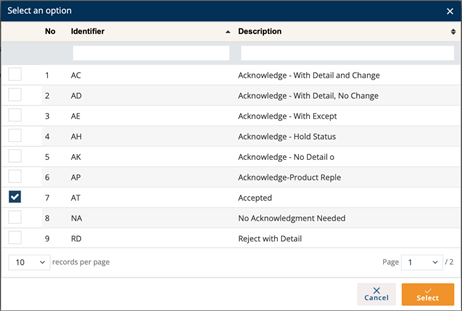
c. To change the Acknowledgement Type, do the following:
i. Click the Search icon.
ii. On the next screen, choose an option, and then click Select.
4. Switch to the Firm Orders tab, which includes details of the firm order lines cloned into the Acknowledgement.
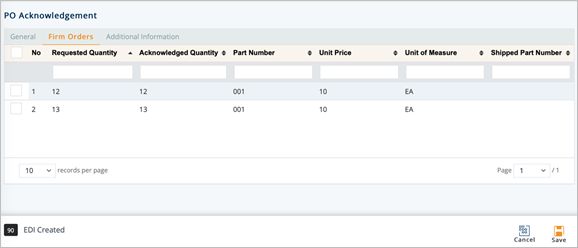
5. On the Firm Orders tab, click the line whose details you want to view.
6. On the PO Acknowledgement Line window, do the following:
Notes
§ For a full description of each field, refer to the Field Definitions in the next section.
§ The dimmed fields cannot be edited.
a. To change the quantity to be acknowledged, enter the new number in the Acknowledged Qty field.
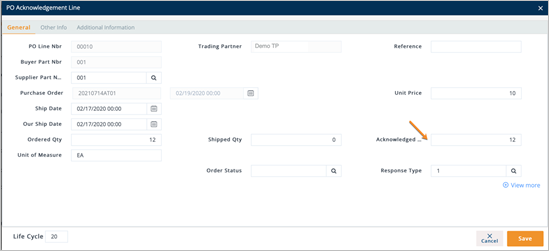
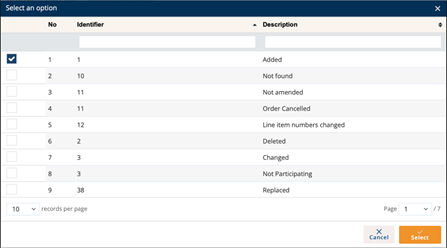
b. To change the Order Status, follow these steps:
i. Click the Search icon.
ii. On the next screen, choose an option, and then click Select.
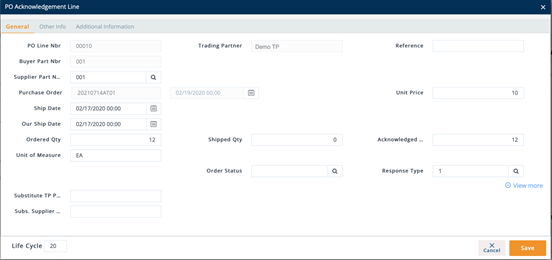
c. Next, click the View more link, and then modify the Substitute TP Part and Substitute Supplier Part, if needed.
Note The substitute part codes are used for reference, as agreed by the vendor and the hub.
d. Next, switch to the Other Info tab, which includes the information cloned from the Firm Order’s Other Info.
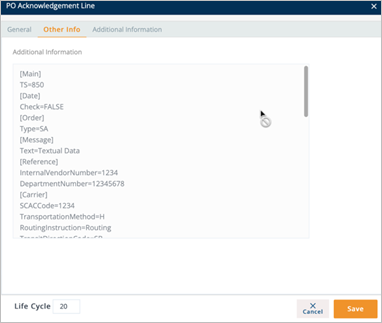
e. Switch to the Additional Information tab, and then insert new fields within the PO Acknowledgement Line as needed.

f. When you’re finished, click Save.
7. On the PO Acknowledgement window, switch to the Additional Information tab, and then insert new fields within the PO Acknowledgement as needed.
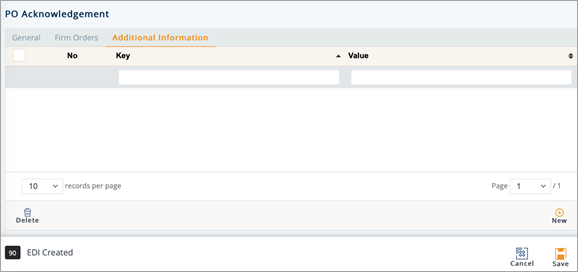
8. When you’re finished, click Save.
§ Trading Partner: The ID code of the Trading Partner.
§ Transaction Type: The type of PO ACK transaction, known in X12 as an 855 and in EDIFACT as an ORDRSP.
§ PO Number: The document reference number of the Purchase Order.
§ Purpose: The Acknowledgement’s purpose code.
§ Acknowledgement Created: The date when the Acknowledgement was created.
§ Acknowledgement Type: The type of Acknowledgement.
Examples:
- ACdefines an Acknowledgement-With Detail and Change.
- ADdefines an Acknowledgement-With Detail, No Change.
§ PO Date: The date when the Purchase Order was created.
Field Definitions – PO Acknowledgement Line
§ Trading Partner: The ID code of the Trading Partner.
§ Reference: The reference number from the original document if shown on the EDI release. This has multiple uses, such as identifying each line item of a PO. For example, Delivery Order Number.
§ Buyer Part Nbr: The Trading Partner's requested part number, found on the EDI release.
§ Supplier Part Nbr: The supplier’s SKU or the internal part number used to cross-reference when you export to an ERP/MRP Inventory Control system.
§ Unit Price: Price of an individual piece.
§ Ship Date: The projected date when units will be shipped.
§ Our Ship Date: Your date when the order is to be shipped.
§ Ordered Qty: The number of units ordered by the Trading Partner, found on the EDI release.
§ Shipped Qty: The number of units shipped, or staged to ship on the Shipment (ASN).
§ Acknowledged Qty: The number of units acknowledged by the supplier to fill the PO.
§ Order Status: The codes that DiAutomotive uses to assign the Firm Order’s status. Please refer to Firm Order Status Codes.
§ Substitute TP Part: The alternative part number used by the buyer for reference, if desired.
§ Substitute Supplier Part: The alternative internal part number used by the supplier for reference, if desired.
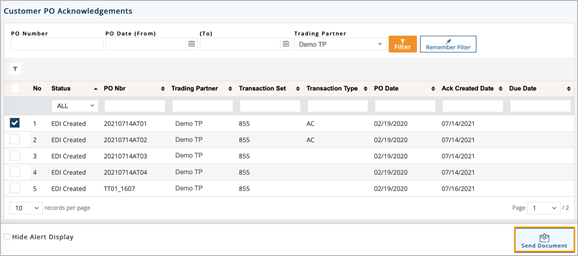
1. On the Customer Demand Mgt menu, click PO Acknowledgement.
2. On the Customer PO Acknowledgements screen, select the record that you want to send.
3. Click the Send Document button.
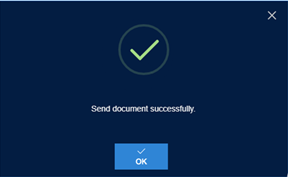
A notification window displays that the document was successfully sent.
Then, the Status of the PO Acknowledgement becomes EDI Sent. On the Outgoing Documents screen, the corresponding 855 document is in the Sent status.
The EDI 846/INVRPT Inventory Inquiry/Advice transaction set is used to communicate inventory information between manufacturers, their suppliers, and resellers. It is used in a number of ways, including:
§ By sellers of goods and services to provide inventory information to a potential customer
§ By a seller’s representatives to supply the seller with inventory information
§ By one seller’s location to supply another location with inventory information
§ By a seller to inquire on the availability of inventory
Manufacturers and suppliers often use 846/INVRPT transactions to notify trading partners of on-hand inventory in various inventory holding locations, such as warehouses, outlets, stores, distribution centers, etc. One common situation is where a manufacturer uses an 846/INVRPT to advise a trading partner of overstocked inventories available at discounted prices. Information included in the 846/INVRPT transaction set includes inventory location identification, item or part description, and quantities. The quantity of an item may be presented in a number of ways, including:
§ Quantity in float
§ Committed quantity
§ On order quantity
§ Returns
§ Backorder quantity
§ Quantity in transit
Create a Customer Inventory Advice
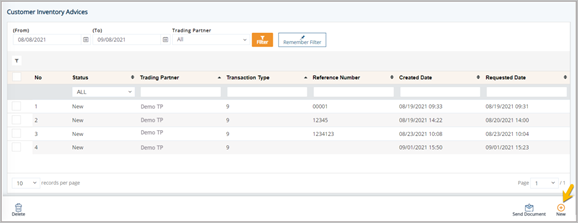
1. On the Customer Demand Mgt menu, click Inventory Advices.
2. On the Customer Inventory Advices screen, click the New button.
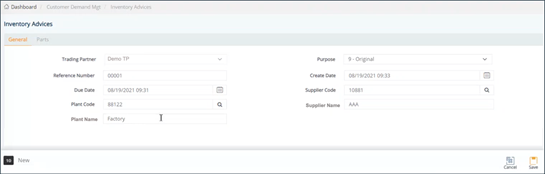
3. On the General tab, fill out the details of the Inventory Advice, as follows.
NOTE For a full description of each field, refer to the Field Definitions in the next section.
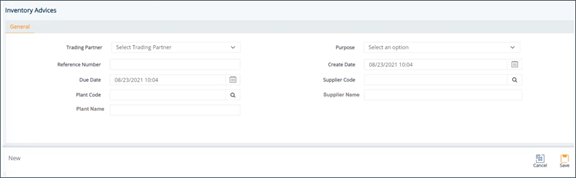
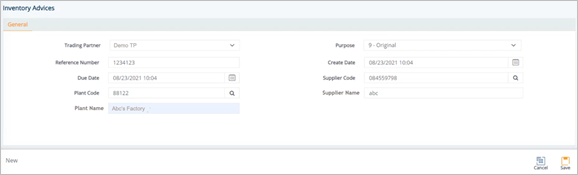
a. Select the Trading Partner in the drop-down list.
b. Select the purpose code in the Purpose drop-down list.
c. Enter the Reference Number in the text box.
d. Set the Created Date and Due Date in the calendars.
e. For Supplier Code, click the Search  icon. On the Browse Supplier Code window, choose an option, and then click Select.
NOTE The supplier codes are loaded from the Addresses module of the trading partner.
f. ForPlant Code, click the Search icon. On the Browse Address Code window, choose an option, and then click Select.
g. Type the Supplier Name in the text box.
h. Type the Plant Name in the text box.
4. When you’re finished, click Save.
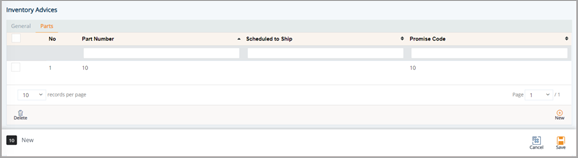
After you save the information on the General tab, the Parts tab is displayed.
5. Switch to the Parts tab.
6. On the Parts tab, click the New icon to create a new part number.

7. On the Inventory Advices Detail window, fill out the details of the part, as follows.
NOTE For a full description of each field, refer to the Field Definitions in the next section.
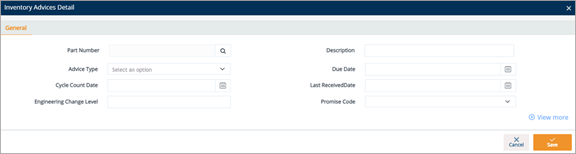
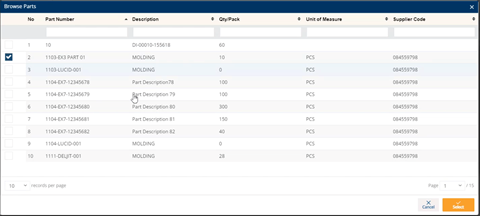
a. For Part Number, click the Search icon. On the Browse Parts window, choose an option, and then click Select.
b. Type the Description in the text box.
c. Select the Advice Type in the drop-down list.
d. Set the Due Date, Cycle Count Date, and Last Received Date in the calendars.
e. Enter the Engineering Change Level in the text box.
f. Type in the Promise Code in the text box.
g. Next, click the View more link to expand the details.
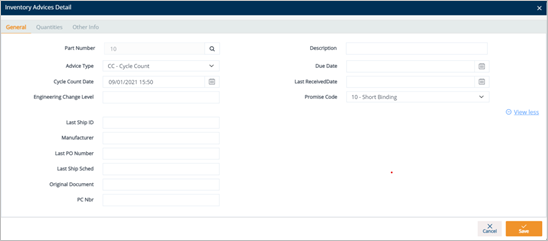
h. Fill out the Last Ship ID, Manufacturer, Last PO Number, Last Ship Scheduled, Original Document, and PC Number in the text boxes.
8. When you’re finished, click Save.
The part is created.
9. On the Inventory Advices window, click to open the part that you created.
tip You can use the Delete icon to remove a record.
On the Inventory Advices Detail window, the Quantities and Other Info tabs are displayed.
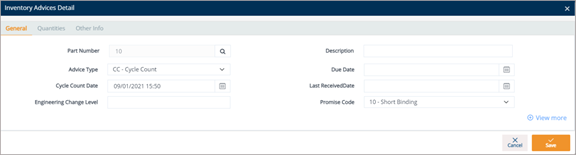
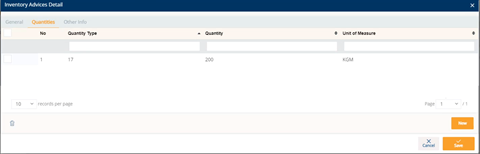
10. Switch to the Quantities tab, and then add the quantity information about the part by doing the following:
a. Click the New button.

b. On the Inventory Advices Detail Quantity window, fill out the form.

c. Click Save.
The part quantity is added.
11. Switch to the Other Info tab, and then add the other information about the part.
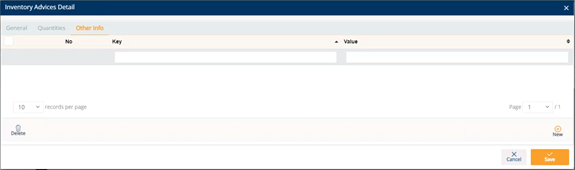
12. When you’re finished, click Save.
Field Definitions
Customer Inventory Advice > General
§ Trading Partner: The ID code of the Trading Partner.
§ Purpose: The Inventory Advice’s purpose code.
§ Reference Number: The reference number from the original document for this inventory advice.
§ Created Date: The date when the inventory advice was created.
§ Due Date: The date when the inventory advice is due.
§ Supplier Code: The ID code of the Supplier.
§ Supplier Name: The name of the Supplier.
§ Plant Code: The branch company of the Supplier Code.
§ Plant Name: The name of the branch company, which belongs to the Supplier.
Customer Inventory Advice > Parts
§ Part Number: The part number for the Inventory Advice.
§ Description: A brief description about the part ordered.
§ Advice Type: The type of Inventory Advice.
Examples:
- IA: Inventory Adjustment
- RA: Receipt Adjustment
§ Due Date: The end date of storage life cycle of the product. It could be shipped date/delivery date.
§ Cycle Count Date: The start date of periodic counting of individual items throughout the course of the year to ensure the accuracy of inventory quantities and values.
§ Last Received Date: The last date when the part number was received.
§ Engineering Change Level: The engineering/design change code for the part ordered.
§ Promise Code: The number of the involved project.
§ Last Ship ID: The last Shipment ID (ASN Number).
§ Manufacturer: Supplier or manufacturer of the product or part.
§ Last PO Number: The last Purchase Order reference number.
§ Last Ship Sched: The last date when this part is scheduled to ship.
§ Original Document: The reference number of the original document for this part.
§ Quantity Type: The quantity type of the part. For example, 17 means Quantity on hand.
§ Quantity: The quantity of the part ordered.
§ Unit of Measure: The Unit of Measure for the part.
Edit a Customer Inventory Advice
1. On the Customer Demand Mgt menu, click Inventory Advices.
2. On theCustomer Inventory Advices screen, click the record that you want to change.
3. On the Inventory Advices window, make the changes on the General and the Parts tabs as needed.
NOTE For a full description of each field, refer to the Field Definitions in the previous section.
General tab
Parts tab

4. When you are finished, click Save.
Send a Customer Inventory Advice
1. On the Customer Demand Mgt menu, click Inventory Advices.
2. On the Customer Inventory Advices screen, select the record that you want to send.
3. Click the Send Document button.
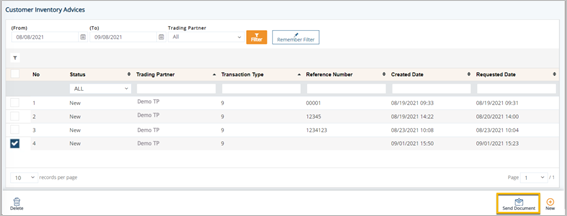
4. On the notification window, click OK.
Then, the Status of the Inventory Advice becomes InventoryAdvice EDI Sent.
Delete a Customer Inventory Advice
1. On the Customer Demand Mgt menu, click Inventory Advices.
2. On the Customer Inventory Advices screen, select the inventory advice that you want to remove, and then click the Delete icon.
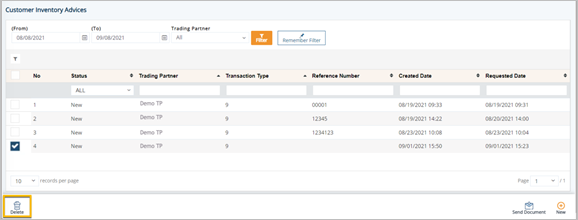
3. On the confirmation window, click OK.
