Barcode Labels
Unless labels and serial numbers are generated during production, it is common to generate shipping labels and create new serial records as shipments are prepared. In TrueAuto, there are many different methods available for printing labels. The processes may differ depending on which methods are best suited for your environment and your Trading Partner’s requirements. The label printing methods in a standard installation of TrueAuto are explained below. If you need more labeling options, such as printing labels at the production line, contact the TrueAuto Support team.
Main Topics:
Before you can print labels:
-
Make sure that you have the correct label formats defined in the Bar Code Label file.
-
Make sure that the Parts for which you are printing labels have a Label Format associated with them.
Work with Barcode Labels
Most labeling methods will cross paths with the Barcode Labels window. Records can be created and changed here, or created in other TrueAuto screens, but they are confirmed, adjusted, printed, or reprinted on the Barcode Labels screen.
1. On the Customer Shipments menu, select Barcode Labels.
2. On the Customer Barcode Labels screen, click the barcode label that you want to view.
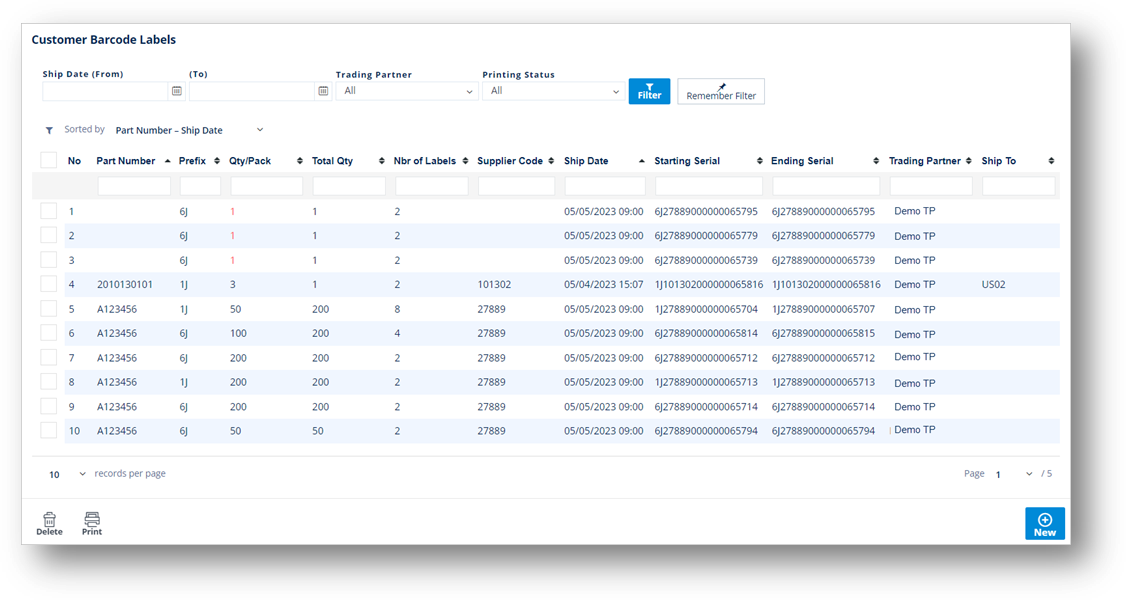
3. On the Customer Barcode Labels screen, view the details on the General tab.
Note For a full description of each field, refer to the following Field Definitions.
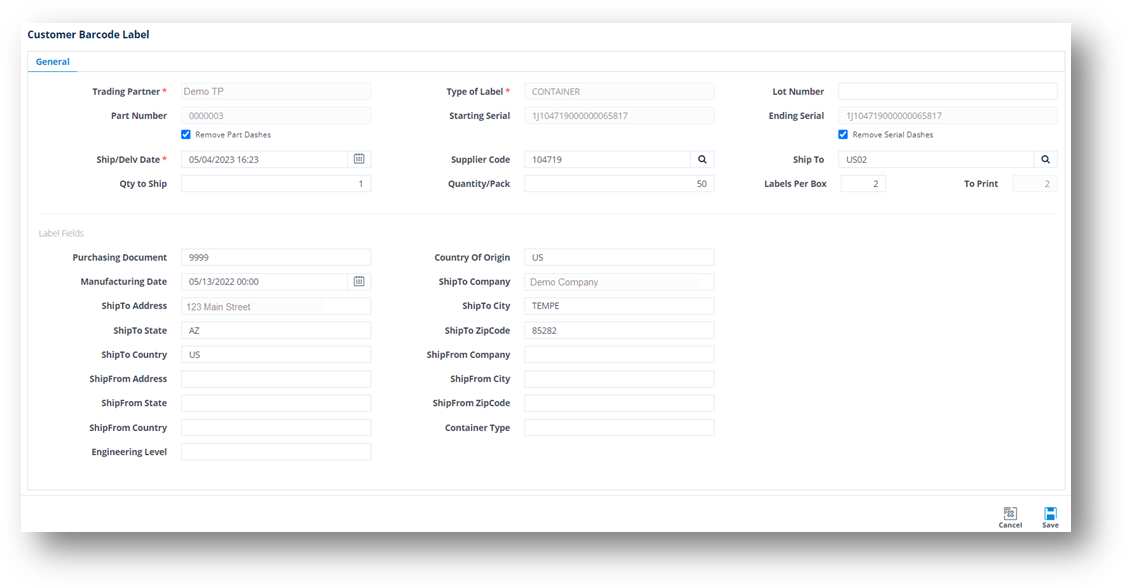
Field Definitions-General
|
Field |
Definition |
|
Trading Partner |
The code of the Trading Partner. |
|
Type of Label |
The barcode prefix for the packaging type, such as Containers or Master labels. Common prefixes include the following: - Container: S, 1S, 3S - Master: 4S or M - Mixed Load: 5S or G |
|
Lot Number |
The Supplier Lot number for this batch of parts. |
|
Part Number |
The Trading Partner's part number. - Remove Part Dashes: Removes dashes from part numbers on the label for Trading Partners that require it. |
|
Starting/Ending Serial |
The starting/ending serial number used for the Trading Partner. - Remove Serial Dashes: Removes dashes from serial numbers for Trading Partners that require it. |
|
Ship/Delv Date |
The Ship or Delivery Date, depending on your Trading Partner. |
|
Supplier Code |
The supplier code assigned by the Trading Partner. |
|
Qty To Ship |
Total unit count of all containers needing labels. |
|
Quantity/Pack |
The number of units per container. This number will show on the Quantity field of the label. If the Qty To Ship is not divisible by Quantity/Pack, the last label will show the remaining quantity. |
|
Labels per Box |
The number of duplicate labels per container. |
|
To Print |
The estimated number of labels to print according to the current fields. Do not change this field. |
|
Part Description |
The description for the part. |
|
Eng Change Level |
The engineering/design change code for the part ordered. |
|
Country |
The supplier’s country in the address. |
|
Supplier name, Supplier Address, Supplier City, Supplier State, and Supplier Zip code |
The supplier’s address information. |
Print a Barcode Label
The Type of Label that you selected for the Barcode Label will be applied to the print job.
1. On the Customer Shipments menu, select Barcode Labels.
2. On the Customer Barcode Labels screen, click the line item that you want to print.
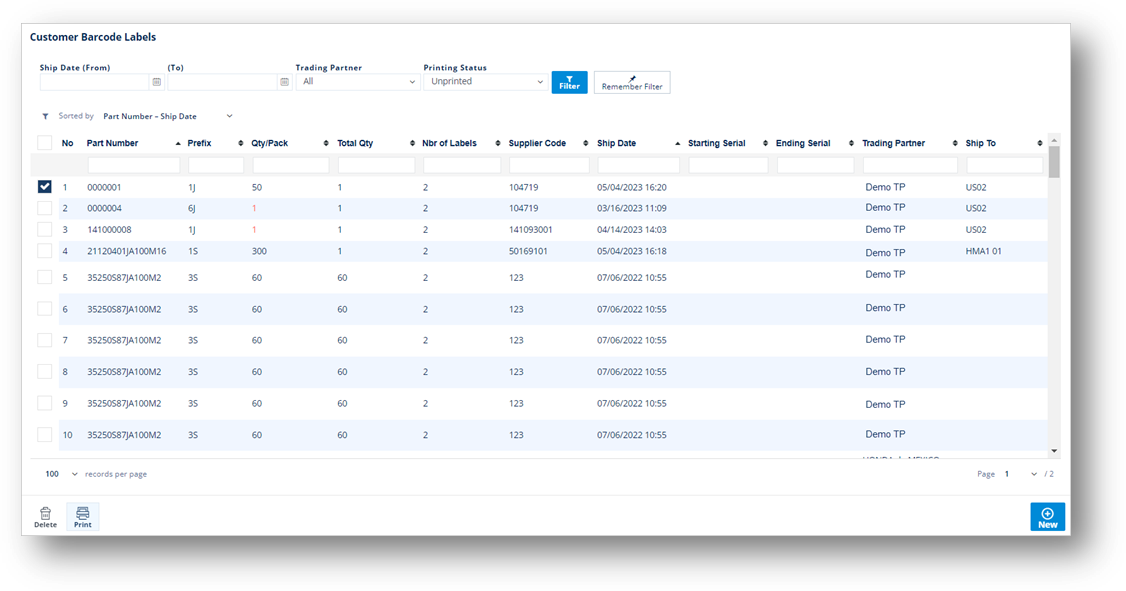
-
Click
 Print to start the print job. When you do this, the following tasks occur:
· Serial Numbers are generated by TrueAuto, Serial records are created and stored, and the label is printed.
· A third-party label printing program will print labels that are already formatted to each Trading Partner’s requirements.
· Most, if not all of the information on the label will be provided by TrueAuto data from a comma-separated file that is generated when you print.
Create a Barcode Label
You can manually create a new Barcode Label record and select the Type of Label template that you want to apply to the print job. If you use this feature, the label templates selected in any other modules will not take effect.
-
On the Customer Shipments menu, click Barcode Labels.
-
On the Customer Barcode Labels screen, click
 New.
New. -
On the General tab, select the Trading Partner in the dropdown list.
-
To select the Type of Label template, click the
 search icon in the Type of Label field.
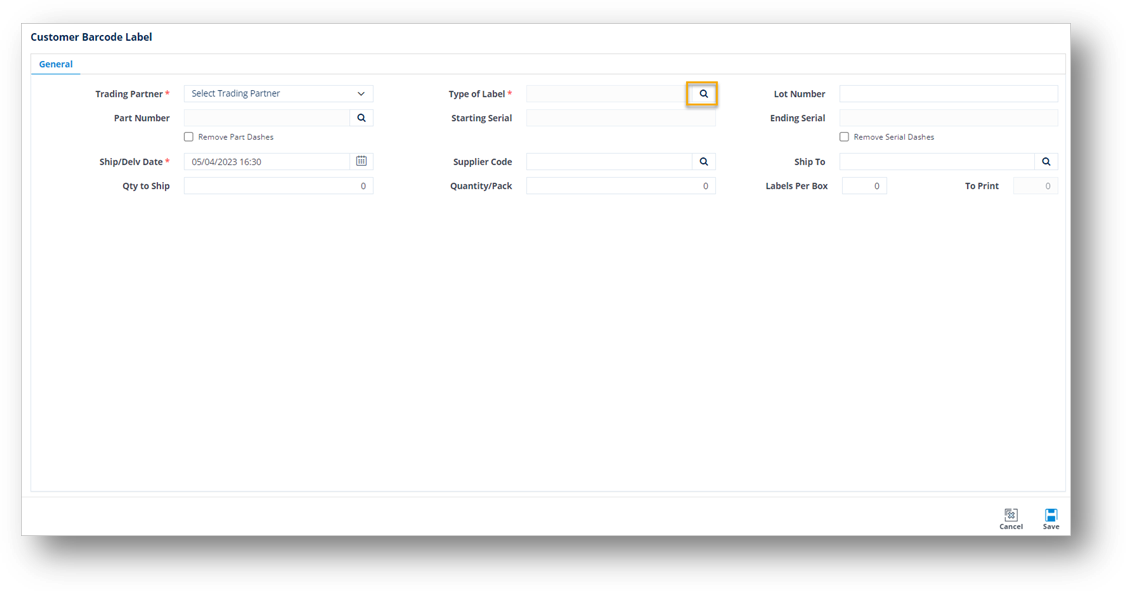
-
On the Select Label Type window, choose the label type that you want to use and click
 Select.
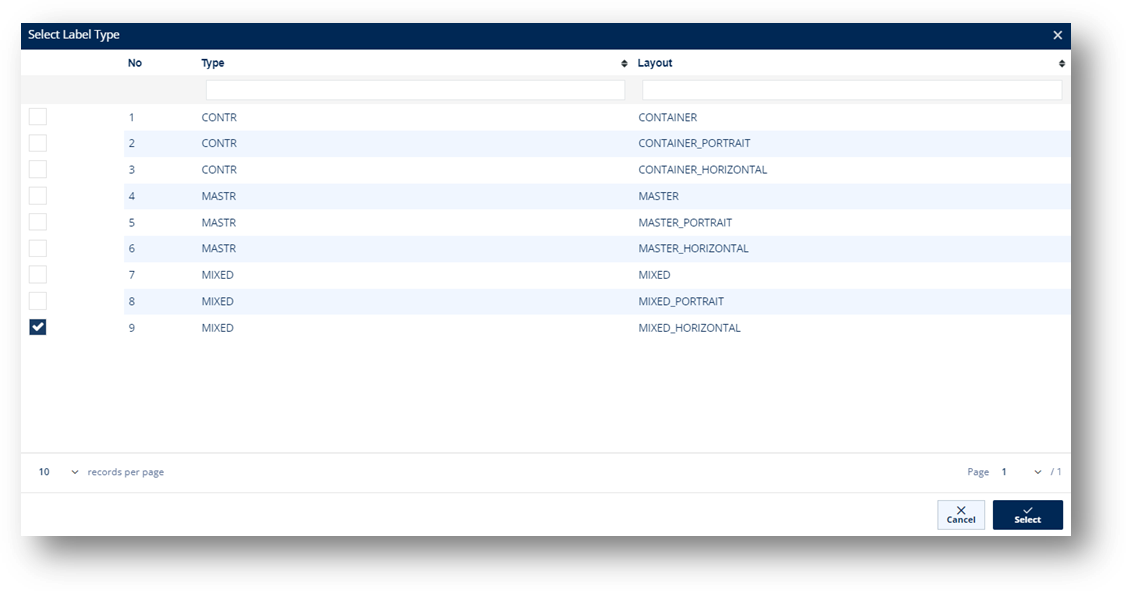
The selected label type is displayed in the Type of Label field.

Where:
BATCH: Batch labels.
CONTR: Container labels.
MASTR: Master labels.
MIXED: Mixed load labels.
QKRCV: Quick receive labels.
Note Always select a value for the Type of Label field first before the other fields.
-
To select the Part Number, do the following:
· Type the first few numbers or the entire Part Number which you would like to print.
· Always enter the Part Number field second before the other fields.
· This may populate information which was previously set as the default in the Parts file.
· Some fields are only populated when Print is executed.
· Some fields are dependent on the Trading Partner.
ALTERNATIVE You can also click the ![]() search icon in the Part Number field. On the Browse Parts window, choose the part number that you want to use and then click
search icon in the Part Number field. On the Browse Parts window, choose the part number that you want to use and then click ![]() Select.
Select.
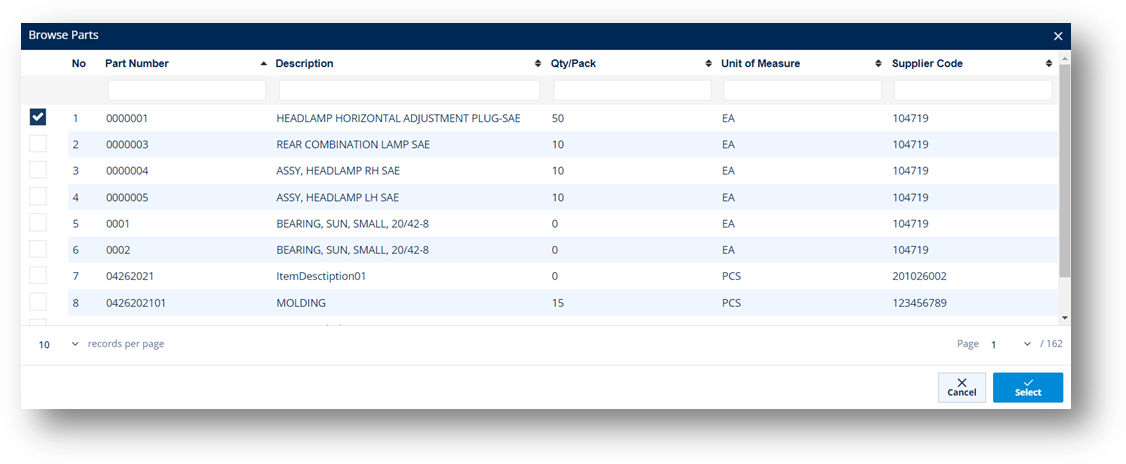
The selected part number is displayed in the Part Number field.
7. To select the Supplier Code, do the following:
a. Click the ![]() search icon in the Supplier Code field.
search icon in the Supplier Code field.
b. On the Browse Supplier Code window, choose the supplier code that you want to use then click ![]() OK.
OK.

The selected Code is displayed in the Supplier Code field.
8. Type the total unit count for this print job:
-
TrueAuto will use Qty To Ship/Quantity/Pack to calculate the number of labels to print.
-
If Qty To Ship/Quantity/Pack does not result in a whole number, a message prompt will be displayed when you save the record. You can click
 OK and continue if needed. A label for a partial container will be printed.
-
Fill out any additional non-default and relevant details that are specific to the containers that you are printing, for example, lot numbers, weights, dates, or other Trading Partner specific requirements. When you are finished, click
 Save.
Save.
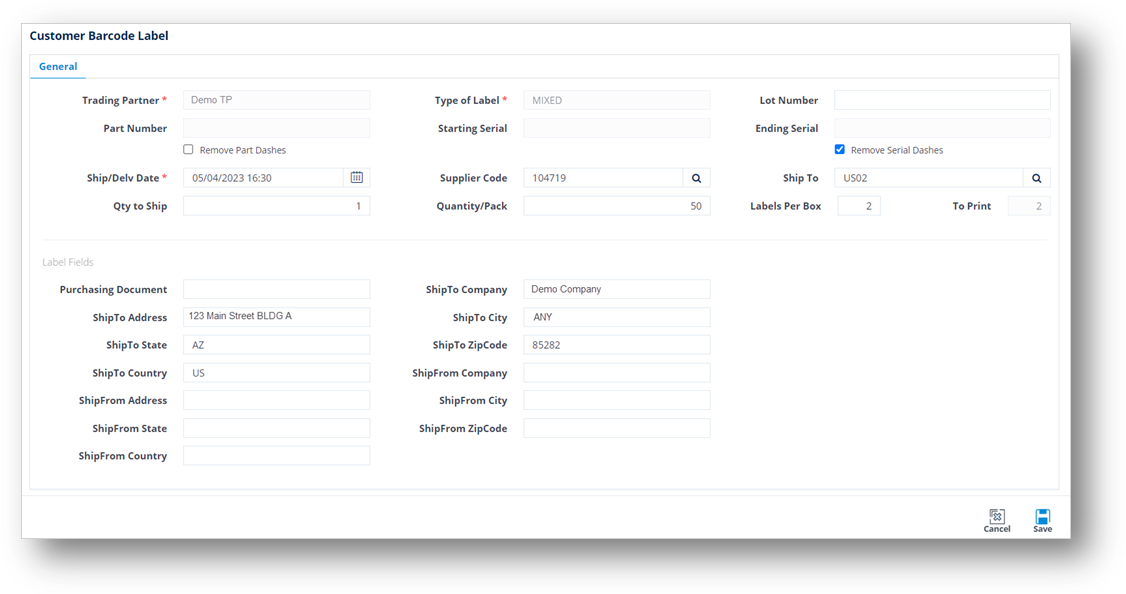
|
NOTE Some fields require you to create multiple print jobs. For instance, if you print a large number of containers that have multiple Lot numbers, you will need to insert one print job per lot number in order to assign the correct lot numbers to their containers. Make sure that you create good workflow documentation about each Trading Partner for quality assurance purposes.
|
Delete a Barcode Label
-
On the Customer Shipments menu, select Barcode Labels.
-
On the Customer Barcode Labels screen, select the label file that you want to remove, and then click
 Delete.
 -
On the confirmation window, click OK.