Email Notifications
TrueAuto’s email function is used to automatically notify the appropriate people of certain events. TrueAuto sends its email messages by group, for example, IT messages are sent to the IT group and Accounting messages are sent to the Accounting group.
Here are several examples:
-
Error notifications during processing of incoming files are sent to the IT Dept.
-
Notifications for the receipt of Remittance Advices are sent to you, and notifications upon receipt of Purchase Orders are sent to a different group of people.
Main Topics:
Email Addresses
The Email Addresses feature functions like an address book and is used to create and store the email addresses that will be used by TrueAuto to send relevant notifications.
To add an email address
1. Go to Settings > Email Notifications.
2. On the Email Addresses tab, click ![]() New.
New.
3. On the Add New Email Address Record window, fill out the form, and then click ![]() Save.
Save.
Note For a full description of each field, refer to the following Field Definitions.

By default, the new email address is set to the Enabled status for TrueAuto to send messages to.

Field Definitions
|
Field |
Definition |
|
Name |
Recipient’s name. |
|
Email Address |
Recipient’s email address. |
|
Status |
Enabled: The email address can receive notifications. |
|
Note |
Any additional information about the email address or notes for future reference. |
|
Created Date |
The date when the email address was created. |
|
Modified Date |
The date when the email address was last modified. |
To enable/disable an email address
1. In the Status column, click the ![]() button to change its status to Disabled.
button to change its status to Disabled.

2. On the confirmation message, click OK to confirm.
The status of the email address becomes Disabled. The disabled email addresses can NOT be assigned to any email group. For more information, refer to the Email Groups section.

TIP Click the ![]() button to change the status back to Enabled.
button to change the status back to Enabled.
To edit an email address
1. On the Email Addresses tab, select the record that you want to change.

2. On the Edit Email Address Record window, make the changes, and then click ![]() Save.
Save.

To delete an email address
On the Email Addresses tab, select the record that you want to remove, and then click ![]() Delete.
Delete.
Email Groups
The Email Group feature is a good way for you to organize sending emails without having to specifically identify individual email addresses.
To add an email group
1. On the Email Notifications screen, switch to the Email Groups tab.
2. Click ![]() New.
New.

3. On the Add New Email Group Record window, fill out the form, and then click ![]() OK.
OK.

The new email group is set to the Enabled status by default.

To assign addresses to an email group
1. On the Email Group tab, select the group to which you want to assign email addresses.

2. On the Email Group Detail window, click Assign.
3. On the Email Addresses window, select the addresses that you want to assign to the email group, and then click ![]() OK.
OK.
Note Only Enabled addresses can be assigned to a group.
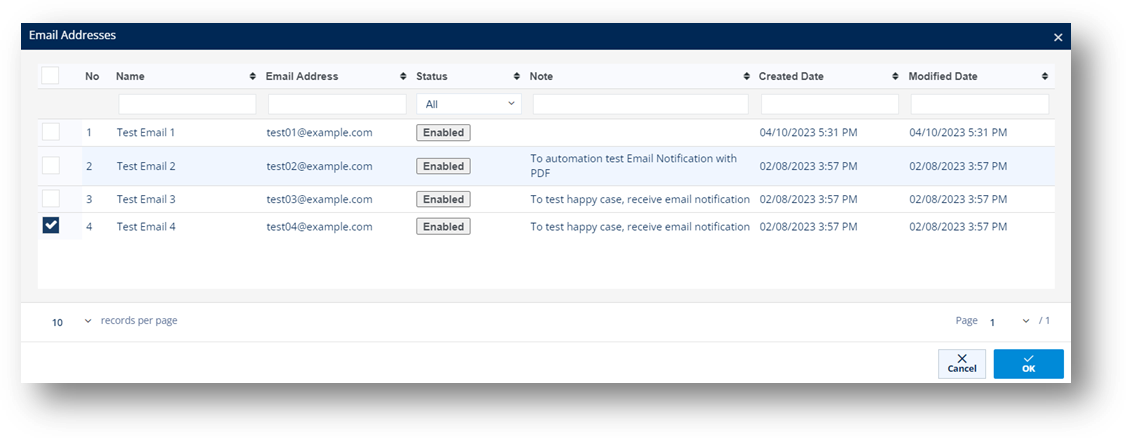
4. On the confirmation message, click ![]() OK to confirm. The Assign Successfully window appears.
OK to confirm. The Assign Successfully window appears.
5. Click ![]() OK.
OK.
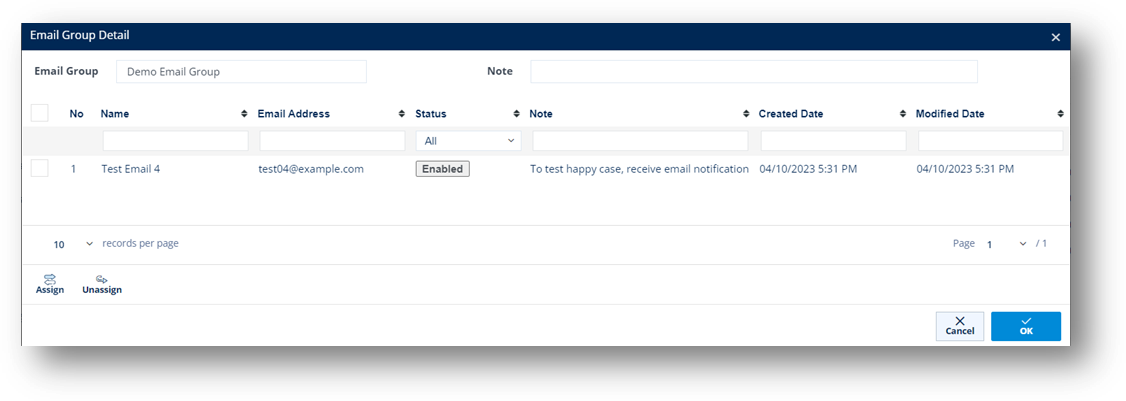
The email addresses are assigned to the email group.
|
TIP To unassign an email address from the group, use Unassign. To disable/deactivate an email address, click Enabled to change its Status to Disabled. You can click it again to change its Status back to Enabled. |
To enable/disable an email group
1. In the Status column, click the ![]() button to change its status to Disabled.
button to change its status to Disabled.
2. On the confirmation message, click OK to confirm.
The status of the email group becomes Disabled. The disabled email groups can NOT be assigned to receive email notifications. For more information, refer to the Email Notification Settings section.
TIP Click the ![]() button to change the Status back to Enabled.
button to change the Status back to Enabled.
To delete an email group
On the Email Group tab, select the record that you want to remove, and then click ![]() Delete.
Delete.
Email Notification Settings
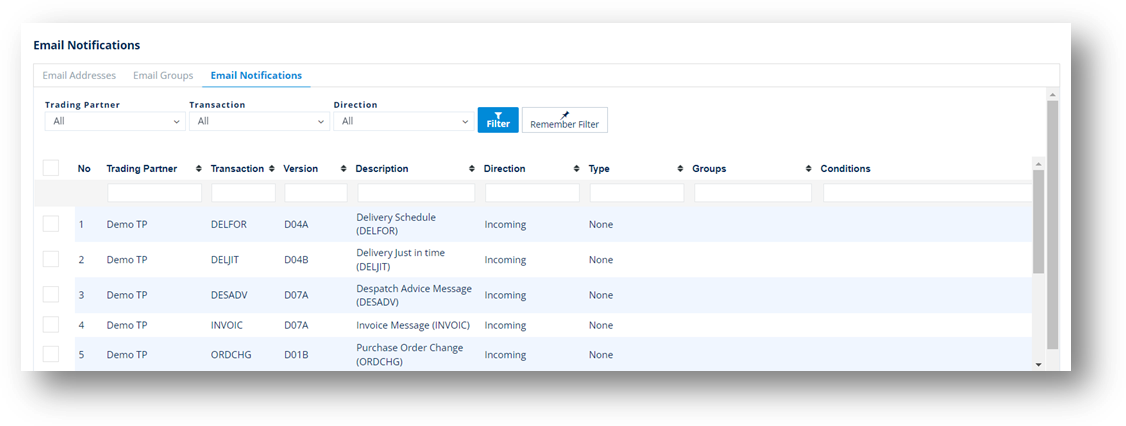
The Email Notifications tab displays a list of transactions with their directions. You can use this feature to set up the email notification types and assign email groups to receive notifications during the processing of incoming/outgoing files. As a result, the notifications will be sent to the assigned email groups.
Here are several examples:
-
Notifications upon receipt of incoming Purchase Orders (ORDERS) are sent to the Sales group.
-
Notifications during the processing of outgoing Invoices (INVOIC) are sent to the Accounting group.
To assign email notifications to a group
1. On the Email Notifications screen, switch to the Email Notifications tab.
2. Select the transaction to which you want to set up an email notification type.
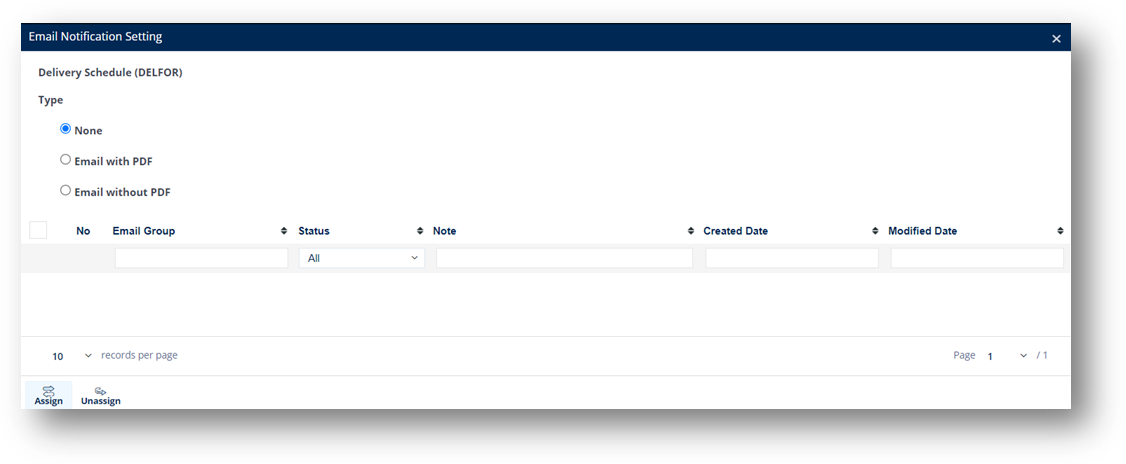
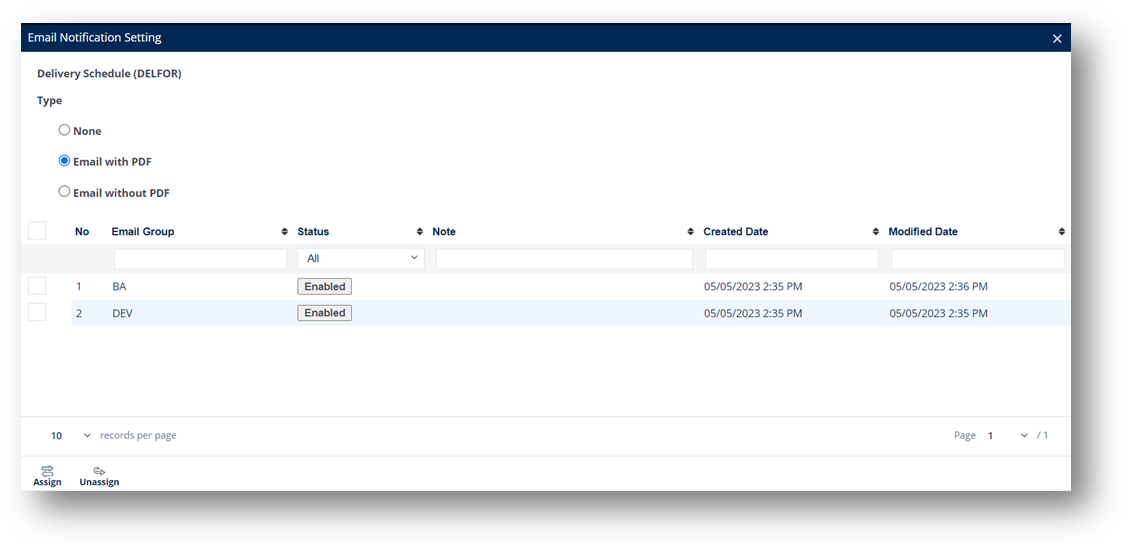
3. On the Email Notification Settings window, do the following:
a. Select the Type of email notification and then click Assign.
None: Do not send notifications.
Email with PDF: Send notifications with an enclosed PDF file.
Email without PDF: Send notifications without a PDF file.
c. On the Email Groups window, select the groups that will receive the email notifications, and then click ![]() OK.
OK.

|
NOTE You can assign email notifications to Enabled groups only. More than one email group can be set up to receive email notifications of a specific email type.
|
d. On the confirmation message, click OK to confirm. The Assign Successfully window appears.
4. When the email groups are assigned, close the Email Notification Settings window.
|
TIP To unassign an email address from the group, use |
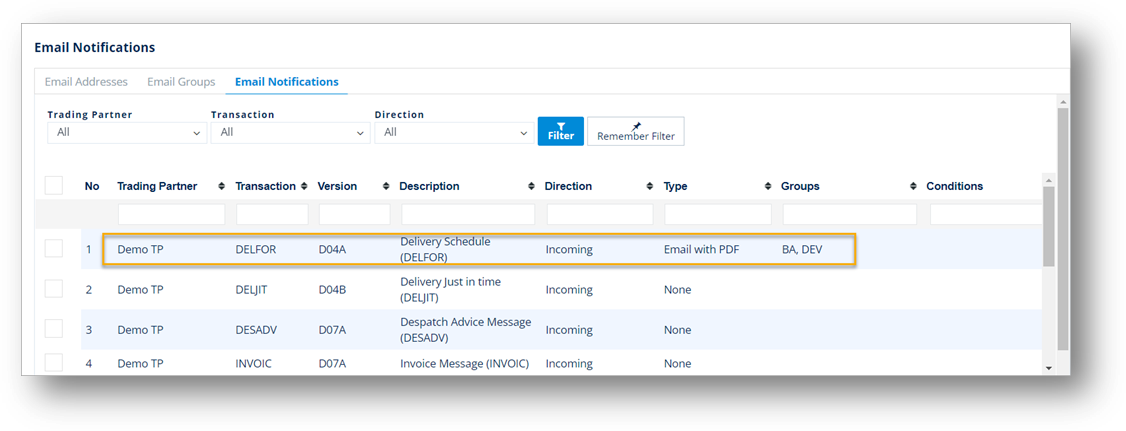
On the Email Notifications tab, the email notification type and the email groups are loaded accordingly.
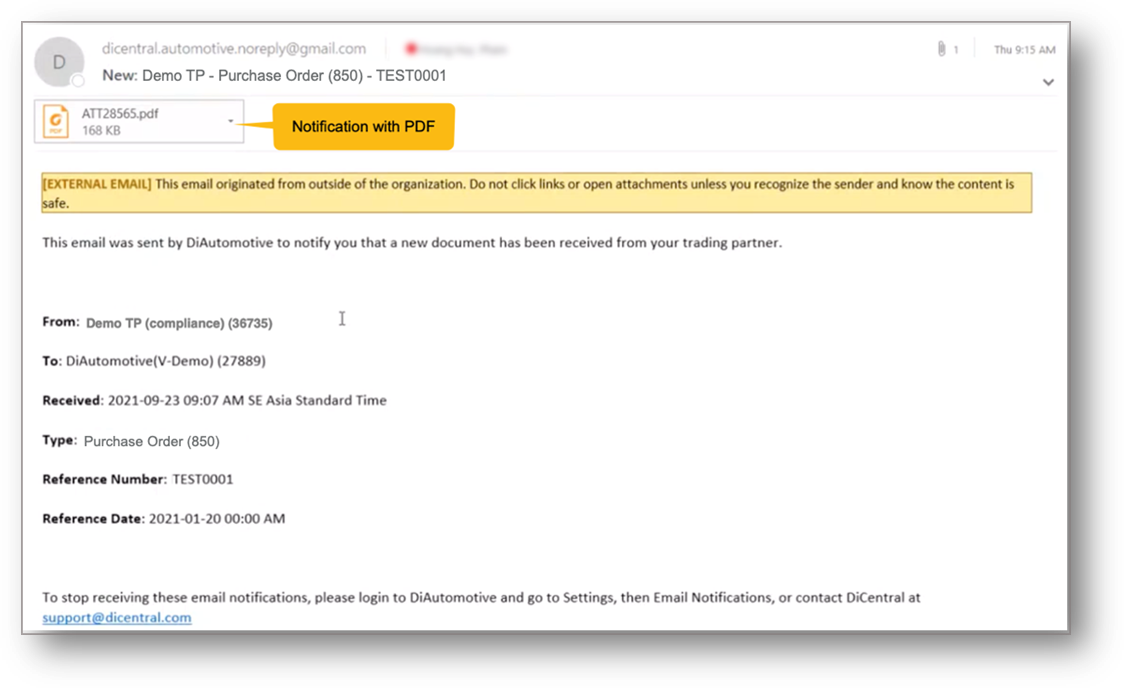
For example, when new Purchase Orders (ORDERS) arrive, TrueAuto will send the documents in .pdf format as an attachment to the assigned email groups.
To disable sending email notifications
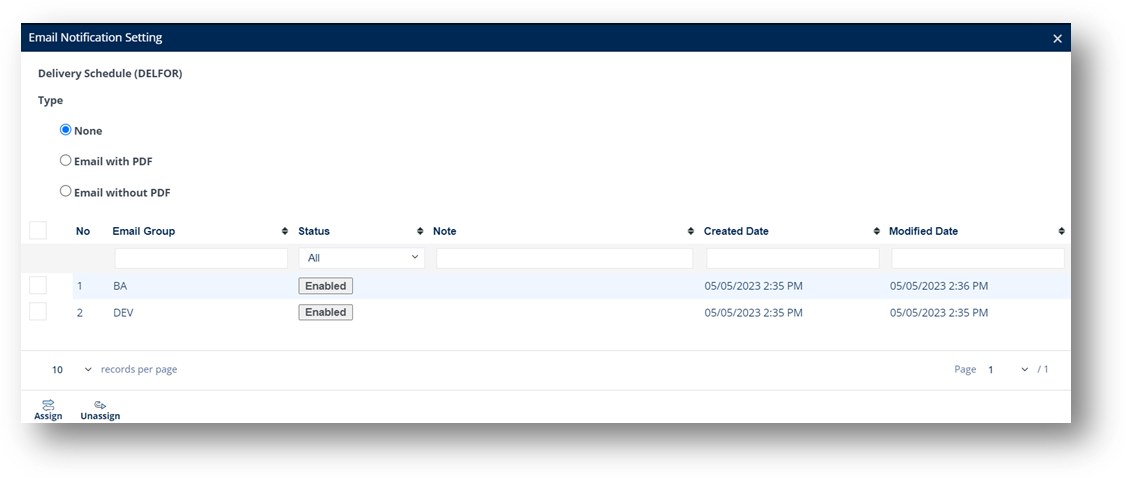
1. On the Email Notifications tab, select the notification that you want to disable.
2. On the Email Notification Settings window, change the Type to None.
ALTERNATIVE Disabled email groups will not receive notifications. You can click the ![]() button to change its status to Disabled. Click
button to change its status to Disabled. Click ![]() to change the status back to Enabled, as needed.
to change the status back to Enabled, as needed.
To unassign a group from email notifications
On the Email Notification Settings window, select the Email Group that you want to unassign, and then click the Unassign icon.
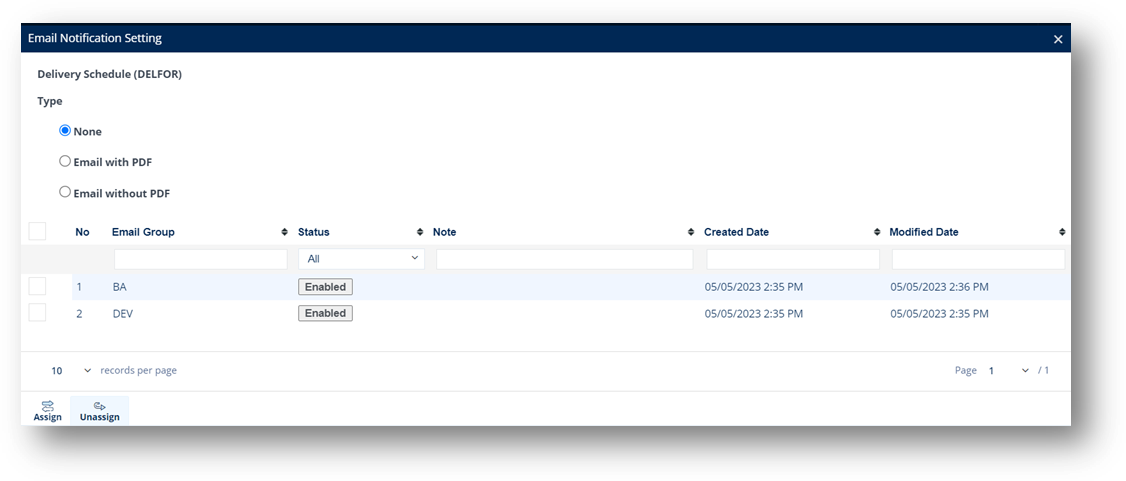
When groups are unassigned from receiving notifications, all the email addresses in the group will not receive notifications.