Ship Date Adjuster
The Ship Date Adjuster is used to change “Our Ship Dates” when the Trading Partner’s requested ship date and time will be different from the actual ones. The original requested ship dates are not affected by this tool. This adjuster is commonly used for:
-
When only the delivery date was requested on EDI, the ship date will be the delivery date by default. Use the adjuster to set the more reasonable ship date based on the duration of transit.
-
Adjust for non-shipping days (weekends, holidays, and abnormal weekly hours).
Main Topics:
Work with Ship Date Adjuster
1. On the Settings menu, click Ship Date Adjuster.
2. On the Ship Date Adjuster screen, select the Trading Partner in the dropdown list and then click ![]() Filter.
Filter.
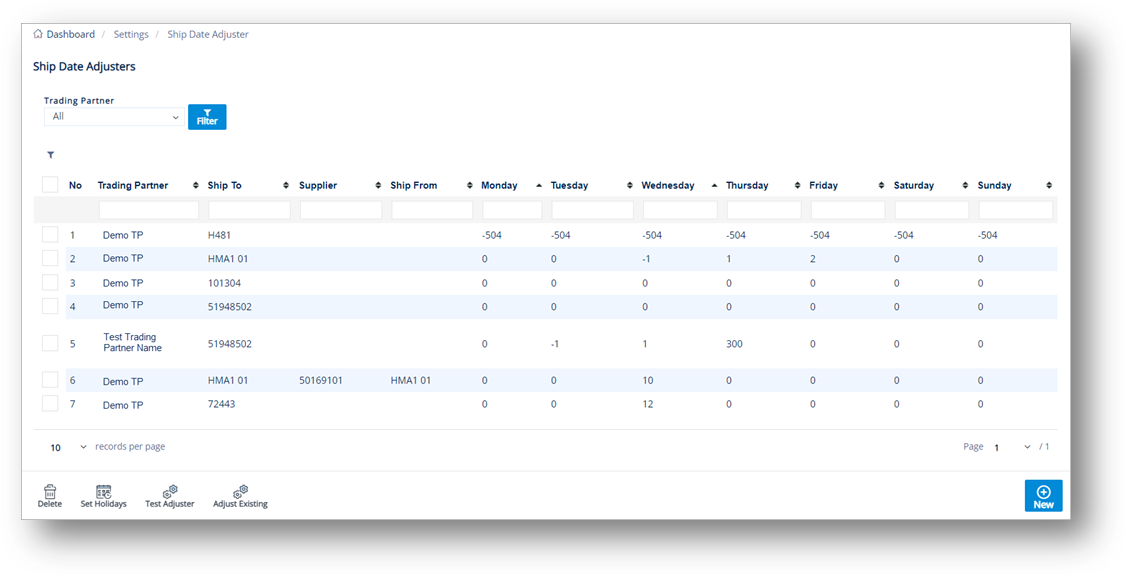
3. Click the item that you want to view.
Note For a full description of each field, refer to the following Field Definitions.
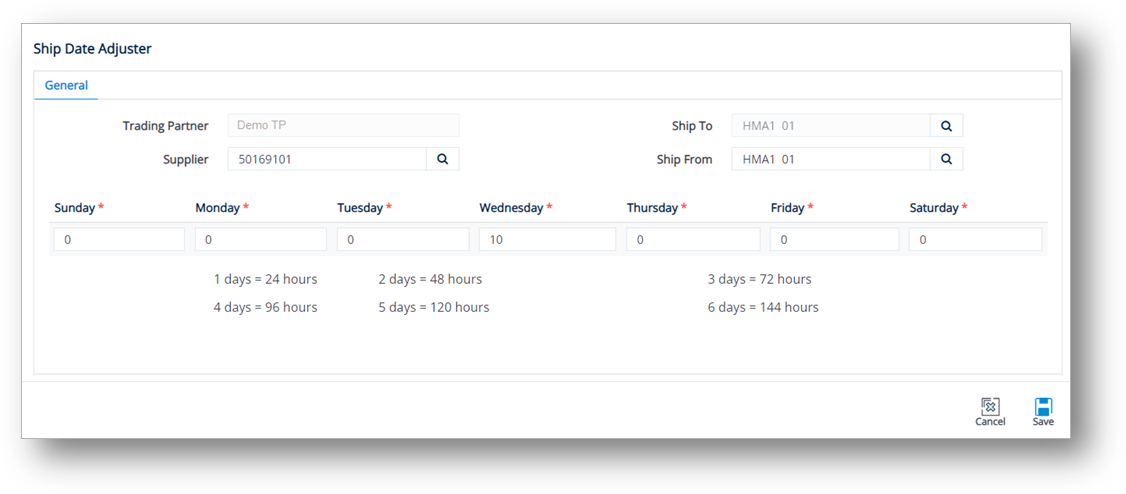
4. Make the changes if needed, and then click ![]() Save.
Save.
Field Definitions
|
Field |
Definition |
|
Trading Partner |
The trading partner whose ship date you want to adjust. |
|
Ship To |
The Ship To address. |
|
Ship From |
The Ship From address. |
|
Supplier |
The Supplier code. |
|
The day of the week (from Sunday to Saturday) |
You can enter the number of hours you’d like to adjust each ship date to as it relates to the day of the week it comes in on. |
Set Holidays
The Ship Date may also be adjusted to any holidays when they are added to the Holiday Management file. In this topic, you will identify specific non-shipping days and the Ship Date Adjuster will set the ship date to one day earlier than that holiday.
Shipping date scenarios
Setting a holiday works in conjunction with the regular Ship To adjustments. For example, if the Ship Date for Monday was adjusted to Friday, then Thanksgiving adjustments may look like this if you are not shipping on Thanksgiving Day or the day after.
The Adjusted Ship Date will be the Wednesday before Thanksgiving.
1. On the Settings menu, click Ship Date Adjuster.
2. On the Ship Date Adjusters screen, click ![]() Set Holidays.
Set Holidays.
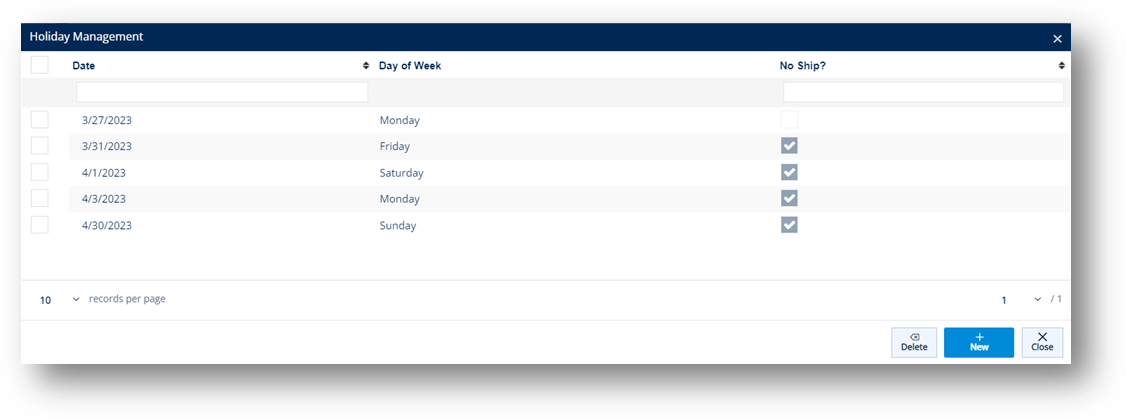
3. On the Holiday Management screen, click ![]() New.
New.
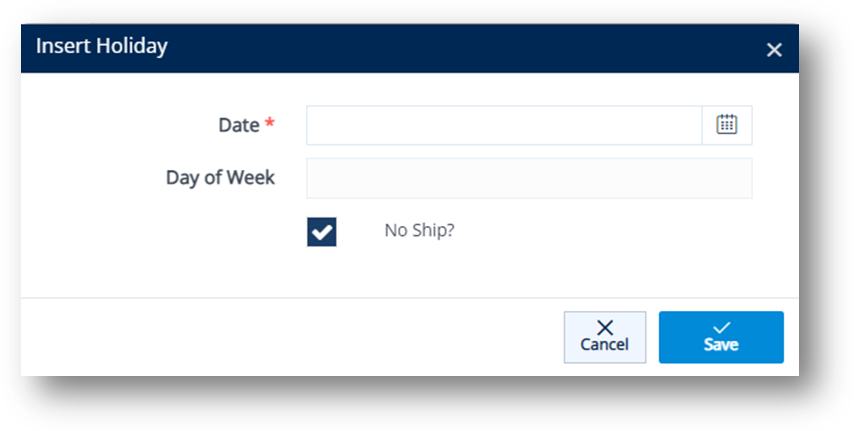
4. On the Insert Holiday window, do the following:
a. Enter the Date.
Note The Day of Week is filled in automatically.
b. Select the No Ship checkbox for that holiday, and then click ![]() Save.
Save.
To delete a holiday
On the Holiday Management screen, select the holiday that you want to remove, and then click ![]() Delete.
Delete.
Adjust Existing Ship Date
1. On the Settings menu, click Ship Date Adjuster.
2. On the Ship Date Adjuster screen, select the record that you want to modify.
3. Click ![]() Adjust Existing.
Adjust Existing.
4. On the Reset Ship Dates window, make the necessary adjustments. Use the following Field Definitions.
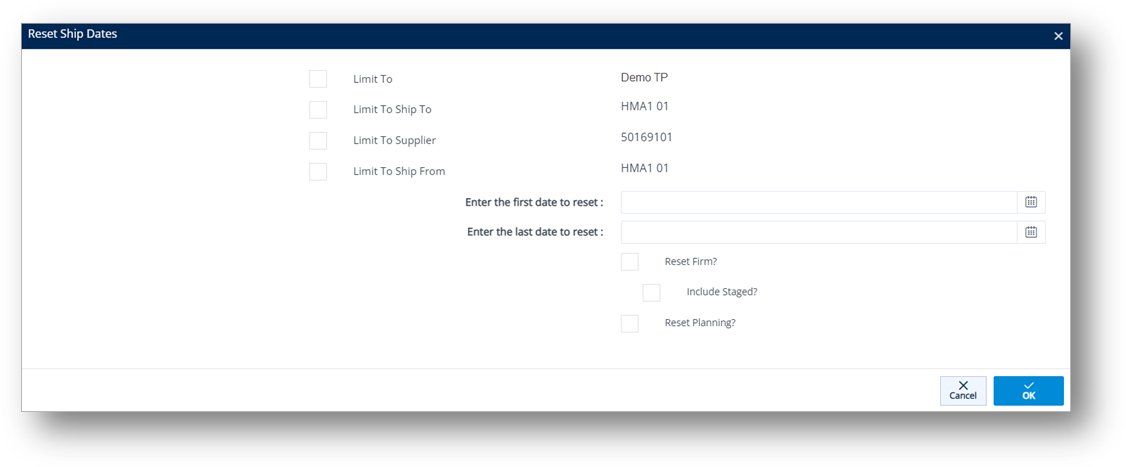
5. When you are finished, click ![]() OK.
OK.
Field Definitions – Reset Ship Date
|
Field |
Definition |
|
Limit To |
The Trading Partner who you want to limit to when resetting the ship date. |
|
Limit To Ship To |
The Ship To code that you want to limit to when resetting the ship date. |
|
Limit To Supplier |
The Supplier code that you want to limit to when resetting the ship date. |
|
Enter First Date and Last Date to Reset |
The first date and last date to adjust the ship date. |
|
Reset Firm Order |
Select to adjust the ship date of the Firm Order. |
|
Include Staged |
Select to include the Staged status of the Firm Order. |
|
Reset Planning |
Select to adjust the Planning ship date. |
Test Ship Date Adjuster
To verify if the adjustment is working as intended, you may experiment with a specific scenario by using the Test Adjuster button.
1. On the Settings menu, click Ship Date Adjuster.
2. On the Ship Date Adjuster screen, select the record that you want to test.
3. Click ![]() Test Adjuster.
Test Adjuster.
4. On the Date Testing window, fill out the ship values for testing.
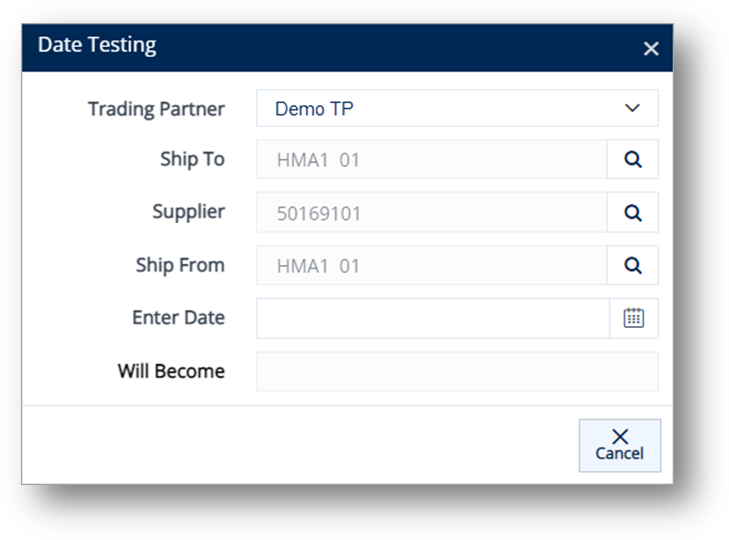
a. Click the ![]() search icon in the Ship To field, and then select the Ship To on the Browse Ship To window.
search icon in the Ship To field, and then select the Ship To on the Browse Ship To window.
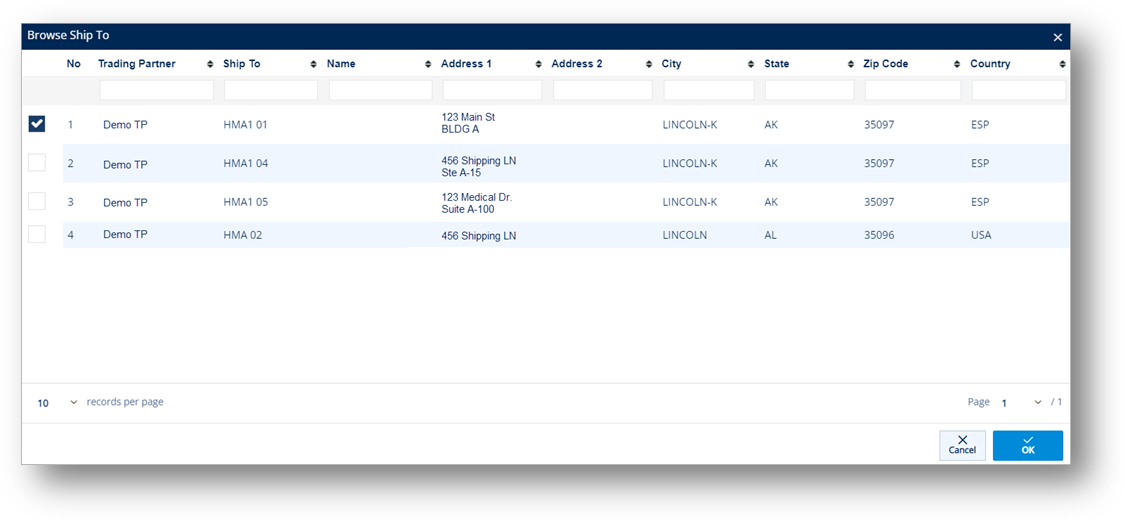
b. Click the ![]() search icon in the Supplier field, and then select the Supplier on the Browse Supplier Code window.
search icon in the Supplier field, and then select the Supplier on the Browse Supplier Code window.

c. Click the ![]() search icon in the Ship From field, and then select the Ship From on the Browse Ship From window.
search icon in the Ship From field, and then select the Ship From on the Browse Ship From window.

d. Fill out the Enter Date field.
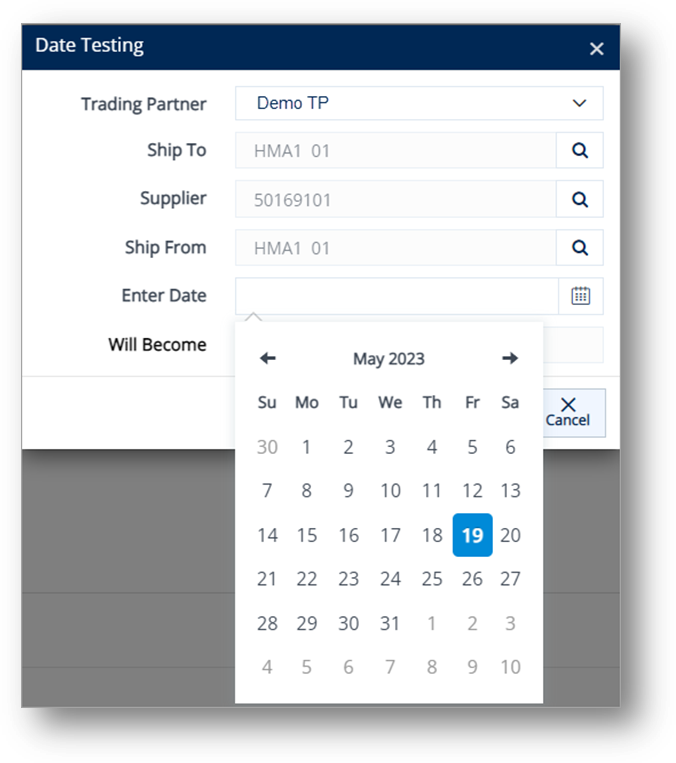
The Will Become field is automatically generated.
Create a Ship Adjuster Record
1. On the Settings menu, click Ship Date Adjuster.
2. On the Ship Date Adjuster screen, click ![]() New.
New.
3. On the General tab, select the Trading Partner in the dropdown list.
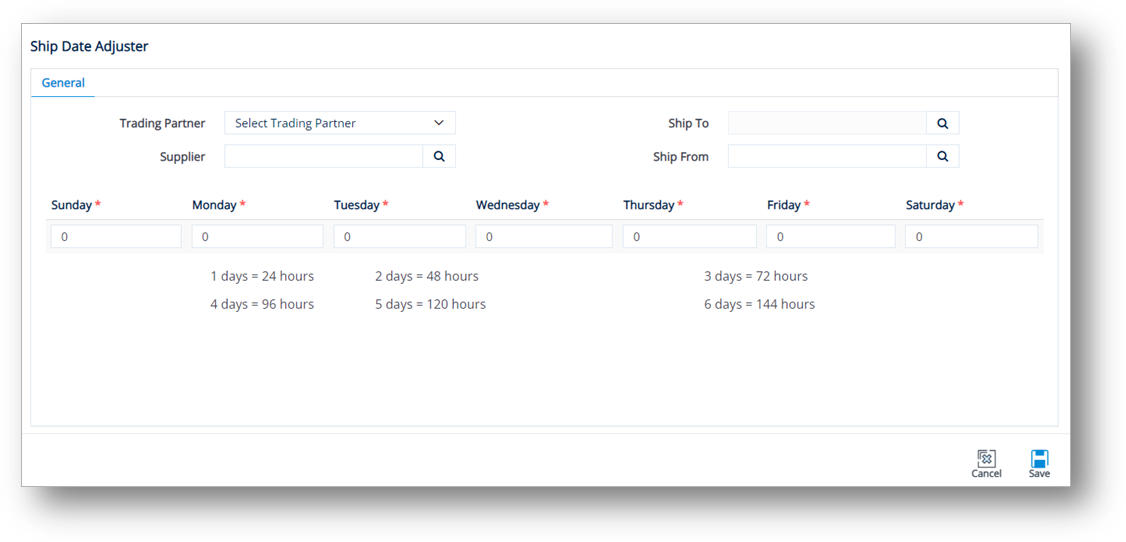
4. Click the ![]() search icon in the Ship To field, and then select the Ship To on the Browse Ship To window.
search icon in the Ship To field, and then select the Ship To on the Browse Ship To window.
5. Click the ![]() search icon in the Supplier field, and then select the Supplier on the Browse Supplier Code window.
search icon in the Supplier field, and then select the Supplier on the Browse Supplier Code window.
6. Click the ![]() search icon in the Ship From field, and then select the Ship From on the Browse Ship From window.
search icon in the Ship From field, and then select the Ship From on the Browse Ship From window.
7. Enter the number of hours that you want to adjust each ship date to as it relates to the day of the week it comes in on.
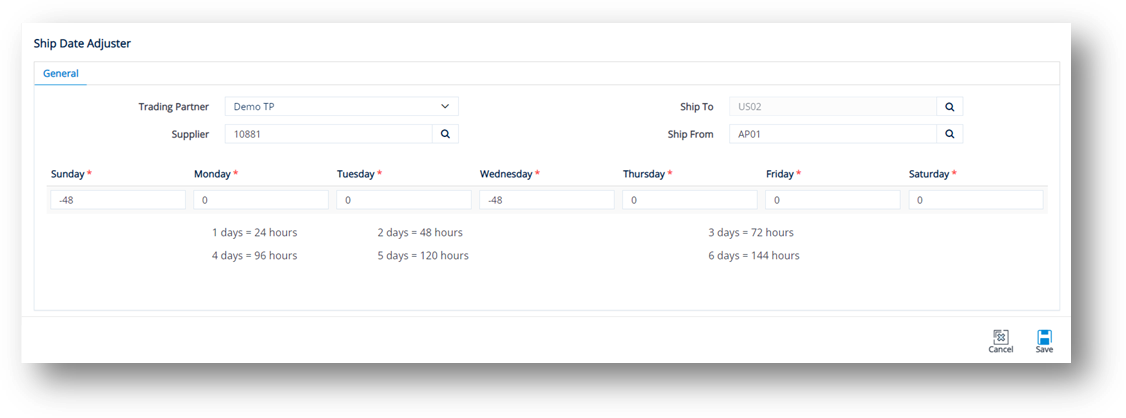
Positive hours move our ship date/time later than the requested date from EDI. Negative hours move the ship date/time earlier.
In the example above, the customer requests only a delivery date. The in-transit is two days. The ship date should therefore be two days prior to the delivery date.
Shipments scheduled for Wed-Sat deliveries are shipped two days in advance.
Because you do not ship on the weekend, Sunday’s delivery will be shipped on Friday’s shipment.
|
NOTE After making your entries, we recommend that you use the Test Adjuster to ensure that you are getting the desired results. |
Delete a Ship Adjuster Record
1. On the Settings menu, click Ship Date Adjuster.
2. On the Ship Date Adjuster screen, select the record that you want to remove.
3. Click ![]() Delete.
Delete.
4. On the confirmation message, click OK.